Posted on 1 Comment

WAPT with HPwebinspect : Part 1

WAPT or Web application penetration testing refers to evaluating the security of websites and web applications. Websites evolved from being simple static HTML pages to incorporate complex dynamic features with bells and whistles. These bells and whistles also brought with them lot of vulnerabilities and thus websites became common targets for hackers. So web application penetration testing is considered very important nowadays.

WAPT could be performed manually or through automatic tools. Automated tools provide lot of advantages over manual testing most importantly the speed. HP Webinspect is one such tool.

It is an automated web application security scanning tool from HP. It helps the security professionals to assess the potential vulnerabilities in the web application. It is basically an automated dynamic application security testing (DAST) tool that mimics real-world hacking techniques and attacks, and provides comprehensive dynamic analysis of complex web applications and services.

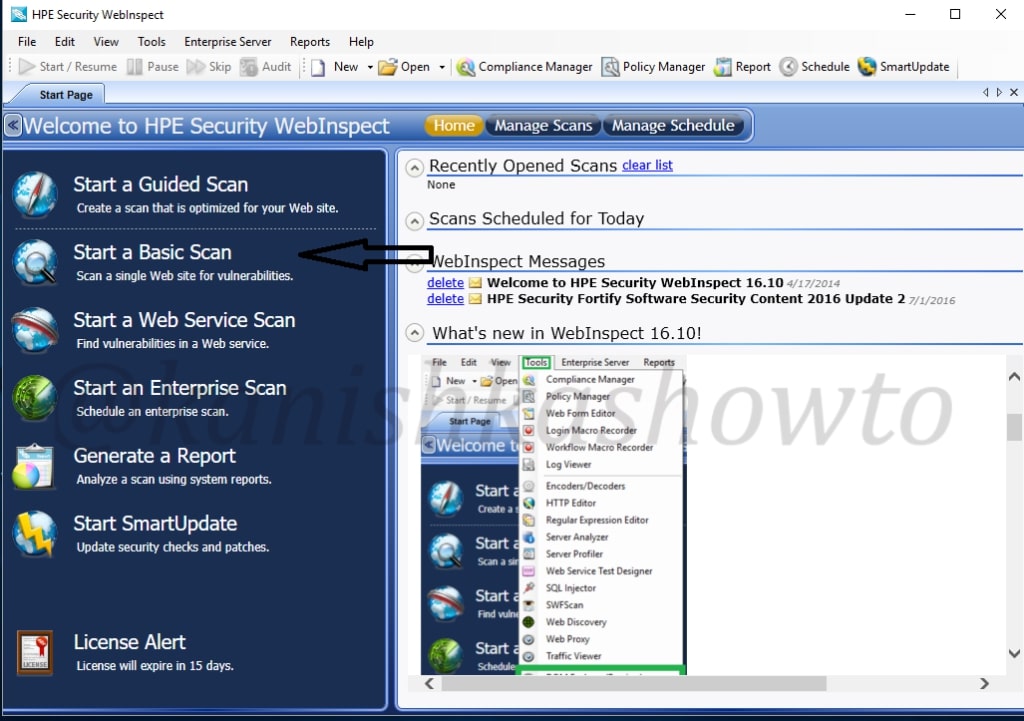
Today we will see how to perform website vulnerability assessment with HPWebinspect. Open the program and click on basic scan. We will see other scan options in the following parts of this tutorial. As its name implies, this option performs a basic security scan on a website.

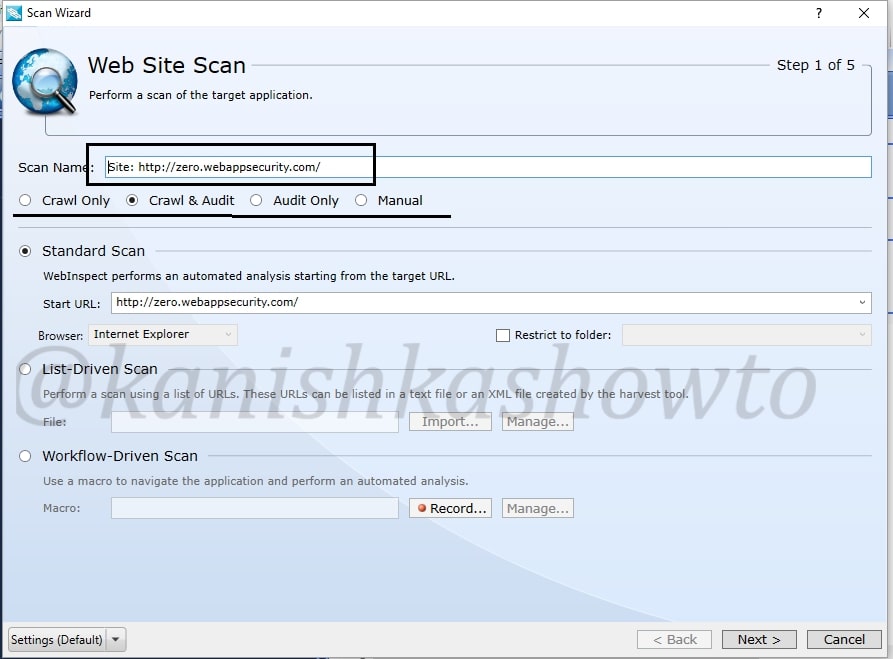
As we select the basic scan option, the “scan wizard” opens as shown below. As I am using a trial version of HPWebinspect I am only allowed to scan the website deliberately provided by HP for this purpose. This website simulates a bank ( named zero bank ) and this will be our target from now on.

I allot the given name. Below the scan name option, we have features with radio buttons. Let’s see these options.

crawl:-This process makes a list of all the pages on the entire website and builds its structure.

auditing:-Auditing is the process in which HPwebinspect will attack the website to find out the vulnerabilities.

I have selected the “crawling and auditing” option. HP Webinspect provides four types of scans.

Standard scan:- Normal scan.
List Driven scan:-You can specify the list of urls for the tool to scan. It will only scan those urls.
Workflow Driven scan:- Similar to list driven scan. You can scan a port of your website by specifying a macro.
Manual scan:-You can specify each link you want to scan. step by step.

Next specify the website you want to scan and click on “Next”.

wapt

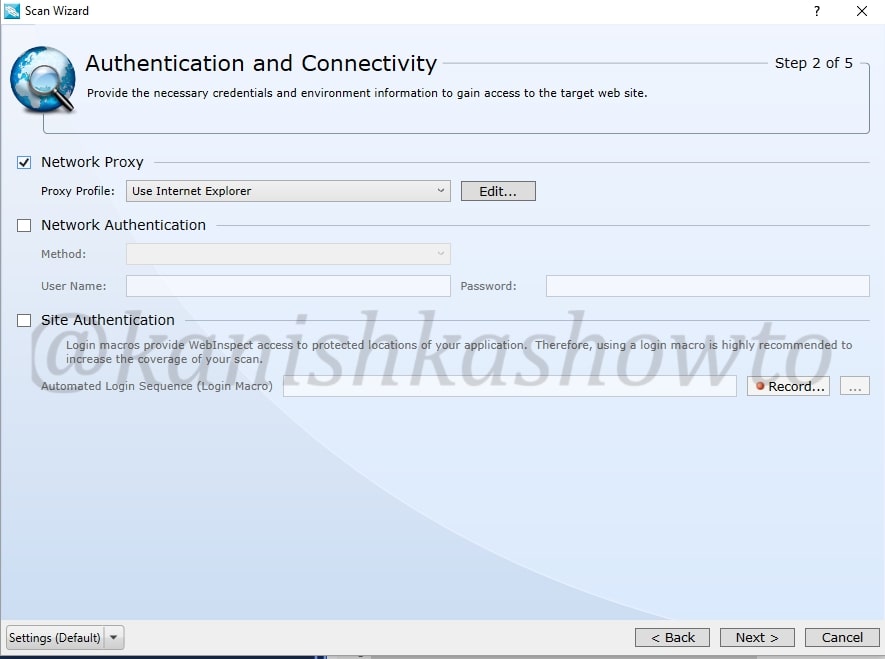
In the next window, you will be prompted for authentication. If your website or network requires authentication, provide them . Choose if you want network proxy or not and click on “Next“.

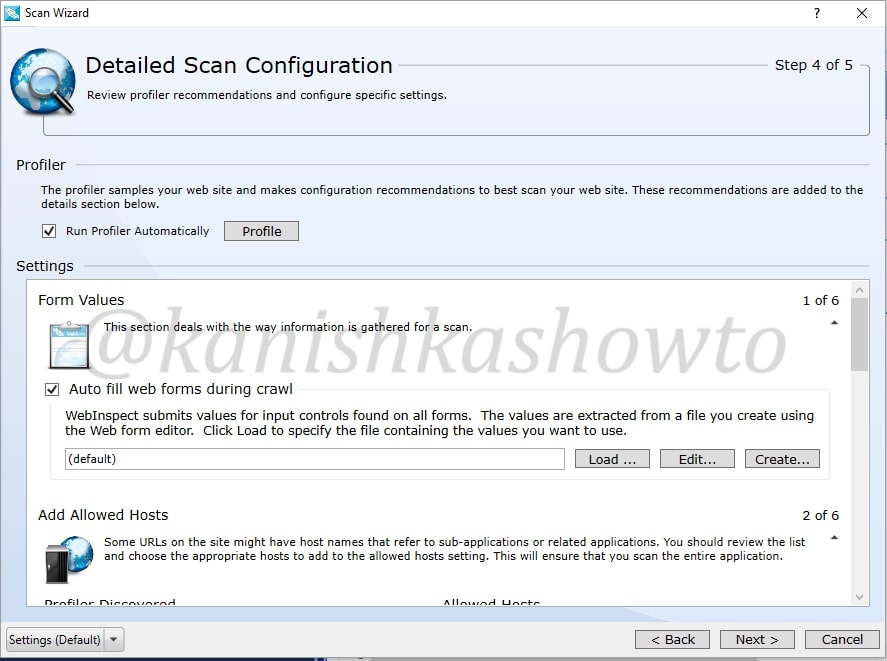
The profiler automatically samples the website and recommends best configuration for the scan. You can select the option. We will see more about profiler later. There are some other settings. Leave them to their default settings and click on “Next”.

You will get a congrats message telling about the successful configuration of scan settings. It’s time to start the scan. Click on “scan”.

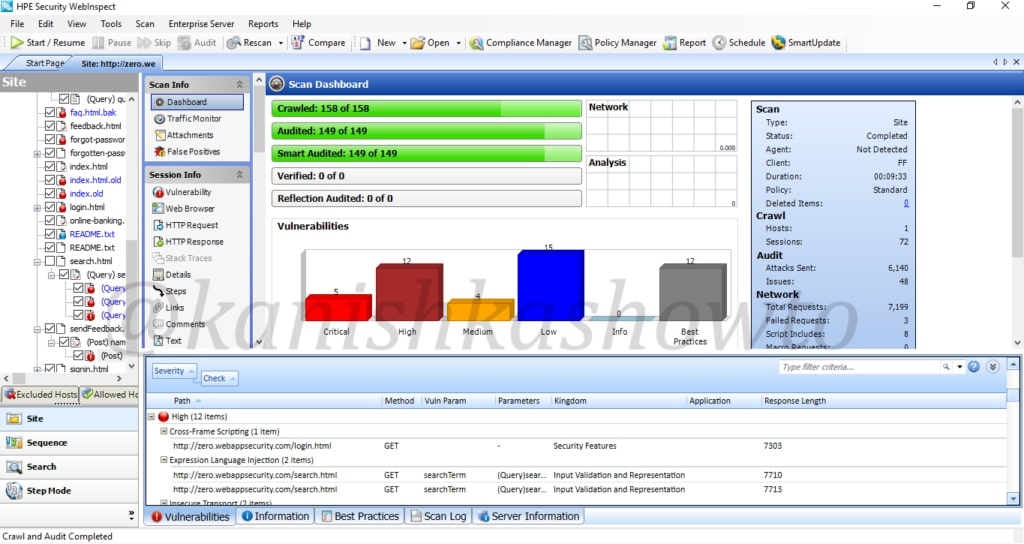
The scan will start as shown below. It will take some time dependent on the size of the website you are scanning.

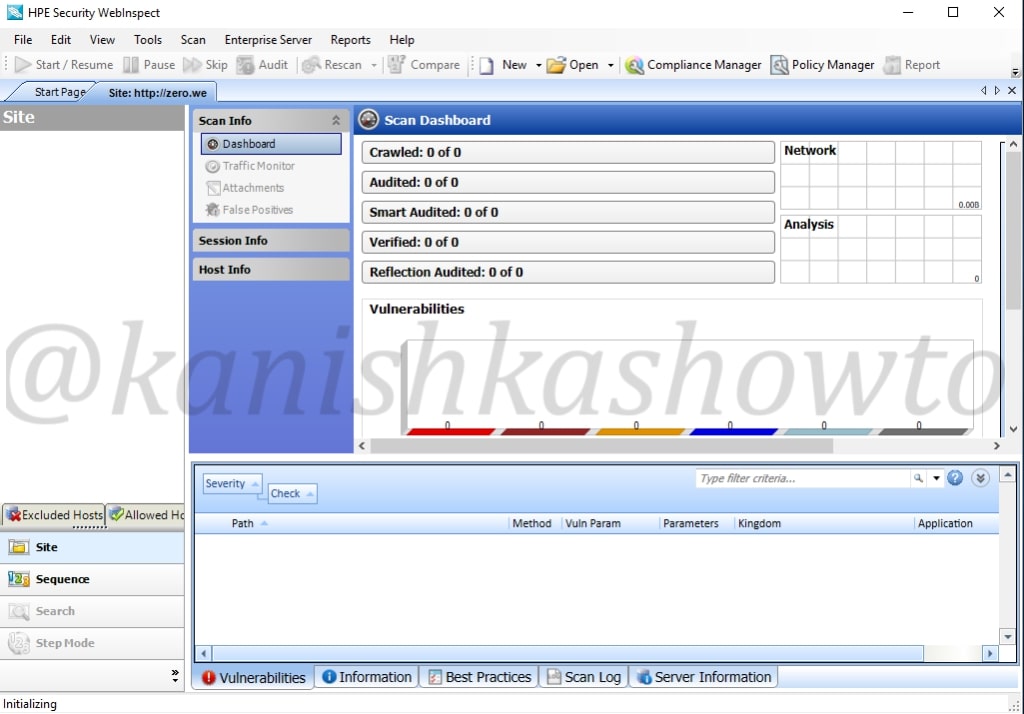
After the scan is finished, it will show the results as shown below. This tool classifies vulnerabilities into critical, high, medium, low and info. That was about basic scanning of website with HPWebinspect.

That’s all in WAPT with HPwebinspect. In our next part, we will see analyzing these vulnerabilities.

Posted on

WordPress user enumeration with Metasploit

Good morning friends. Not all vulnerabilities are unauthenticated, sometimes we require credentials to exploit a vulnerability. But how do we get these credentials. Metasploit has an auxiliary module for WordPress user enumeration. Let’s see how this exploit works.

Start Metasploit and load the wordpress user enumeration exploit as shown below. Type command “show options” to see the options we can specify. We can see a variety of options. All the options are self explanatory but let us see some of the options.

The “BLANK_PASSWORDS” option if set will check if any of the users are without any password. The “VERBOSE”option will display more clearly what the module is doing. The “USERNAME” and “PASSWORD” option will check for single username and password respectively. The “USER_AS_PASS” option will check whether the username itself is being used as password. The USER_FILE and PASS_FILE are used to specify file for usernames and passwords to enumerate respectively. The VALIDATE_USERS option will first validate if user exists on the target even before trying to crack his password. The “USER_PASS” file option allows us to specify the same file for username and password as shown below. Here I have specified a wordlist consisting of most common passwords as the USER_PASS file.

When we execute the module, we can see that it will first validate all the usernames.

wordpress user enumeration

What if we know the username? The first question is how will we know the username. Just go through one of our previous howto : WordPress vulnerability assessment with WPSCAN. The tool gave use a hint that username is “root”. Now we will set the username as root, specify a common password dictionary as password file as shown below.

When I run the script, it confirms that the username is valid and tries all words in the dictionary as password one by one.

After some time we can see that we successfully cracked the password for user “root” as “123456”.

HOW TO STAY SAFE:

Never use not only common passwords but also common usernames for your websites. Still most of the people tend to use common usernames like admin, administrator etc. and common passwords.

Posted on

WordPress version detection with Metasploit

Hello aspiring Ethical Hackers. In this article we will learn about a WordPress Version Detection Module. WordPress is one of the most popular CMS available for websites. Its latest release to time, 4.5 has been downloaded 40,446,377 times till editing of this howto. But being popular in field of hacking has its own disadvantages. This Metasploit Module performs wordpress version detectionlatest version suffers from oEmbed Denial of Service (DoS), Password Change via Stolen Cookie and Redirect Bypass vulnerabilities.

Similarly every version of WordPress has some vulnerability or other. But how do we find out which version of WordPress is the site running. Metasploit has an auxiliary module for WordPress version detection. Let’s see how it works.

Start Metasploit and load the module. Type command “show options” to see the options we required for this module.

Multiple IP addresses can be set as shown below. I am trying five targets.

After assigning IP addresses, type command “run” to execute the exploit. The first target is my own. As you can see, our two of our targets responded with their version. But what about others? Maybe a firewall is blocking our request or maybe our targeturi is wrong. Please try this scan with targeturi set to “/” and also “/wordpress” for better results.

wordpress version detection

By the way, version 4.1 suffers from a arbitrary file upload vulnerability. See how to perform complete WordPress vulnerability scan with WPscan on a WordPress website.

Posted on 2 Comments

SMB enumeration for beginners

In the previous part of the tutorial, we performed a vulnerability scan on our target Metasploitable and got some high ranking vulnerabilities. Before we take the plunge and exploit those vulnerabilities, let’s do some enumeration first.

Enumeration is the process of collecting information about user names, network resources, other machine names, shares and services running on the network. Although little bit boring, it can be very helpful for the success of the hack in real time. In our previous parts, we have performed scanning and banner grabbing. So we already know what services are running on the target machine. They include FTP, telnet, SMTP and SMB etc. We can perform enumeration on all these services.

SMB stands for Server Message Block. Its mainly used for providing shared access to files, printers and miscellaneous communications between nodes on a network. It also provides an authenticated inter-process communication mechanism. It is a predecessor of Common Internet File system (CIFS). To know more about SMB please go here.

SMB enumeration can provide a treasure trove of information about our target. So for today’s tutorial let’s see how to perform SMB enumeration with Kali Linux. I will use three tools inbuilt in Kali Linux : enum4linux, acccheck and SMBMap.

The first tool we will use is enum4linux. As the name suggests, it is a tool used for enumeration of Linux. To see all the options of this tool, just type “enum4linux -h“. Using this tool, first let us see the users of the SMB service. Open terminal and type command “enum4linux -U 192.168.25.129” as shown below.

As we can see above, this system is part of a workgroup. Know the difference between domain and workgroup. We can see below that it has listed all the SMB users present on the target.

Of all the usernames the tool got us, I am assuming only three usernames are useful to us: user,root and msfadmin since others seem more like processes but we will keep our fingers crossed.

Before we check for validity of these credentials, let us perform a full enumeration with enum4linux. In the terminal type command “enum4linux 192.178.25.129” i.e without any options. As you can see below, it lists us Nbtstat information of what services are active on the target.

SMB enumeration

It also provides us with the OS information.

And crucial info about Shares, i.e which user has what rights on the target.

It provides us password policy info, in case we don’t get the credentials and want to crack them.

Groups present on the system.

It will also display users based on RID cycling.

It seems there are no printers connected to the target.

Ok, now we know the users. Let’s try to find out the passwords for the usernames we seem to have got. We will use a tool called acccheck for this purpose. It is a password dictionary attack tool that targets windows authentication via the SMB protocol. We will see more about password cracking later. First I will try it with the user “user”. In Kali Linux, most of the password dictionaries are present in “usr/share/dirb” directory. So I specify a dictionary which consists of most common passwords used.

Here, I am just guessing that the user may be using a common password. After specifying all the options, Hit Enter. The cracking process starts as shown below.

Once the tool gets the correct password, it stops the scan and displays a success message as shown below. Voila … the password of the user “user” is “user” only.

Seeing this result, I get a new idea. There might be a possibility that all the users may be using their username as password. To find out this, I create a new file called user.txt with all the usernames we got with enum4linux and specify the file for both username and password as shown below.

We got succces with three users; user, msfadmin and a blank user with password “games”. Since we successfully got some credentials, it’s time to see the share drives on our target system. For this, we will use another tool called SMBMap.

SMBMap allows users to enumerate samba share drives across an entire domain. List share drives, drive permissions, share contents, upload/download functionality, file name auto-download pattern matching, and even execute remote commands.

First let us check the rights of each user we got as shown below.

We can see that users user and msfadmin have READ,WRITE permissions on tmp directory only and the Blank user doesn’t have much. Next let us try to list all the drives on the target system with user “msfadmin”. We can see we don’t have enough privileges to execute a command.

Since we have READ privileges, let us read the drive on the target system as shown below. Well that’s all for SMB enumeration guys. If you want to read about SMTP enumeration, you can go here.

RESULT: We got some usernames which may be useful to us while exploiting the system in future.

Posted on 1 Comment

Bypass UAC exploit to Elevate Privileges

Bypass uac stands for bypassing user account control. User account control is the security measure introduced in Windows OS since Windows 7. It helps in preventing any malicious program from running with admin privileges. With UAC, applications and tasks always run with privileges of a standard or non-administrator account, unless a user authorizes administrator-level access to the system. UAC will not allow any unauthorized program from making any inadvertent changes to the system.

This may include even our meterpreter shell. We have seen many exploits where we got meterpreter shell. But when you check your privileges by typing command “getuid”, we can see that we are running as a standard user as shown below. When we try to get system privileges with command “getsystem”, we can see it failed.

Bypass uac exploit as its name implies, bypasses the user account control security feature in Windows 7 to give us system privileges. This is available in Metasploit. For this exploit to work, we should already have a meterpreter shell on our target system.

Now let use see how to get system privileges with this exploit. First background the current meterpreter session by typing command “background”. Next search for bypassuac exploit as shown below.

bypass uac

Load the exploit as shown below. Type command “show options” to see what options we need to set. We can see only one option is required: session. This is the session id number with which our previous meterpreter session was running. While we background our session, we saw that our session id number is 1. ( see the above image ). Set session id option to 1 as shown below.

Type command “exploit” to run our exploit. Type command “getsystem” to try to get the system privileges once again. This time we successfully got the system privileges as shown below.