Posted on Leave a comment

Beginners guide to SIEM

Hello, aspiring ethical hackers. In our previous blogpost, you learnt about threat intelligence. In this article, you will learn everything you need to know about Security Information & Event Management or SIEM solutions and its role in threat intelligence.

What is SIEM?

You have learnt in threat intelligence that data & information related to security is collected, processed and analyzed to detect upcoming threats to the organization. This data not only includes external data but also data from the organization’s network itself.

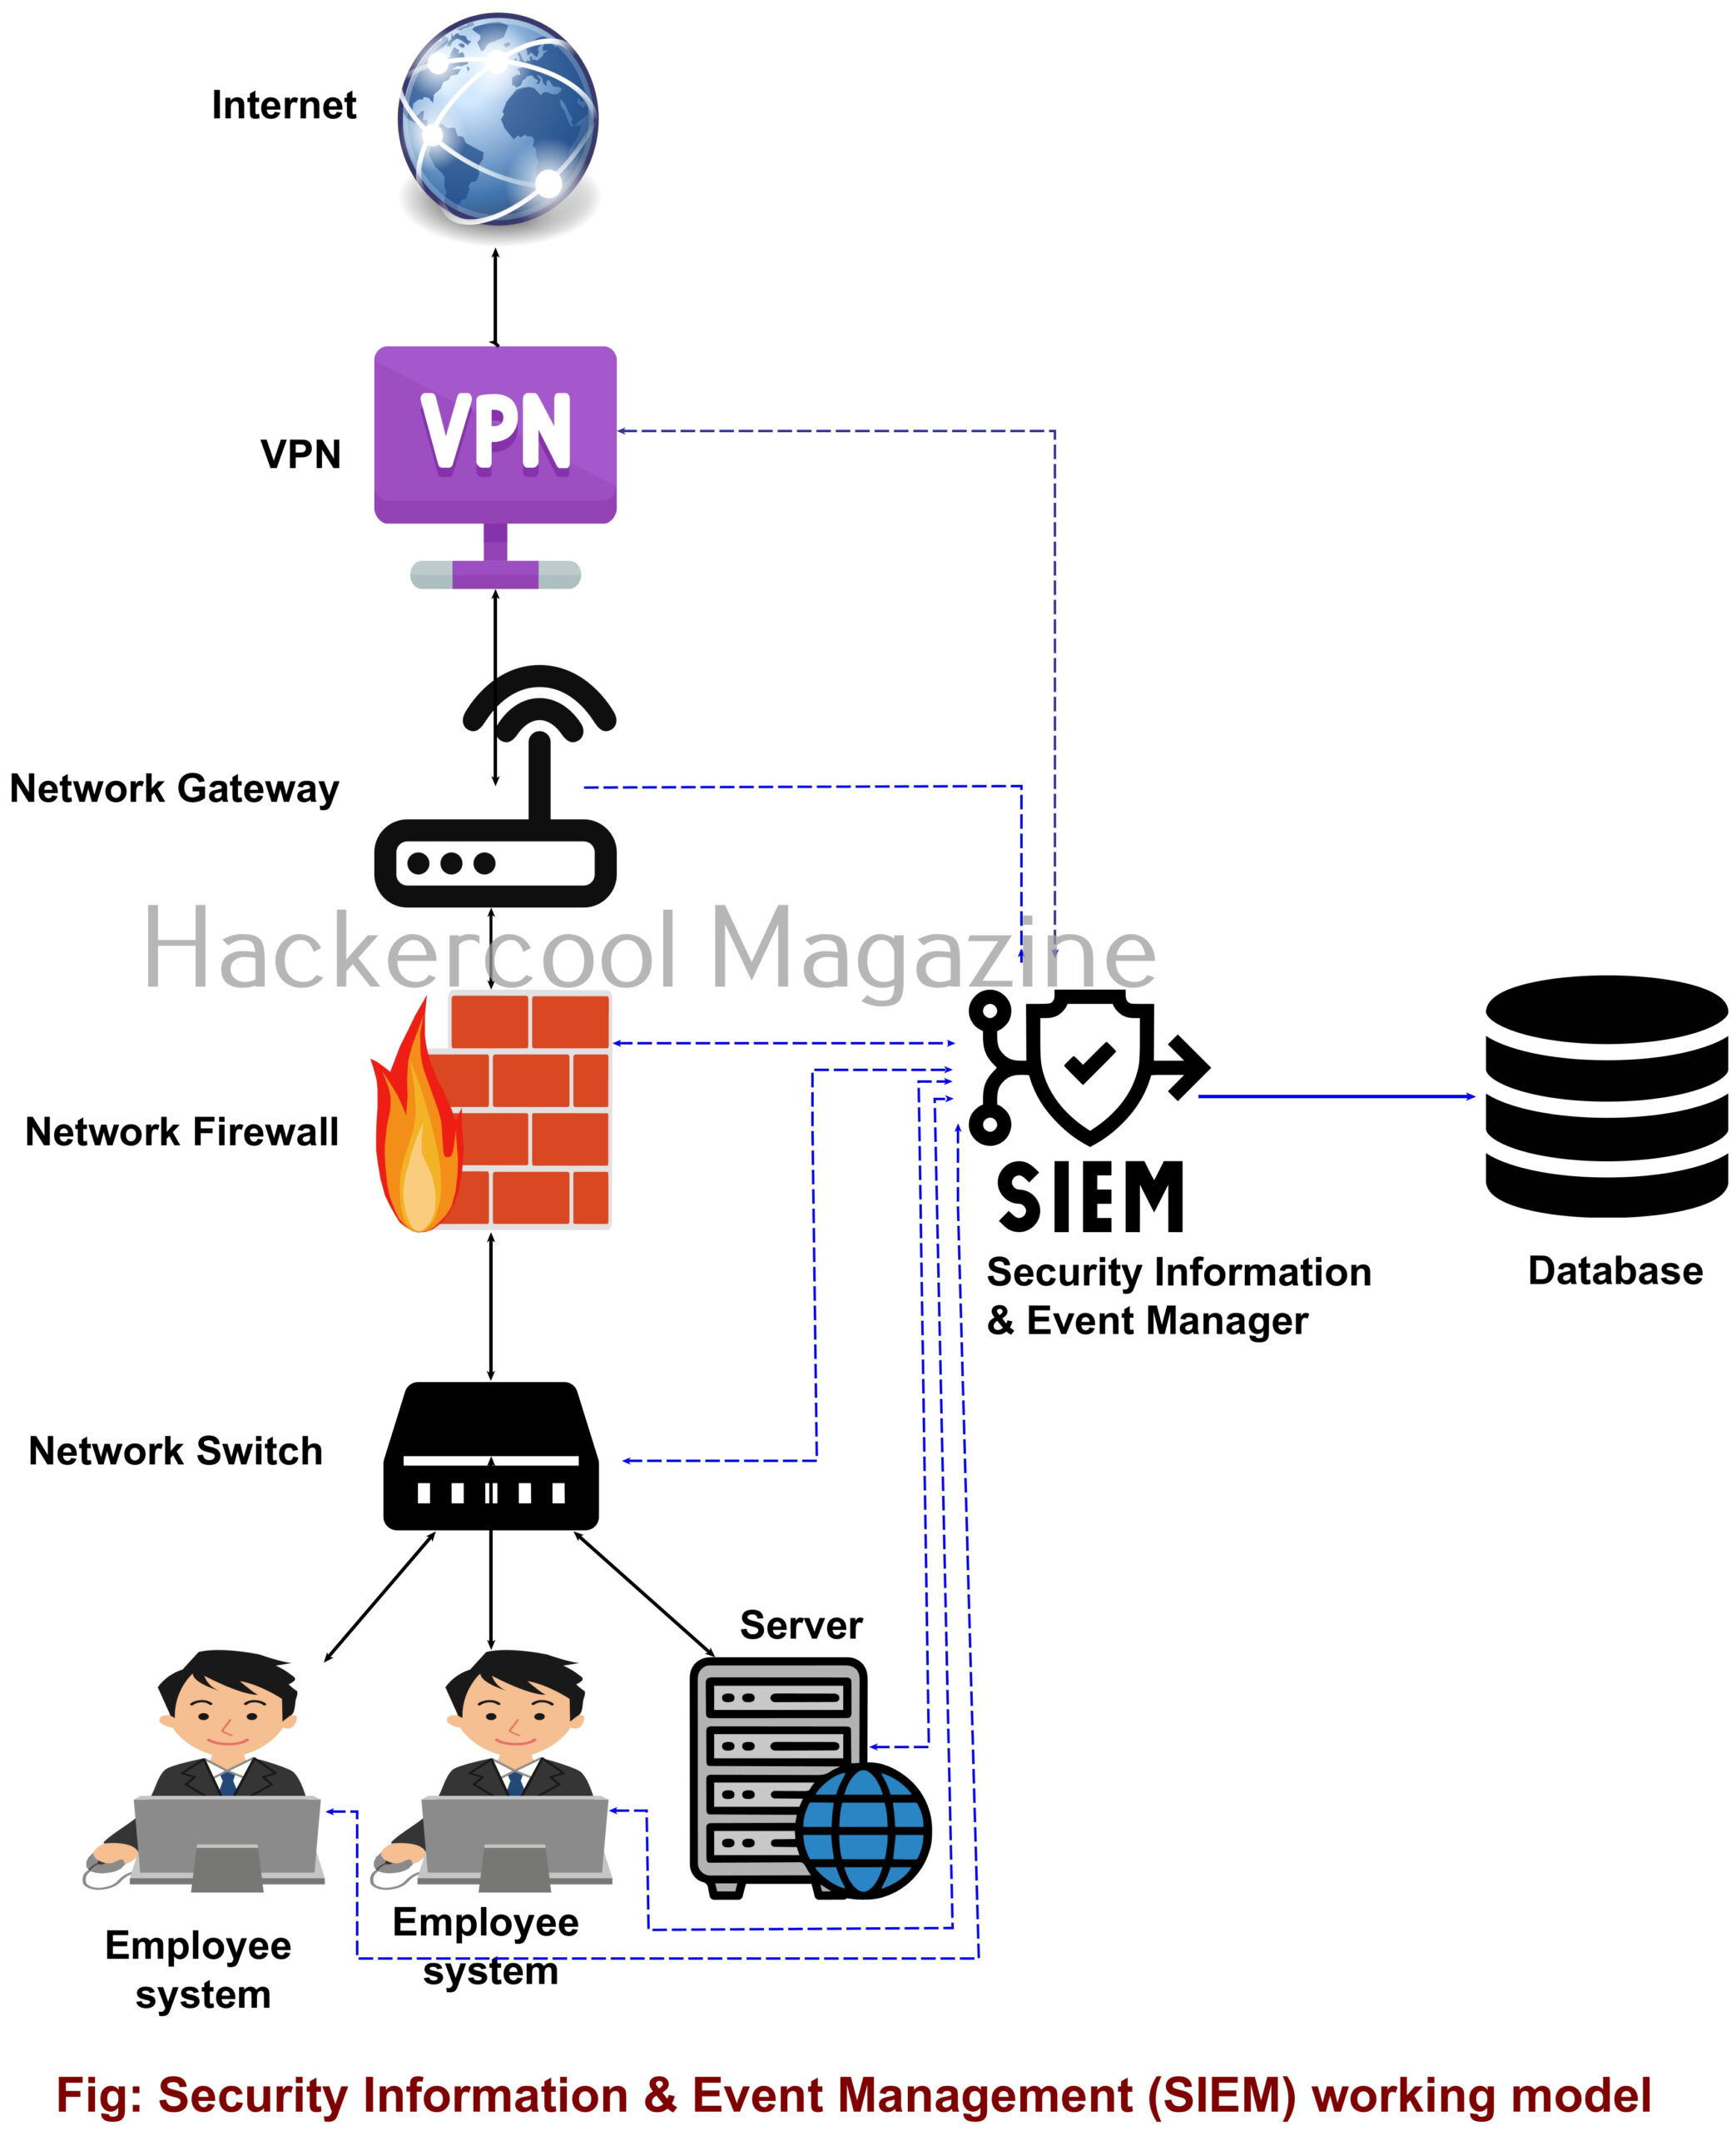
A Security Information & Event Management solution’s role comes here. It collects information, stores, processes, analyzes and upgrades security related data from multiple devices from the organization. This also helps in proper incident response. SIEM can collect, aggregate, analyze data from multiple devices in a network like Firewalls, IDS, IPS, Network gateways, Honeypots, Wireless access points, Endpoint security solutions, Routers, Switches etc. If it finds anything suspicious, it can trigger an alert and even quarantine the resource.

SIEM is a combination of Security Information management (SIM) and Security Event Management (SEM) solutions. It can be considered a successor to log viewers and event management tools.

Importance of SIEM

You have just now learnt that Log analysis tools and Event viewer tools are the predecessors of SIEM solutions. Well, manually viewing and analyzing logs and events can be a process requiring efforts of huge proportions. Just imagine that with multiple devices in a network, instead of a single system. This can directly affect the security of the organization as most of the threats nowadays require immediate response.

Here’s where a SIEM solution proves resourceful. It not only simplifies and automates but also enhances the security of the organization. Some popular SIEM vendors include Splunk, IBM QRadar, LogRhythm, Microsoft Sentinel, Securonix, Exabeam, Sumologic etc.

Posted on Leave a comment

Beginners guide to Incident response

Hello, aspiring ethical hackers. In this article, you will learn everything you need to know about Incident Response (IR). Unfortunately, unlike pen testing or ethical hacking, the role of incident response becomes important only after a cyber attack or any other cyber incident has occurred.

What is Incident Response (IR)?

In simple terms, incident response is how you or your organization respond to a cyber attack or a data breach that occurred in your organization. Obviously, any organization will want to respond to any cyber incident in such a way that the impact or damage due to that incident is minimized and contained.

So, IR is a planned and organized response of an organization to a cyber attack or incident.

Why is incident response important?

No matter how much security an organization has, there is no guarantee that a cyber incident may not occur. This cyber attack can damage the organization’s brand reputation, affect customers retention, damage intellectual property etc. A data breach can simply make a business run out of business.

IR aims to reduce this damage as quickly as possible. This requires a definite plan instead of ad hoc responses.

Stages of Incident Response

As I told you, Incident response should follow a planned and organized approach that should make the organization quickly recover from the impact of the cyber attack. Any good Incident response should have 5 steps. They are,

1.Preparation or Planning

Every organization should have a definite Incident response plan that caters to its requirements and depends on resources it wants to protect in its organization. This plan should be in written format. It should also have a dedicated incident response team that is not only aware of the incident response plan but also trained in it. This team should have the necessary tools and documentation ready in the case of a cyber attack.

2.Identification:

The next step is identifying the incident. In this era of false positives and false negatives, the incident response teams should be able to first determine what is a cyber attack to its organization. For example, let’s imagine an organization uses Windows XP machines in its organization. You know Windows XP machines are vulnerable to ms08-067.

Multiple SYN requests to SMB port of Windows XP machines of an organization may raise shackles but it is not yet an incident. But somebody exploiting the vulnerability to gain a shell or creating a new user account on that Windows XP machine can be termed as an incident.

3.Containment:

Once an incident has been identified correctly, the next step should be to limit and prevent further damage. The infected resource should be isolated and steps taken to ensure that customers or employees don’t experience any problems in accessing the resource.

Going with the same example we gave above, the infected Windows XP machine should be isolated so that the infection can be prevented from spreading to other devices on the network. In some cases, the network traffic needs to be rerouted or redirected. Once isolated, the forensics team should be informed so that it can perform digital forensics to further investigate the incident.

4.Eradication:

After the infected system or resource is isolated and the forensics team is done with creating forensic images of the infected system, the next step is the removal and restoration of systems affected by the security incident. For example, this stage involves fixing the ms08-067 vulnerability and removing the malware or payload, backdoors from the infected system. The important role of this stage is to make sure that the system cannot be exploited again.

5. Recovery

This stage involves bringing the infected system back into production environment and to make sure that another incident doesn’t occur. Before the infected system is brought back into production again, they are tested, monitored, validated and cleansed of all malware.

All of the above steps should be written in policy plan and should be documented. That’s all about Incident response. Next, learn how to prevent your organization from being hacked with threat intelligence.

Posted on

Beginners guide to Information security

Hello, aspiring ethical hackers. In our previous blogpost, you learnt about cybersecurity. In this blogpost, you will learn about Information security. The word Information security is often used interchangeably used with cybersecurity but they are different although not entirely. So, let’s begin with definition of Information security.

What is Information security?

Information security, also known as InfoSec is the name given to all the processes and procedures that are used to protect information (both digital and physical) from cyber threats in an organization.

Importance of Information security

Now, that you have understood what InfoSec is, let me explain to you it’s importance. As the world moves more towards digitization, humans increasingly depend on technology and internet for storing and transmitting information. This information is very important and faces both cyber and physical threats. With the difficulty of performing a hacking attack becoming simple day-by-day and threat actors and cybercriminals increasingly evolving their tactics, the role of information security has become all too important not only for organizations but also individuals.

Principles of Information security

InfoSec has there core principles. Popularly known as CIA triangle, they are Confidentiality, Integrity and Availability. Let’s learn about each of them in detail.

1.Confidentiality:

Confidentiality ensures that all the sensitive information is safe from unauthorized access.

2. Integrity:

Integrity ensures that the sensitive information is safe from destruction without proper authorization.

3. Availability:

Availability ensures that the information is available to authorized users whenever they need them.

Types of information security

Although InfoSec is a single word, it is a combination of different branches. Let’s learn about each of them in detail.

1.Network security:

Network security refers to protection of the network infrastructure both software and hardware, communication infrastructure, communication protocols etc. This includes all the devices in a network, communication between them and even between them and external assets.

2.Endpoint security:

Endpoint security deals with security of the endpoint devices in the network. These include Desktops, Laptops and other devices that act as access point to an organization’s network.

3. Web security:

This refers to protection of websites, web applications and the infrastructure coming with it.

4. Mobile security:

Mobile security is concerned with security of the mobile devices like mobiles and tablets which are increasingly being used in organizations.

5. Application security

Application security deals with protection of all the applications used in organization.

6. Cloud security:

Cloud security refers to protecting of data, applications and services hosted in private and public cloud environment.

7. IoT Security:

IOT security refers to protection of Internet Of Things (IOT) devices and networks from cyber attack and data breaches.

Information Security vs Cybersecurity

By now you should have clearly understood what InfoSec is. Let’s see what is the difference between InfoSec and cybersecurity. Cyber security is the entire practice of protecting computers, networks and data from cyber attacks. InfoSec is protection of all kinds of information from threats.

Posted on

Beginners guide to Kismet

Hello, aspiring ethical hackers. In our previous blogpost, you learnt everything about wifi hacking. In this article, you will learn about kismet, a wifi security assessment tool.

Kismet is a wireless network and device detector, sniffer, war driving tool and intrusion detection system (WIDs) for not just wifi but also Bluetooth, Zigbee, RF and more. Let’s see the working of this tool. For this, I will be using Kali Linux as kismet is installed by default on Kali or is present in its repositories. We will also be needing a wireless adapter that can monitor wireless packets. I am using ALFA AWVS036NHA adapter for this article.

First thing we do is to plugin the adapter to the system and check if it is connected to the device using command shown below.

iwconfig

In the above image, you can see our wireless interface is named “wlan0”. Next, we start monitor mode on our wireless adapter using command as shown below. Monitor mode allows the adapter to scan for all wireless networks in the air.

sudo airmon-ng start wlan0

We can confirm if monitor mode is enabled on the adapter by once again using “iwconfig” command.

As you can see in the above image, the mode of the adapter changed from managed to monitor and its name changed to wlan0mon from wlan0. Now we have to start kismet on this interface. It can be done as shown below.

sudo kismet -c <wireless interface>

kismet starts capturing data immediately as shown below.

You can see the wireless network and wireless devices in a browser with the link given at the beginning of the capture. The URL is “localhost:2501”. Go to the URL using a browser. As soon as you do that, you will be faced with a login screen as shown below.

Since you are setting up kismet for the first time, set a username and password and most importantly don’t forget them.

Then click on “Continue” to see the interface of kismet.

Kismet will show you all the wireless access points it has detected.

While the top shows all the wifi access points and client devices, in the bottom you can see messages. Just beside the “messages” tab there is a “Channels” tab where you can see all the channels and active devices on each channel.

Coming to the top, while devices tab shows you all the wireless devices, clicking on the SSIDs tab displays all wireless access points. You can even search for a access point of your choice. For example, let’s search for wifi access point named “Hackercool_Labs”.

Clicking on the resulting entry shows more details about the wireless access point as shown below. We can see that the access point is a router from TP-Link.

It will also show the MAC addresses of the devices or clients connecting to this particular access point as shown below.

We can even learn more about the devices connecting to this access point. For example, the device that connected to our target access point is a mobile from Xiaomi. Similarly, we can identify other devices like cameras, smart devices etc.

We can learn the channel on which it is running and its frequency.

To the top left, there is a kismet menu.

Click on “Data sources”. This will give you information from where your data is coming.

By default kismet hops from one channel to another channel (channels are explained in our wifi hacking article) to collect information. You can even lock kismet to a single channel. For example, say 7.

That’s all for now. In our future updates we will show you what more you can do with kismet. Learn about wifipumpkin3 tool.

Posted on

Beginners guide to Routersploit

Hello, aspiring ethical hackers. In our previous blogpost on Data link layer attacks, you learnt about various devices that are present in a LAN. You also learnt that one of the devices is a router. In this article, you will learn about Routersploit, a tool that is used to test security of a routers and other embedded devices in a LAN.

A router is a computer and networking device that forwards data between two different networks. For example, between internet and a LAN. A router is usually placed at the entrance of the network where the external network is connected. It is known as a gateway. In some cases, a router also acts as a firewall, IDS & IPS.

Routersploit framework is an open-source exploitation framework for embedded devices like routers. Let’s see how this tool works. For this, we will be using Kali Linux as our attacker system as routersploit is available by default on Kali repositories. As target system, we will be using IPFire (past version).

Routersploit can be started using the command shown below.

The interface of Routersploit is almost similar to Metasploit. So use command “use” and double press “Tab” button to see options of Routersploit.

Similar to Metasploit, Routersploit also has different modules divided based on the functions they perform. These are creds modules, exploit modules, payload modules, encoder modules, generic modules and scanner modules.

These are further divided into modules based on their sub functions. To see them, type any of the module type and once again hit tab two times. For example, let’s select scanner module.

As, you can see, different scanner modules are displayed. There are scanner modules for routers, cameras etc. You can select any module as shown below. For example, let’s select the autopwn module. The autopwn module of Routersploit tries all the exploits and modules it has on the target device and prints out the result.

Once you have chosen a module, use the “show options” command to see all the options this module needs. For example, the autopwn module just needs the target IP address. Set the target IP as shown below.

After setting all the options, just execute the module using command “run”. In the same manner, you can see and use different exploit modules on Routersploit.

If you know the make of target router, you can even search for all the exploit modules belonging to it. For example, let’s search for modules for our target router i.e IPfire.

In the above image you can see all the modules related to Ipfire. Let’s see if our IP fire target is vulnerable to shellshock vulnerability.

As you can see, the target is indeed vulnerable.

After setting all the options and executing the module, Routersploit successfully exploited the IP Fire shellshock vulnerability and exposed the /etc/passwd file of the target device.

Now, let’s see one of the credentials module.

This module I selected below, checks if our target IPfire is using default credentials for FTP service.

In this case, our target doesn’t expose FTP and hence is not vulnerable.