Posted on Leave a comment

Beginners guide to Information security

Hello, aspiring ethical hackers. In our previous blogpost, you learnt about cybersecurity. In this blogpost, you will learn about Information security. The word Information security is often used interchangeably used with cybersecurity but they are different although not entirely. So, let’s begin with definition of Information security.

What is Information security?

Information security, also known as InfoSec is the name given to all the processes and procedures that are used to protect information (both digital and physical) from cyber threats in an organization.

Importance of Information security

Now, that you have understood what InfoSec is, let me explain to you it’s importance. As the world moves more towards digitization, humans increasingly depend on technology and internet for storing and transmitting information. This information is very important and faces both cyber and physical threats. With the difficulty of performing a hacking attack becoming simple day-by-day and threat actors and cybercriminals increasingly evolving their tactics, the role of information security has become all too important not only for organizations but also individuals.

Principles of Information security

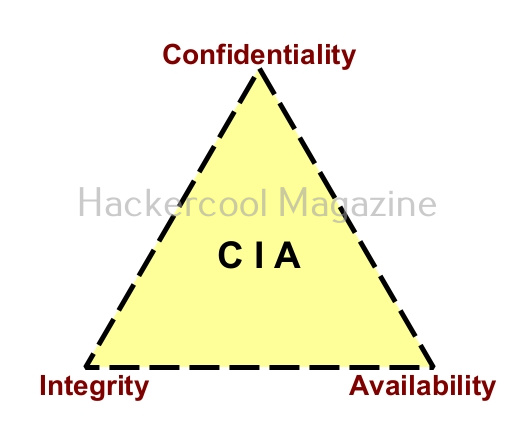
InfoSec has there core principles. Popularly known as CIA triangle, they are Confidentiality, Integrity and Availability. Let’s learn about each of them in detail.

1.Confidentiality:

Confidentiality ensures that all the sensitive information is safe from unauthorized access.

2. Integrity:

Integrity ensures that the sensitive information is safe from destruction without proper authorization.

3. Availability:

Availability ensures that the information is available to authorized users whenever they need them.

Types of information security

Although InfoSec is a single word, it is a combination of different branches. Let’s learn about each of them in detail.
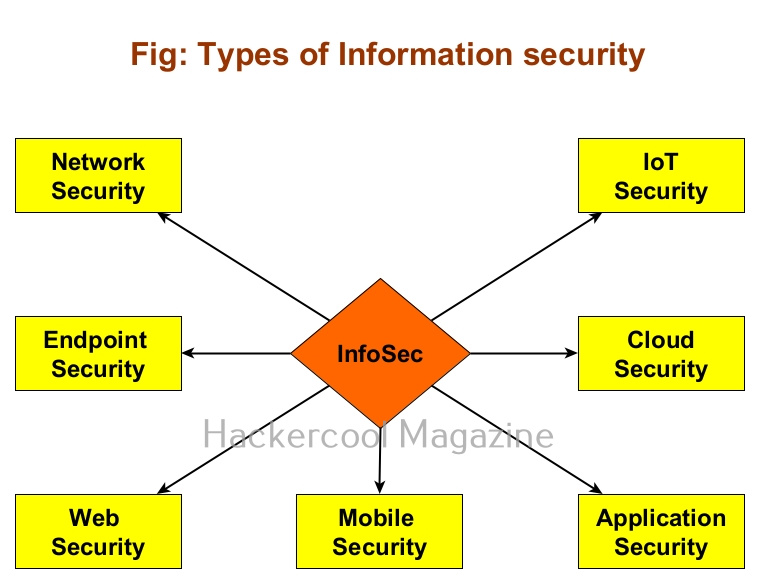
1.Network security:

Network security refers to protection of the network infrastructure both software and hardware, communication infrastructure, communication protocols etc. This includes all the devices in a network, communication between them and even between them and external assets.

2.Endpoint security:

Endpoint security deals with security of the endpoint devices in the network. These include Desktops, Laptops and other devices that act as access point to an organization’s network.

3. Web security:

This refers to protection of websites, web applications and the infrastructure coming with it.

4. Mobile security:

Mobile security is concerned with security of the mobile devices like mobiles and tablets which are increasingly being used in organizations.

5. Application security

Application security deals with protection of all the applications used in organization.

6. Cloud security:

Cloud security refers to protecting of data, applications and services hosted in private and public cloud environment.

7. IoT Security:

IOT security refers to protection of Internet Of Things (IOT) devices and networks from cyber attack and data breaches.

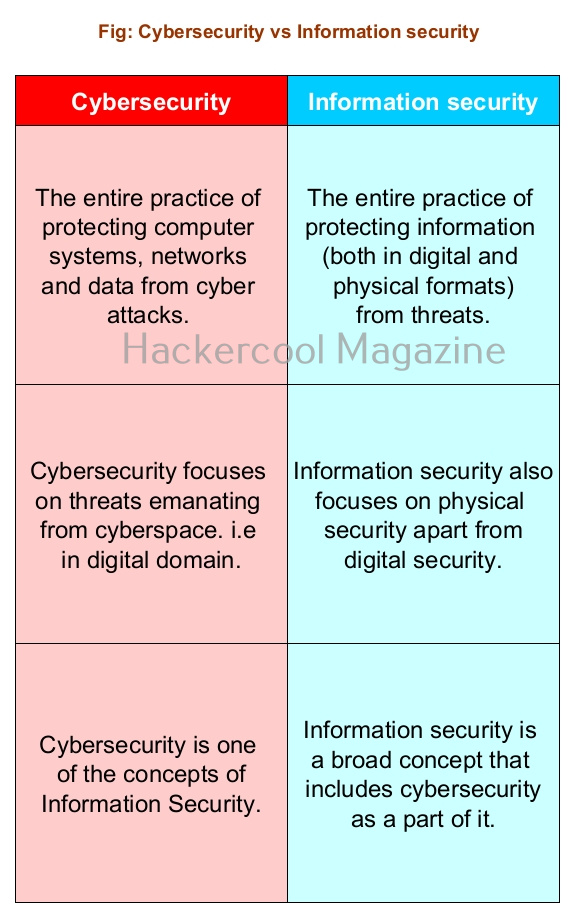
Information Security vs Cybersecurity

By now you should have clearly understood what InfoSec is. Let’s see what is the difference between InfoSec and cybersecurity. Cyber security is the entire practice of protecting computers, networks and data from cyber attacks. InfoSec is protection of all kinds of information from threats.

Posted on

Beginners guide to Kismet

Hello, aspiring ethical hackers. In our previous blogpost, you learnt everything about wifi hacking. In this article, you will learn about kismet, a wifi security assessment tool.

Kismet is a wireless network and device detector, sniffer, war driving tool and intrusion detection system (WIDs) for not just wifi but also Bluetooth, Zigbee, RF and more. Let’s see the working of this tool. For this, I will be using Kali Linux as kismet is installed by default on Kali or is present in its repositories. We will also be needing a wireless adapter that can monitor wireless packets. I am using ALFA AWVS036NHA adapter for this article.

First thing we do is to plugin the adapter to the system and check if it is connected to the device using command shown below.

iwconfig

In the above image, you can see our wireless interface is named “wlan0”. Next, we start monitor mode on our wireless adapter using command as shown below. Monitor mode allows the adapter to scan for all wireless networks in the air.

sudo airmon-ng start wlan0

We can confirm if monitor mode is enabled on the adapter by once again using “iwconfig” command.

As you can see in the above image, the mode of the adapter changed from managed to monitor and its name changed to wlan0mon from wlan0. Now we have to start kismet on this interface. It can be done as shown below.

sudo kismet -c <wireless interface>

kismet starts capturing data immediately as shown below.

You can see the wireless network and wireless devices in a browser with the link given at the beginning of the capture. The URL is “localhost:2501”. Go to the URL using a browser. As soon as you do that, you will be faced with a login screen as shown below.

Since you are setting up kismet for the first time, set a username and password and most importantly don’t forget them.

Then click on “Continue” to see the interface of kismet.

Kismet will show you all the wireless access points it has detected.

While the top shows all the wifi access points and client devices, in the bottom you can see messages. Just beside the “messages” tab there is a “Channels” tab where you can see all the channels and active devices on each channel.

Coming to the top, while devices tab shows you all the wireless devices, clicking on the SSIDs tab displays all wireless access points. You can even search for a access point of your choice. For example, let’s search for wifi access point named “Hackercool_Labs”.

Clicking on the resulting entry shows more details about the wireless access point as shown below. We can see that the access point is a router from TP-Link.

It will also show the MAC addresses of the devices or clients connecting to this particular access point as shown below.

We can even learn more about the devices connecting to this access point. For example, the device that connected to our target access point is a mobile from Xiaomi. Similarly, we can identify other devices like cameras, smart devices etc.

We can learn the channel on which it is running and its frequency.

To the top left, there is a kismet menu.

Click on “Data sources”. This will give you information from where your data is coming.

By default kismet hops from one channel to another channel (channels are explained in our wifi hacking article) to collect information. You can even lock kismet to a single channel. For example, say 7.

That’s all for now. In our future updates we will show you what more you can do with kismet. Learn about wifipumpkin3 tool.

Posted on

Beginners guide to Routersploit

Hello, aspiring ethical hackers. In our previous blogpost on Data link layer attacks, you learnt about various devices that are present in a LAN. You also learnt that one of the devices is a router. In this article, you will learn about Routersploit, a tool that is used to test security of a routers and other embedded devices in a LAN.

A router is a computer and networking device that forwards data between two different networks. For example, between internet and a LAN. A router is usually placed at the entrance of the network where the external network is connected. It is known as a gateway. In some cases, a router also acts as a firewall, IDS & IPS.

Routersploit framework is an open-source exploitation framework for embedded devices like routers. Let’s see how this tool works. For this, we will be using Kali Linux as our attacker system as routersploit is available by default on Kali repositories. As target system, we will be using IPFire (past version).

Routersploit can be started using the command shown below.

The interface of Routersploit is almost similar to Metasploit. So use command “use” and double press “Tab” button to see options of Routersploit.

Similar to Metasploit, Routersploit also has different modules divided based on the functions they perform. These are creds modules, exploit modules, payload modules, encoder modules, generic modules and scanner modules.

These are further divided into modules based on their sub functions. To see them, type any of the module type and once again hit tab two times. For example, let’s select scanner module.

As, you can see, different scanner modules are displayed. There are scanner modules for routers, cameras etc. You can select any module as shown below. For example, let’s select the autopwn module. The autopwn module of Routersploit tries all the exploits and modules it has on the target device and prints out the result.

Once you have chosen a module, use the “show options” command to see all the options this module needs. For example, the autopwn module just needs the target IP address. Set the target IP as shown below.

After setting all the options, just execute the module using command “run”. In the same manner, you can see and use different exploit modules on Routersploit.

If you know the make of target router, you can even search for all the exploit modules belonging to it. For example, let’s search for modules for our target router i.e IPfire.

In the above image you can see all the modules related to Ipfire. Let’s see if our IP fire target is vulnerable to shellshock vulnerability.

As you can see, the target is indeed vulnerable.

After setting all the options and executing the module, Routersploit successfully exploited the IP Fire shellshock vulnerability and exposed the /etc/passwd file of the target device.

Now, let’s see one of the credentials module.

This module I selected below, checks if our target IPfire is using default credentials for FTP service.

In this case, our target doesn’t expose FTP and hence is not vulnerable.

Posted on

UNIX privesc check: Complete guide

Hello, aspiring ethical hackers. In our previous blogpost, you learnt about Linux privilege escalation. In this article, you will learn about UNIX privesc check , a tool that will help you in elevating privileges on a Linux and UNIX system.

UNIX privesc check is a shell script that checks for all simple privilege escalation vectors on a UNIX system. This script finds misconfigurations and other settings that could allow local unprivileged users to elevate privileges on a target Linux system.

Let’s see how this tool works. For this, we will be using Kali Linux as this tool is available by default in its repositories. As target system, we will be using Metasploitable 2 installed in our virtual hacking lab.

As it is a local privilege escalation script, it needs to be run on the target system. Obviously, you need to have access on the target system. Learn various methods to gain access to a Linux system in our Linux hacking article. After gaining access, we can use any method to download the UNIX-privesc-check script to the target system.

Next, it can be executed like any other shell script.

Unix privesc check runs in two modes: standard and detailed. In standard mode it performs a speed optimised check of security settings. It can be run in standard mode as shown below.

./unix-privesc-check standard

In the detailed mode, it performs all checks performed in standard mode but additionally it will also perform checks of permissions of open file handles and other files. This mode sis low but can help you find more weaknesses in 3rd party programs. UNIX privesc check can be run in detailed mode using command shown below.

./unix-privesc-ccheck detailed

It is good practice to save the scan output to a file. This can be done as shown below.

Usually this file with scanned output needs to be transferred to the attacker system for analysis. This can be done using tools like netcat or socat. For example, let’s transfer “detailed_output.txt” file to attacker system for observation. While observing the output file, you need to look out for “warning” signs. These allow in privilege escalation of Linux system.

For example, you can see that SUDO is configured in the above image.

This tool has also found one binary with SUID bit set. Learn about SETUID privilege escalation.

It has even found public and private SSH keys which can be used to login to SSH server on target system. Learn about SSH hacking in our comprehensive guide.

That’s how we use this tool. Learn about Windows privesc check, a tool that helps us in elevating privileges on a Window system.

Posted on

Beginners guide to PowerSploit

Hello, aspiring ethical hackers. In our previous blogpost, you learnt what is Post-Exploitation and various techniques of Post exploitation. In this article, you will learn about PowerSploit, a Post-exploitation framework.

PowerSploit is a collection of Microsoft PowerShell modules that help Red Teamers and Penetration testers during post exploitation phase of pen testing. Let’s learn how to use this.

For this, I will be using Kali Linux as attacker system as PowerSploit is installed by default in Kali repositories. We are doing this on the same virtual hacking lab but we are replacing Metasploitable 2 target system with Windows 10 target system.

You can start PowerSploit by using command shown below.

powersploit

This will show you this. As you can see, all modules and scripts of PowerSploit are placed in different directories based on their functioning.

Here are all the PowerShell scripts and modules of PowerSploit.

To use a module or a script of PowerSploit, all you need to do is to copy the script you want to the target system. The uploading method can be different based on different situations.

For doing this, we need to already have access to the target system after gaining access. For this article, let’s assume I gained initial access to the target system and have meterpreter access on it.

We use the upload command of meterpreter to upload the “Get_Computer-Details.ps1” PowerShell script to target system. The “Get-ComputerDetails.Ps1” module gathers information about target system.

Once uploaded, you can use different techniques to execute the module. This depends on the type of access you have on the target system. For this article, Iuse shell command of meterpreter to get a CMD shell on the target system and use “PowerShell” to execute the PowerSploit’s script.

You can use all the scripts of PowerSploit in the same way. Learn how to use nishang post exploitation framework.