
Hello, aspiring ethical hackers. In this blogpost, you will learn how to create a virtual hacking lab for practicing hacking. No matter how many articles or blogposts you read or how many hacking courses you take, you cannot truly understand the concept of hacking until you perform those hacking tutorials practically. To practice hacking effectively, you need a secure environment without the risk of compromising the security of a safe network or systems and attract legal consequences due to your actions.
What is a Hacking lab?
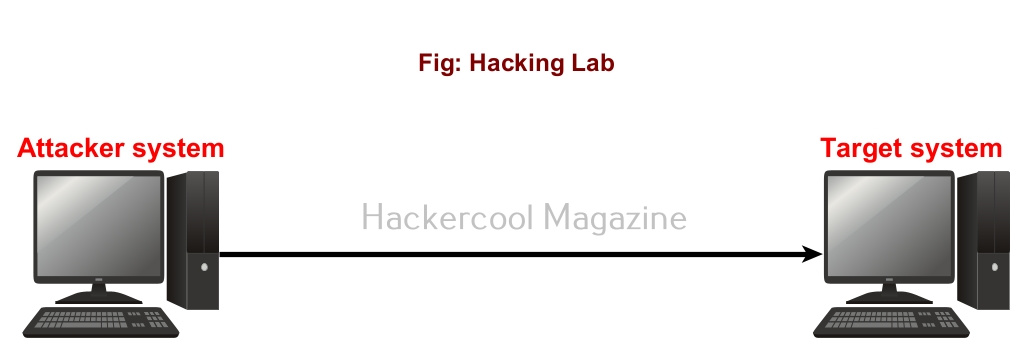
A hacking lab is a lab that provides a safe environment to practice hacking without the above-mentioned risks. The most basic hacking lab consists of two machines: attacker system (the system from which you hack) and target system (the system which you hack).
What is a virtual hacking lab?
Just now, you have learnt that a basic hacking lab needs to have one attacker system and target system. They can be installed on separate hardware but this may prove expensive especially as you upgrade your hacking lab in future. Luckily, hacking labs can be created on a single system itself using virtualization solutions. Virtualization allows you to install multiple operating systems on a single machine. Some of the popular virtualization solution are Oracle VirtualBox, Parallels Desktop, VMware vSphere, Hyper-V, QEMU etc.
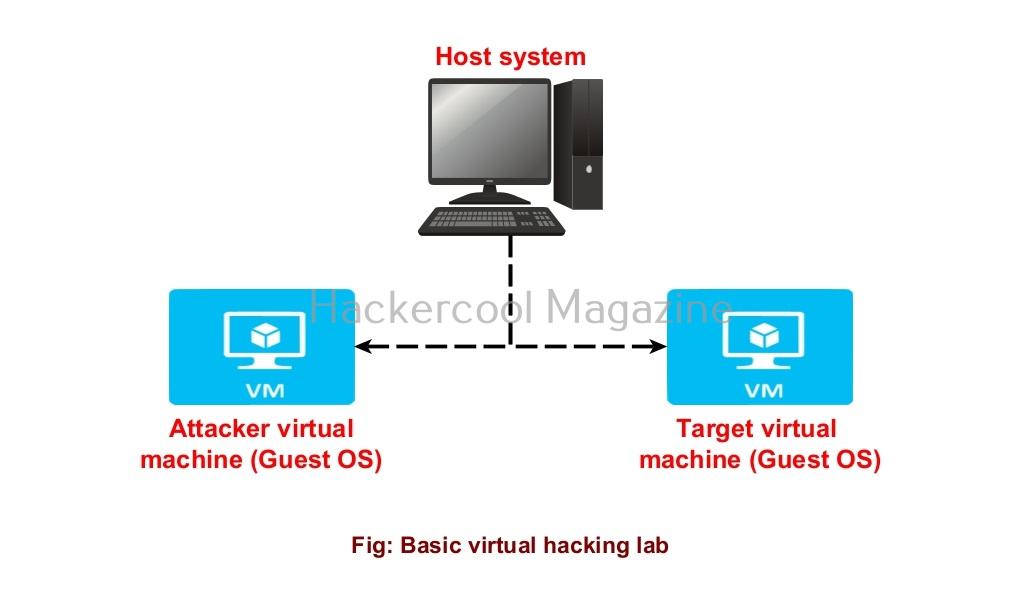
The hacking labs created using this method is called virtual hacking lab. They are inexpensive compared to the cybersecurity lab and easily adaptable. Of all the solution mentioned above, I will be using Oracle Virtual Box as it is FREE and also rich in features. Oracle VirtualBox can be downloaded and installed on Windows, Linux, macOS, Solaris etc. Here, I have installed virtual Box on a Windows machine.
How to create a virtual hacking lab?
Let’s create a simple hacking lab with an attacker system and target system on VirtualBox. The operating system on which Oracle VirtualBox (or any another virtualization software) is installed is known as the Host machine. The operating systems that are installed in Oracle VirtualBox as called as GUEST machines. So here, in VirtualBox, we are going to install two guest machines: one is Kali Linux (attacker system) and Metasploitable 2 (target system).
What do we need?
1. Oracle VirtualBox. (Download)
2. Kali Linux. (Download)
3. Metasploitable 2. (Download)
Install Kali Linux and Metasploitable 2 in VirtualBox.
See how to install Kali Linux in VirtualBox.
See how to install Metasploitable 2 in VirtualBox.
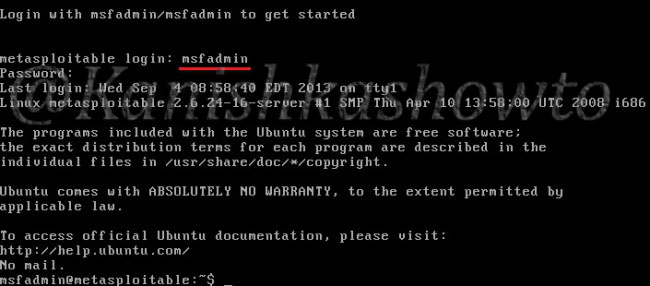
Once both the virtual machines are installed, turn on both the machines. Login into the Metasploitable 2 VM. Default username and password are “msfadmin / msfadmin”.
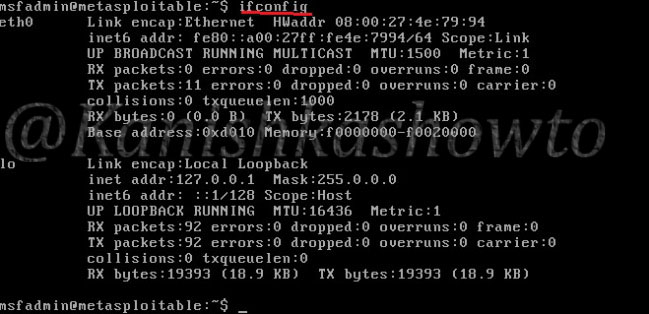
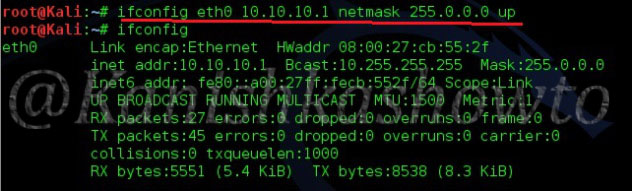
Type the command “ifconfig”to find out the IP address of your target system.
Similarly login into the Kali Linux machine and in the terminal, type command “ip a” to find out its IP address.
Test whether the attacker system can communicate with the target system by pinging the target system from the attacker system as shown below.
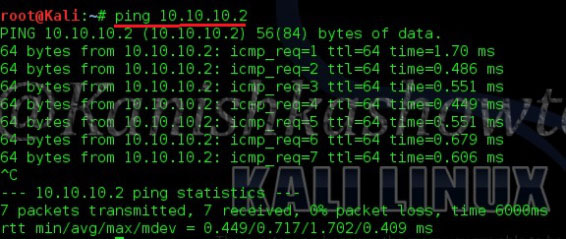
The connection is successful. Our virtual hacking lab is ready. Happy practicing hacking.
Various networking modes of VirtualBox
Above, we created a simple virtual hacking lab successfully. Go to “settings” of any of the above GUEST machines and go to “Network settings”, you will see that this Guest machine is attached to a NAT adapter.
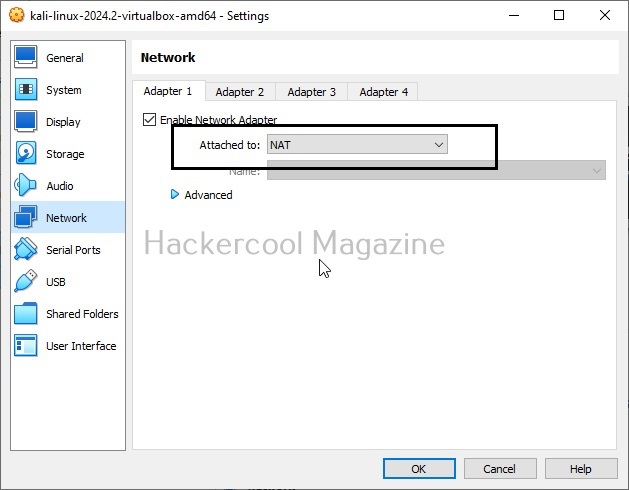
When you install a GUEST machine in VirtualBox, the default network mode is NAT. Apart from NAT, there are other network modes on VirtualBox.
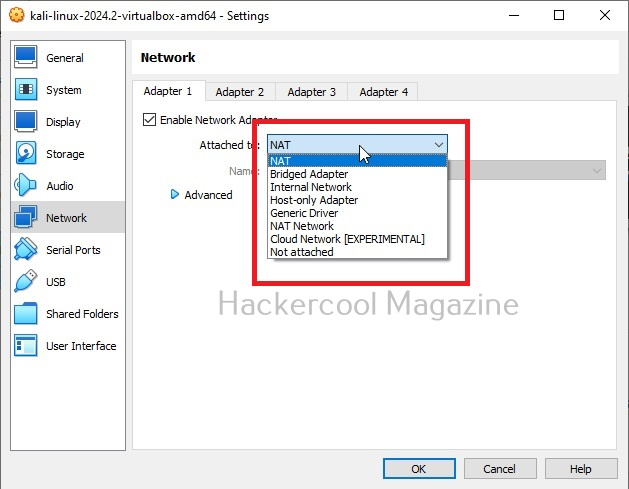
Each networking mode plays a different role in hacking. So, it’s good to learn about each of them.
1. NAT:
NAT stands for Network Address Translation (NAT). This is the default networking mode of VirtualBox. This mode allows web access, downloading of files from internet, etc. Our simple lab above is NAT. This is used to create a hacking lab when both attacker system and target system need internet access.
2. NAT network:
This is useful in creating hacking lab on a separate internal network that uses outbound connections.
3. Bridged adapter:
When you use a Bridged adapter, the virtual machine uses the network adapter of the Host machine and acts as a separate machine in the LAN network of the Host machine.
4. Internal network:
This creates a different kind of network separated from the host system. This network doesn’t have access to the outside internet.
5. Host-only network:
This creates a network in which the virtual machines have access to the Host machine.
6. Not attached:
In this type of network, the virtual machine is disconnected from everything. This might be useful in creating a malware analysis lab.
[…] evening friends. We have seen how to create a virtual pentest lab both in Oracle VirtualBox (see here) and Vmware Workstation(see here). Although both penetration testing labs were almost similar, […]
[…] http://kanishkashowto.wordpress.com/2013/09/05/how-to-create-free-pentest-lab-using-virtualbox/ <– some info could be gathered to .. […]
Hi there! Good tutorials! Just want to ask if this can be done using a Windows XP virtual machine? Thanks! and More power!
Thank You, John. Yes, you could use any OS for that matter.
is it possible do this with Android os and Win 7 ,kali linux?
@harsha, just replace Windows Xp with Windows 7 and for android you have to install Android x86 version.
Hi, I did evey step but when I type ping 10.10.10.2 nothing happens. It just says PING 10.10.10.2 (10.10.10.2) 56(84) bytes of data.
Hi Alexander, Can you send me screenshots of your IP addresses in Kali and Metasploitable.
I dont know if I can. I tried print screen but it wont let me paste it on here. I took a picture on my iphone but I dont know how to put it on here either 🙁 The IP for kali is 10.10.10.1 and for metasploitable is 10.10.10.2
Hi Kanishka,
Installed Metasploitable and Kali with no problem. It is also setting ip addresses correctly as 10.10.10.2 and 10.10.10.1 with the ifconfig. Kali is however not able to ping Metasploitable and says destination host is unreachable. Not able to figure out the problem. Help?
Hi Kanishka,
In continuation of my earlier comment regarding inability to ping metasploitable from kali details are as under:
root@kali:~# ifconfig
eth0: flags=4099 mtu 1500
inet 10.10.10.1 netmask 255.0.0.0 broadcast 10.255.255.255
ether 08:00:27:fa:25:8e txqueuelen 1000 (Ethernet)
RX packets 0 bytes 0 (0.0 B)
RX errors 0 dropped 0 overruns 0 frame 0
TX packets 0 bytes 0 (0.0 B)
TX errors 0 dropped 0 overruns 0 carrier 0 collisions 0
lo: flags=73 mtu 65536
inet 127.0.0.1 netmask 255.0.0.0
inet6 ::1 prefixlen 128 scopeid 0x10
loop txqueuelen 0 (Local Loopback)
RX packets 37 bytes 2912 (2.8 KiB)
RX errors 0 dropped 0 overruns 0 frame 0
TX packets 37 bytes 2912 (2.8 KiB)
TX errors 0 dropped 0 overruns 0 carrier 0 collisions 0
root@kali:~# ping 10.10.10.2
PING 10.10.10.2 (10.10.10.2) 56(84) bytes of data.
From 10.10.10.1 icmp_seq=1 Destination Host Unreachable
From 10.10.10.1 icmp_seq=2 Destination Host Unreachable
From 10.10.10.1 icmp_seq=3 Destination Host Unreachable
From 10.10.10.1 icmp_seq=4 Destination Host Unreachable
From 10.10.10.1 icmp_seq=5 Destination Host Unreachable
From 10.10.10.1 icmp_seq=6 Destination Host Unreachable
^C
— 10.10.10.2 ping statistics —
7 packets transmitted, 0 received, +6 errors, 100% packet loss, time 6008ms
pipe 3
root@kali:~#
metasploitable ip is correctly set to 10.10.10.2
help to resolve?
@Sankaran, sorry for the delayed response. Change the options of network adapter from “internal network” to “NAT” for both the machines. You don’t need to set the IP address manually. Ping and tell me the result.
Thanks.Sorry for delayed response as well. I kept trying and reinstalled VB and the two VMs.It is working fine with internal network settings. Thanks once again.
hello,
the above worked very well, I was just wondering if there was a way for it to be persistent? or would i have to retype this in every time i boot up the two machines?
thanks in advance,
michael
@Michael, the arrangement is persistent.
I have the same problem
root@kali:~# ping 10.10.10.2
PING 10.10.10.2 (10.10.10.2) 56(84) bytes of data.
From 10.10.10.1 icmp_seq=1 Destination Host Unreachable
From 10.10.10.1 icmp_seq=2 Destination Host Unreachable
From 10.10.10.1 icmp_seq=3 Destination Host Unreachable
^C
— 10.10.10.2 ping statistics —
6 packets transmitted, 0 received, +3 errors, 100% packet loss, time 5015ms
pipe 3
Hey Tony, you are getting this error becaus -e KALI could not find the Metasploitable. Are you sure both the machines are on the same network. Check once again. Check the IP add -ress by using ifconfig command. If you have followed the instructions correctly, there shou- ld not be a fuss.
Hi, Everything worked as expected. However when i power down the virtual machines, and re-launch them, the settings applied , adding the IP addresses etc. have not been saved and has reverted to the start. Meaning everytime i want to do this, i need to keep following this tutorial.
Is there any way to save all the settings and commands done, so i don’t have to keep doing this?
thanks.
Sam, I am uanble to comprehend as to why it’s happening to you. Did you folow the tutorial exactly? No problem though. You can still have a workaround by using Host-Only networking or Nat networking. By the way, which version of Virtualbox are you trying this on.
Same problem here: i followed all your steps and were worthless. Changing from internal network to NAT gave me the same result: nothing. Don’t know what i’m doing wrong. I’ll paste here both machines
-with both meta and kali having NAT configuration:
Metasploitable:
I just have realized that i can’t copy and paste from meta but you have to trust me, i have performed the “sudo ifconfig eth0 10.10.10.2 netmask 255.0.0.0 up” command so many times that i now have it present my mind all day.
kali:
root@kali:~# ifconfig
eth0: flags=4163 mtu 1500
inet 10.0.2.15 netmask 255.255.255.0 broadcast 10.0.2.255
inet6 fe80::a00:27ff:fe04:5c0b prefixlen 64 scopeid 0x20
ether 08:00:27:04:5c:0b txqueuelen 1000 (Ethernet)
RX packets 2 bytes 650 (650.0 B)
RX errors 0 dropped 0 overruns 0 frame 0
TX packets 26 bytes 2326 (2.2 KiB)
TX errors 0 dropped 0 overruns 0 carrier 0 collisions 0
lo: flags=73 mtu 65536
inet 127.0.0.1 netmask 255.0.0.0
inet6 ::1 prefixlen 128 scopeid 0x10
loop txqueuelen 1 (Local Loopback)
RX packets 34 bytes 2402 (2.3 KiB)
RX errors 0 dropped 0 overruns 0 frame 0
TX packets 34 bytes 2402 (2.3 KiB)
TX errors 0 dropped 0 overruns 0 carrier 0 collisions 0
root@kali:~# ping 10.1.1.2
PING 10.1.1.2 (10.1.1.2) 56(84) bytes of data.
^[c^C
— 10.1.1.2 ping statistics —
16 packets transmitted, 0 received, 100% packet loss, time 15001ms
##here i started to enter numbers that i saw they could share a pattern like 000.0.00.0 so not very important##
root@kali:~# ping 10.1.1.255
PING 10.1.1.255 (10.1.1.255) 56(84) bytes of data.
^C
— 10.1.1.255 ping statistics —
6 packets transmitted, 0 received, 100% packet loss, time 5017ms
root@kali:~#
same with internal network configuration
What can I do?
i also tried with both machines having the same netmask (as in the tutorial) although in the example i pasted the machine having 255.255.255.0 netmask
See my reply and try.
Hey Angel. I can understand your frustration. Seeing the above data you sent me, it seem- s both machines are not on the same subnet. Do this to fix the problem. Turn off both the machines. On Virtualbox machines, click on each machine. Then go to “settings”. In “settings” opt ion, click on “Network” option. You should see a “Enable network adapter” screen. Make sure it is “NAT”. Click on “OK”. Do this in both machines. Your problem should be solved.
Ok I’ve done all the steps and I guess it worked but my kali machine will not stop pinging, this has been going on for an hour now and i’m getting really frustrated. I just want to start practicing
and get on with all of these tutorials and courses but nothing any of theses instructors teach is working and i feel that by the time get everything to start working all this info will be worthless.
what the hell am i doing wrong?
@Afterimage, Hit on CTRl+C to stop it.
[…] With this we successfully finished installing Metasploitable in Virtualbox. See how to create a penetration testing lab. […]