Posted on

Complete guide to Subfinder

Hello, aspiring ethical hackers. In our previous blogpost, you learnt what is footprinting and various techniques used for footprinting. In this blogpost, you will learn about subfinder, a tool that helps us in footprinting.

Subfinder is a sub domain discovery tool that queries and retrieves valid sub domains for a given domain or website. It is a simple tool that uses passive subdomain enumeration for this purpose.

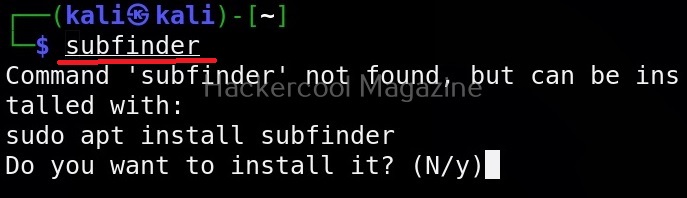
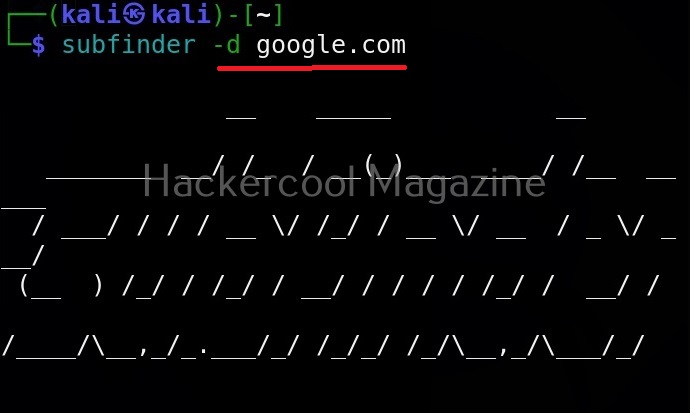
Let’s see how to use this tool to perform subdomain enumeration. For this, we will be using Kali Linux as our attacker machine. Subfinder can be installed on Kali as shown below.

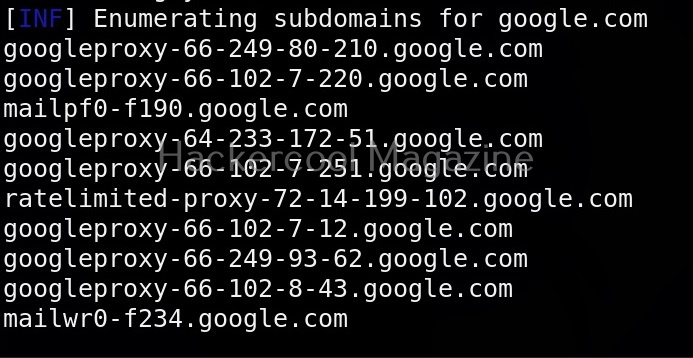
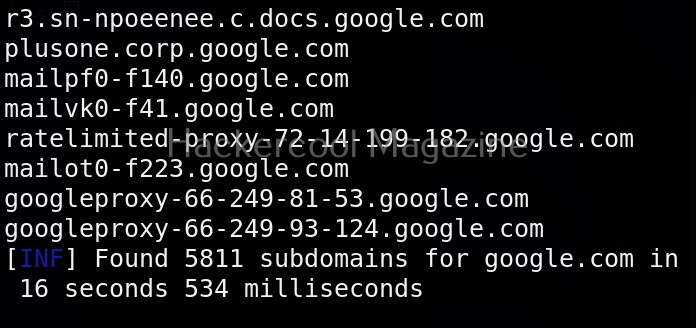
The simplest method to use subfinder to query a sub domain of a particular domain is as shown below.

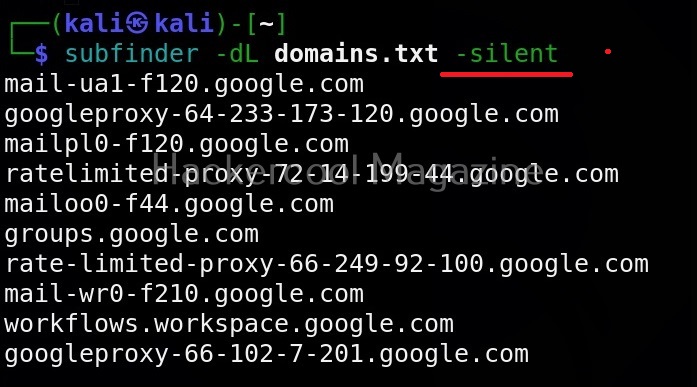
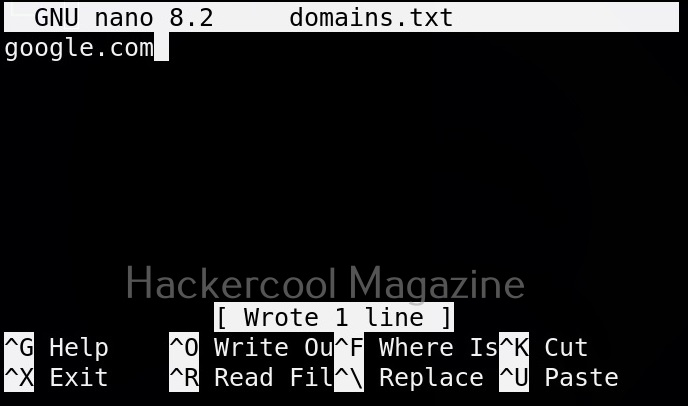
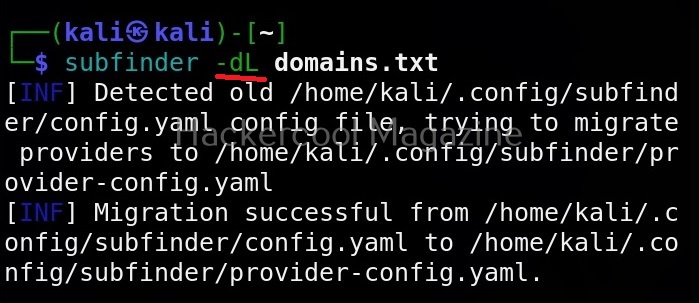
Specify multiple domains at once (-dL)

This tool can also query multiple domains at once. You can supply these domains using a file. For example, let’s create a new file “Domains.txt” and add a domain as shown below.

This file can be provided as input to subfinder as shown below.

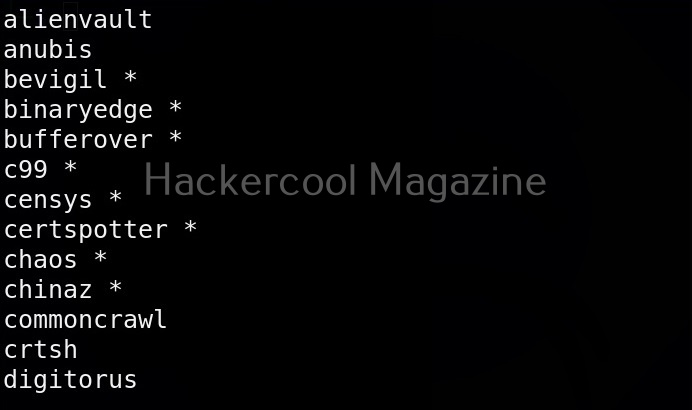
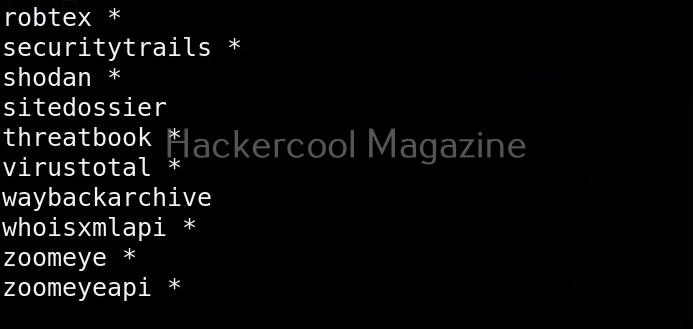
View all the sources of this tool (-ls)

Subfinder collects information from a number of sources like AlienVault, Anubis, Censys, Shodan etc. You can view all the sources the subfinder tool queries using the command given below.

Query a single source (-s)

You can specify subfinder to query just one source using (-s) option as shown below. For example, let’s just specify GitHub and Anubis as sources.

Query all the sources (-all)

We can also specify this tool to query all the sources using the “-all” option.

Exclude some sources (-es)

We can even exclude some sources as shown below. For example, let’s exclude GitHub.

Display the source this tool queried in results (-cs)

We can even display source information to be displayed in output using the “-cs” option as shown below.

Saving output (-o)

You can save the output of this tool to a file as shown below.

Silent mode

In this mode, sub finder just displays the sub domains it found and nothing else.

Posted on

Beginners guide to ARP scan

Hello, aspiring ethical hackers. In our previous blogpost, you have learnt about network scanning and enumeration. In this blogpost, you will learn about a tool named arp scan, a command line tool used for scanning and fingerprinting on the local network.

ARP scan is available for Linux and BSD systems and uses ARP protocol to scan the network. Let’s see how to use this tool. For this, we will be using Kali Linux as this tool is available for download by default in Kali repositories.

It is good to run arp scan tool as root user in order not to face some errors. You can simply scan a network using arp-scan as shown below.

If you want to scan your local network, you can simply specify the “-r” option to do it as shown below.

If your device is connected to multiple networks and you want to scan a particular network, you can specify the network interface using the “-I” option. By default if the “-I” option is not specified, arp-scan will search the system interface list for the lowest numbered configured up interface, excluding Loopback and scan that network.

Quiet mode (-q)

If you want minimal output to be displayed for each responding host, while scanning with arp-scan, you can use quiet mode. While using this mode, only the target IP address and MAC address are displayed.

Plain mode (-x)

If you want more less details like just the responding host details, you can use the plain mode. While using this mode, arp scan suppresses the header and footer text in output as shown below.

Ignore duplicates (-g)

By default, arp scan displays duplicate packets by flagging them with (DUP.n) where “n” is the number of times the target host responded. By specifying the option, these duplicate packets can be ignored by arp-scan.

Calculate and display round trip time (-D)

Network Packet round trip time (RTT) is the time it takes for a data packet to travel from a source to a destination and back again. It is a key matric to measure network latency and is usually measured in milliseconds. Setting this option, allows us to measure the round trip time.

Retry attempts (-r)

This option can be used to specify the number of retry attempts to make per host. By default arp-scan makes 2 retry attempts. For example let’s set it to 3.

timeout (-t)

By default, 500ms is the timeout for this tool. This option can be used to change it however.

Interval (-i)

If you have limited bandwidth to use for scanning with this tool, you can use this option to control the outgoing bandwidth by limiting the packet rate. For example, let’s set the interval between each packet to 400 milliseconds. It can also be set to micro seconds by appending the “u” option.

Bandwidth (-B)

This option is useful when you want to control the outbound bandwidth to a specific value. By default, bandwidth is 2,46,000 bits per second.

Resolve responding addresses to hostnames (-d)

This option is used to resolve the hostnames for addresses detected by this tool. The default output format will display the hostnames instead of the IPv4 address.

Limit the number of hosts to scan (-M)

By default, arp-scan scans all the hosts on the network that are LIVE. You can limit the number of hosts to scan using this option.

Posted on

JPS Virus maker: Beginners guide

Hello, aspiring ethical hackers. In our previous blogpost, you learnt how to create a virus from scratch. However, not always viruses are created from scratch in real-world. There are many virus makers available to easily create viruses. In this blogpost, you will learn about one such tool named JPS Virus maker.

Why we chose this tool particularly? There are numerous virus makers available on internet and for sale on dark web. We chose this tool because our intention is not to create a virus but just show you how easy it is to create a virus. An also because since its popular and harmless (because it is easily detected by even basic AV’s. Note that this is for education purpose only.

JPS virus maker runs on Windows. Once you download JPS virus maker to the Windows system, clicking on the executable opens a window as shown below. (Note that JPS virus maker is portable and needs to installation. Also note that Antivirus needs to be disabled while creating a virus with JPS virus maker. Otherwise Antivirus will flag it as malicious software.

Here, you can see all the functions of the virus maker. You can specify any or all functions you want to perform on the targets system. You can select a single function or multiple functions at once.

But first let us click on the “About” button to learn more about its creator.

You can see that it is written in Delphi. With the “server name” option, you can select the name for the virus you want to create from the given values. Let’s name it “sender.exe”.

Similarly, you can also set the name for your virus after successful installation on the system.

Below all the functions given for you to set for your virus, you can select the option to restart, log off, turn off and hibernate the target system. You can find additional functions for your virus by clicking on the button next to “Exit”.

You can even convert your virus into a worm. To understand the difference between virus and a worm, read our guide on malware. You can even select a icon for your virus. Let’s select PDF icon, for example.

After you select all the functions you want your virus to have, click on “Create Virus” and the virus will be created.

The virus is ready. Now all we need to do is to send it to the target and convince them to execute it. For this, you need to learn social engineering.

Posted on

Beginners guide to Hping3

Hello, aspiring ethical hackers. In this blogpost, you will learn about a tool named Hping 3. Hping3 is a network tool that can be used to send custom ICMP/TCP/UDP packets and to display target’s replies like ping does with ICMP. This tool can be used to perform echo requests, port scanning, test network performance using different protocols, perform traceroute, fingerprint target operating systems, test firewalls and even perform DOS attack.

Let’s see some of the uses of the this tool. For this we will be using Kali Linux on which hping3 is installed by default. As target, we will be using Metasploitable 2 set in our virtual hacking lab. So let’s begin with.

The simple way to use hping3 to specify a target IP address as shown below.

You can see that hping3 sends echo request messages and displays the replies.

Modes

Hping3 supports many modes and protocols. By default, it uses TCP protocol to send TCP header file to target system’s host port 0 with a window size of 64 without any TCP flags on.

The above image is of that only. However, hping3 supports more modes.

Raw IP mode:

In this mode, hping 3 will send IP headers with data appended to it.

ICMP mode:

In this mode, hping 3 will send ICMP echo requests which can also be modified.

UDP mode:

In this mode, hping 3 sends UDP to targets host’s port 0.

Listen mode:

In this mode, hping3 waist for incoming connections acting as a listener (waits for packets of a specified signature).

Scan mode:

In this mode, the tool expects as argument that describes groups of ports to scan. Port groups can also be specified using comma separated notation.

Detailed output (-V)

To get more detailed output while using this tool, verbosity level can be specified using “-v” option as shown below.

Spoofing your address (–spoof)

Hping 3 also allows you to spoof your address while using it as shown below.

Send data to a specific port (-p)

If you want to see how different ports on the target system are reacting to different packet, you need to send the packet using the ‘-p’ option. With this option, we can specify the destination port as shown below.

Number of packets to send (-c)

In the above example, hping 3 will continously send packets. You can even limit the number of packets to be sent using the ‘-c’ option. Let’s send only one packet to target port 80.

You can set the any number of packets you want.

In the above image, you can see that there are no replies from target port 80 to above request. That’s because we are sending a ping request to port 80 which belongs to HTTP. Let’s send the same packet to port 8 (echo request) and see the difference.

Now, we have a reply. Let us send a SYN request to port 80 of our target system and see the reply.

As you can see, we are getting SYN-ACK reply as expected. Let’s see how it reacts to ACK scan.

It’s replying with a RST flag. Just like this, we can perform all the scans that can be perform using NMap.

Denial of Service (DoS) attack

We can also perform DOS attack with hping3. Here are various options of sending a large number of packets to the target system or resource.

Fast:

With this option, hping3 will send 10 packets for second to the target. For example, let’s send SYN packets to target port 80.

Faster:

When we specify this option, it sends packet faster than the earlier option (fast).

Flood;

The name itself implies that it will send packets faster than the earlier option without taking care even to display incoming replies.

Posted on

Complete guide to fcrackzip

Hello, aspiring ethical hackers. In our previous blogpost, you learnt about various methods of password cracking. In this blogpost, you will learn about fcrackzip, a tool that can crack passwords of zip archives. Frackzip is a fast password cracker written in assembler. It can crack password protected zip archives using brute forcing or dictionary based attacks.

This tool is useful for pen testers while doing pen tests, ethical hackers and even cyber forensic experts. Sometimes in the course of a pen test or a cyber forensic investigation, you encounter password protected zip archives. They may be backups or confidential files. Cracking the password of the password protected archives can reveal information that can be helpful further in a pen test. That’s where fcrackzip comes real handy.

Let’s see how fcrackzip works. For this article, I will be using Kali Linux on which this tool is installed by default. We also need a password protected zip archive as shown below.

All you have to do to crack the passwords of the zip archive using fcrackzip is to give the below command.

fcrackzip <password protected zip archive>

This will bruteforce the password of the zip archive. This is same as using the brute force option which is set with ‘-b’ option.

Set the initial password to test or specify a dictionary(-p)

The ‘-p’ option of fcrackzip does two things. It can set initial password for brute forcing or it can be used to specify a wordlist while dictionary cracking.

Dictionary Cracking (-D)

You can set dictionary cracking by using option ‘-b’ as shown below.

Get a more detailed output (-v)

If you want a detailed and verbose output you can get it using the ‘-v’ option as always.

Characterset specification

You can also specify a character set you want to use while brute forcing with fcrackzip using the “-c” option as shown below. Here’s how we can set fcrackzip to use only numbers while brute forcing.

Here are the options you can set with ‘-c’.

a: Include all lowercase character.

A: Include all uppercase charcater.

I: Include digits (0-9)

!: Include symbols !:$%&/()=?{[]}+*^#

Verifying the cracked password

Till now you have seen that fcrackzip found many passwords. Well, all of them are not the correct passwords. Just like any password cracker there will be false positives while using this tool. We can weed out this false positives using unzip to extract the archive using the password fcrackzip claims to be found.

Specify the length of the password to use for cracking (-l).

Using this option, you can set the length of the password to use for brute forcing as shown below.

That’s how you use fcrackzip to crack password protected zip archives.