Posted on

Beginners guide to buffer overflow

Hello aspiring ethical hackers. In our previous blogpost, you learnt about remote code execution vulnerability. In this article, you will learn about buffer overflow vulnerability. This vulnerability is one of the most well known vulnerabilities but is also most common in software and apps. This vulnerability is also known as buffer overwrite vulnerability.

What is a buffer overflow?

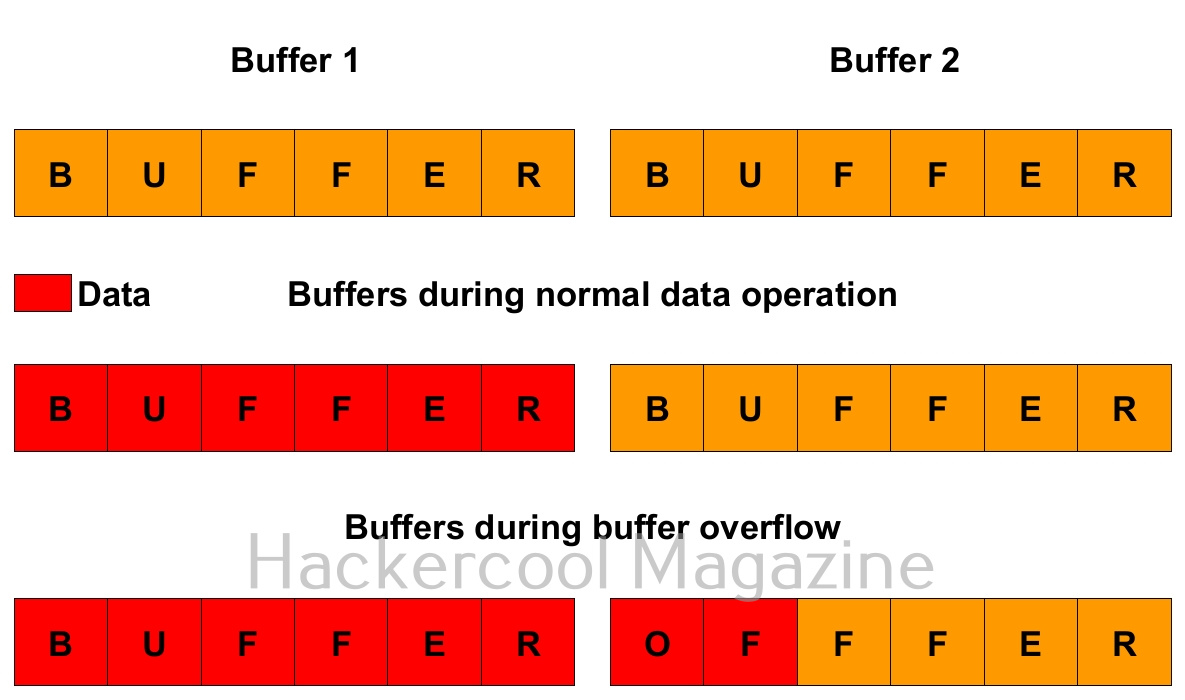
To understand what is a buffer overflow, you have to first understand what is a buffer. So, first, let’s start with that. A buffer is a name given to an allocated memory space in programming. Programs and applications use memory space to store data temporarily and while transferring. This memory space is allocated while writing the program. This allocated memory space is called a buffer or memory buffer.

What is buffer overflow? For example, let’s say there is a program that takes input from you. Let’s say that input is username. So the programmer allocates 8 bytes of memory buffer to the data you enter. What happens if the data you enter as username is more than that allocated memory space, let’s say 10 bytes. The additional 2 bytes of memory overflows the allocated buffer space and and occupies the adjacent memory locations. This is known as buffer overflow. Depending on the circumstances, buffer overflow can be very dangerous sometimes even leading to execution of malicious code.

Types of buffer overflow vulnerabilities

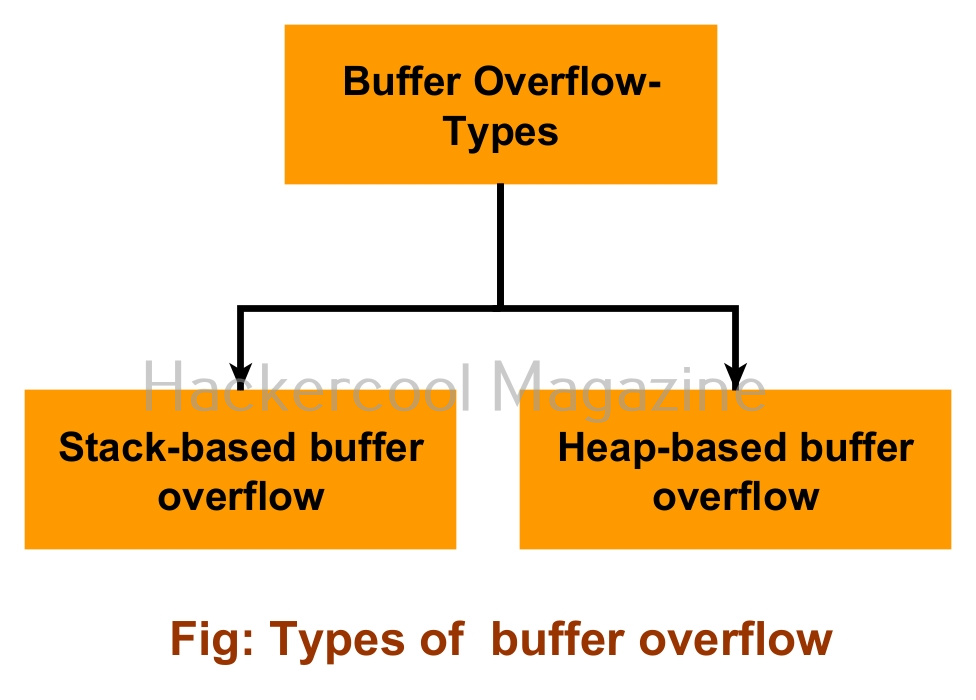
Since buffer overflow is the overflow of data in memory buffers, there are prominently two types of buffer overflow depending on how a data is saved. They are,

1. Stack based buffer overflow:

In programming, a memory stack is used to store local variables, function arguments etc. If a overflow occurs in stack memory, it is known as stack overflow.

2. Heap based buffer overflow:

In programming, a memory heap is used for dynamic memory allocation allowing users to create and manage memory blocks while executing the program. An overflow in a heap is known as Heap buffer overflow.

Practical demonstration

Let’s see buffer overflow practically. For this, we will be writing a simple C program named “hc_wyn” with the code shown below. We are doing this on Kali Linux.

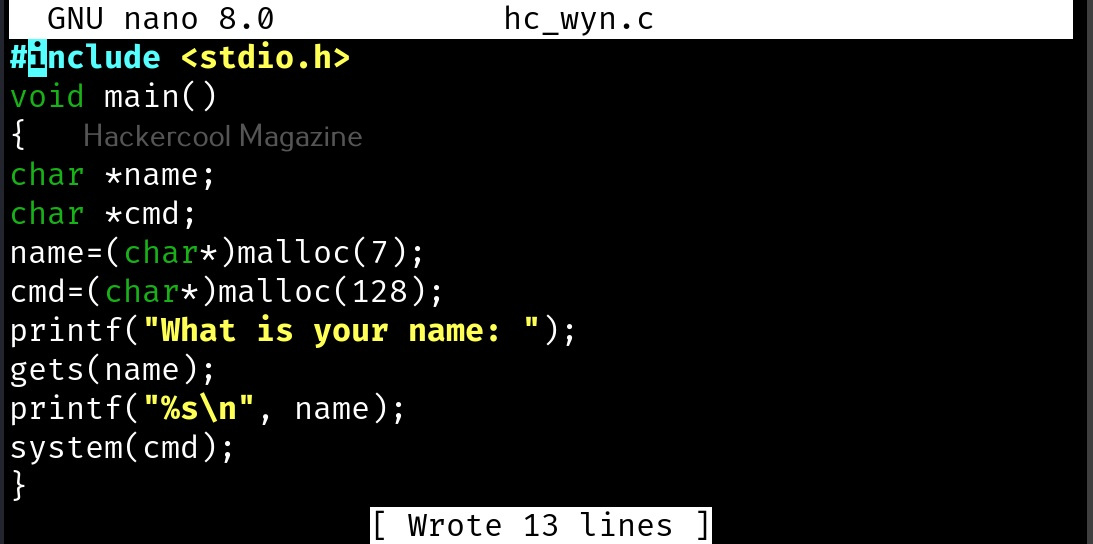
Let me explain the internal code of this program line by line. Let’s jump to the 4th and 5th line directly in which we are declaring two pointers “name” and “cmd”. In C, a pointer is a variable that holds the memory address of another variable. The asterisk symbol signifies a pointer to a char variable. In the 6th and 7th line of the program, we are using a C function named “malloc” which is used to dynamically allocate memory during runtime. As you can see, it allocates a memory of 8 and 128 bytes to ‘name’ and ‘cmd’ respectively. To put simply, we have created two buffers here, one of 8 bytes and other of 128 bytes.

In the 8th line, it will prompt users to enter their name. In the 9th line, we use a function gets() to read the line of input from stdin. Put simply, gets() reads the input the user has entered. This user input will be stored in memory buffer “name”. The code in 10th line will display the name anyone has entered as it is. In 11th line, we are using system() function. This function passes commands to the command processor of the operating system and returns output. Here, it will execute any command given to “cmd” variable. After we finish coding it, we compile the “hc_wyn.c” program using gcc as shown below.

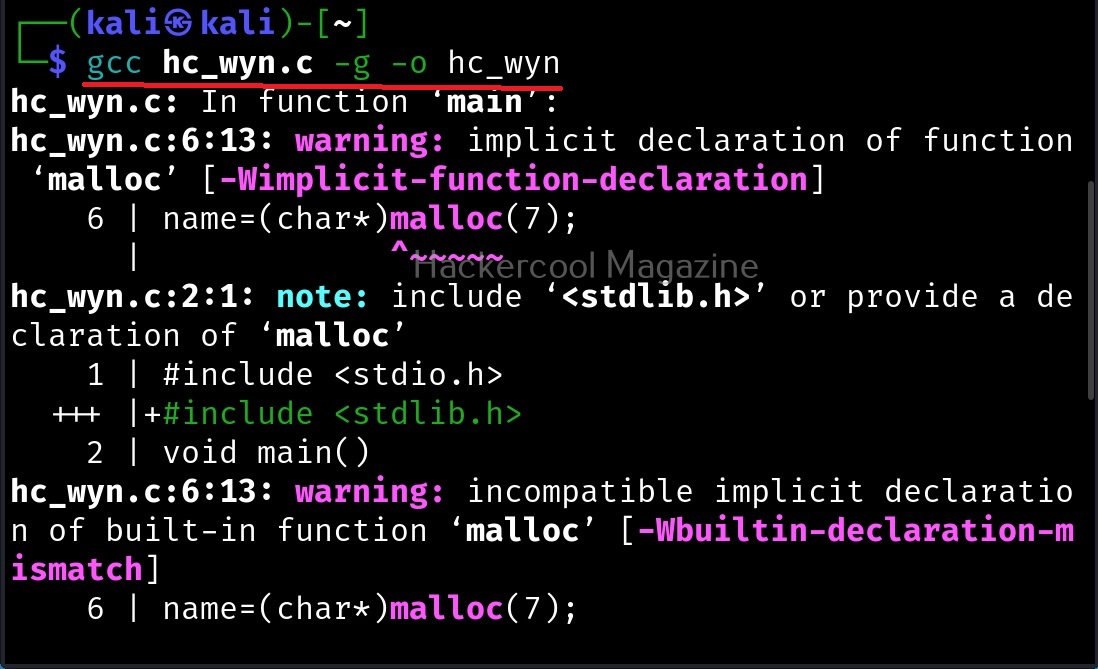
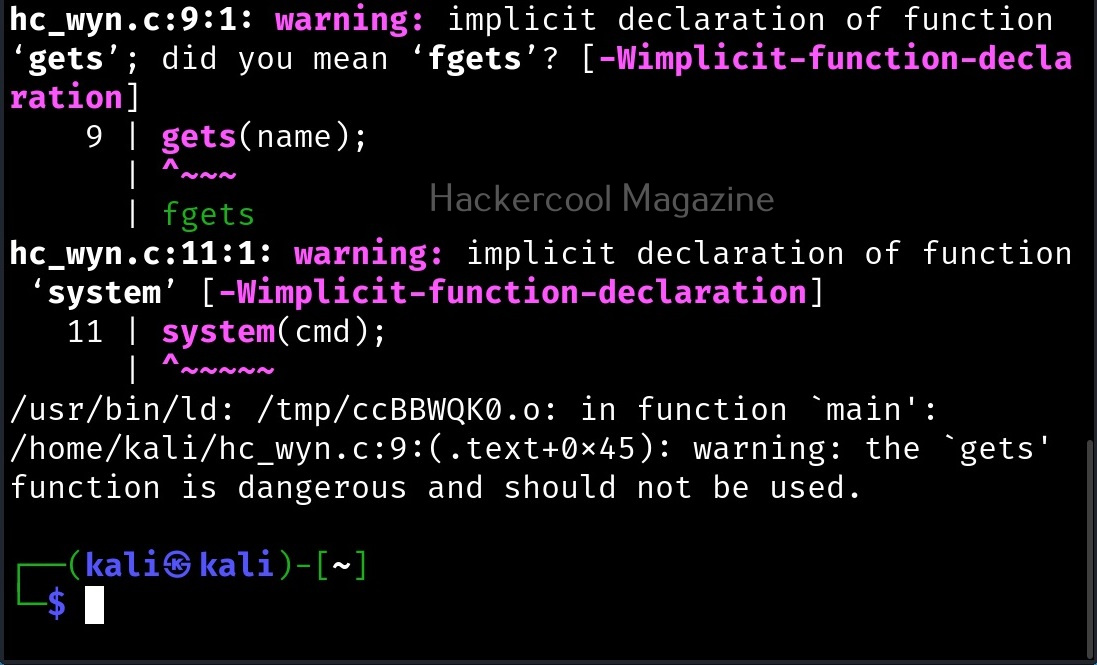
The compilation should pop up many warnings. As long as there are no errors, ignore the warnings for now. Let’s execute the compiled program as shown below.


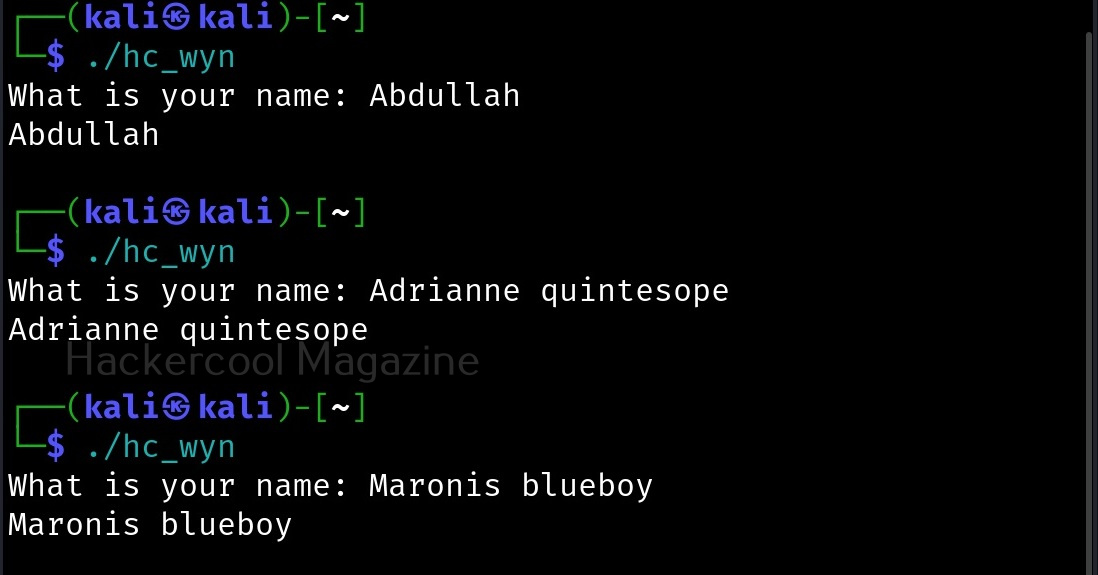
As it is intended to do, this program will output you back the name you typed. But when we enter a long name like “Cassandrius Thornston Gray mywills”, apart from returning back the name we entered, this program also returns what looks like output for Linux command “ls” as shown below.

Why did this happen? You might not have noticed but already a buffer overflow occurred here. To understand it clearly, let’s add three additional lines of code to our “hc_wyn” program as shown below.

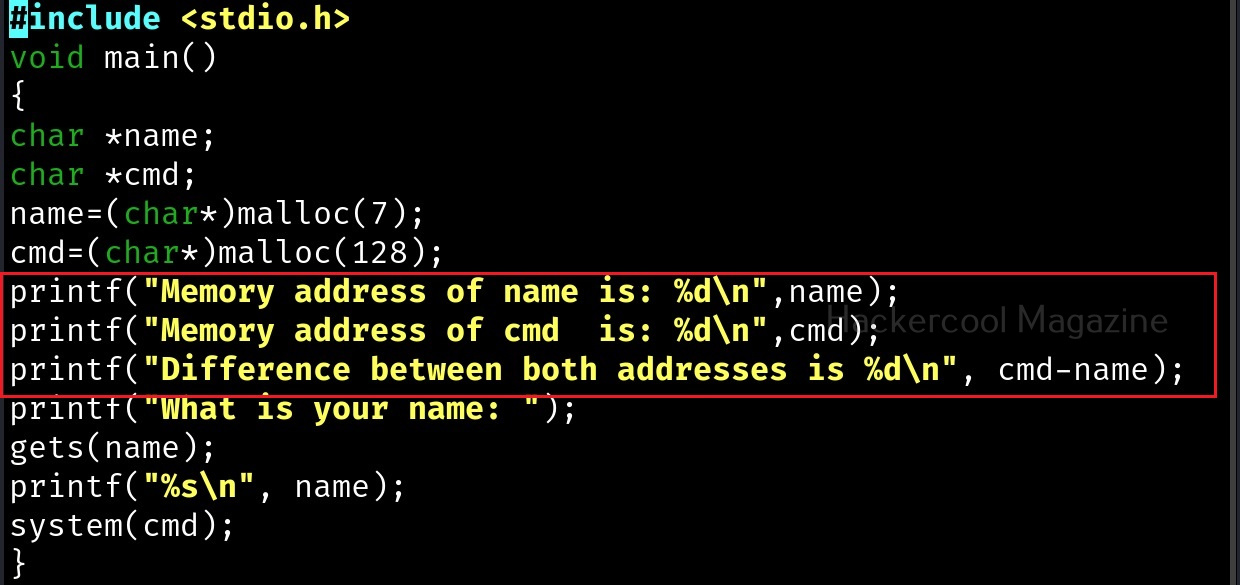
The first line of code we added prints the memory address of the variable “name”. The second line of code prints the memory address of variable “cmd”. The third line of code we added gives the difference between two memory addresses. What the third line of code does is that it gives us the length of the memory buffer of variable “name”. Note that these two buffers are adjacent to each other.

Let’s recompile the program again and execute it. The result is as shown below.

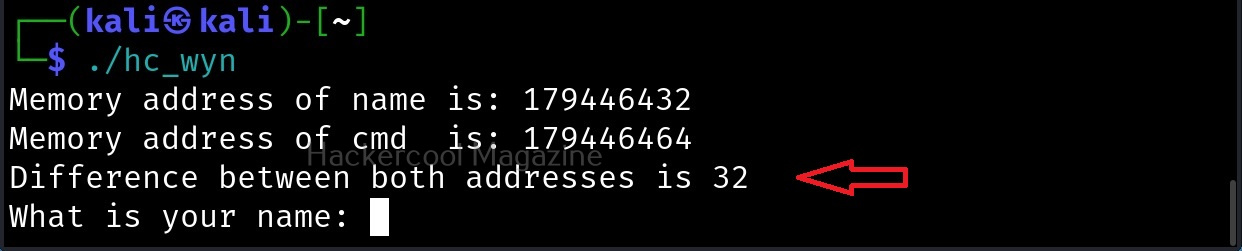
As you can see, the size of the buffer of variable “name” is 32 characters. Now let’s see what went wrong with the program when we entered name “Cassandrius Thornston Gray mywills”. Let’s start with counting the number of characters in the name we just entered.
Cassandrius: 11 characters.
Thornston: 9 characters.
Gray: 4 characters
mywills: 7 characters
Three spaces: 3 characters
Total characters: 11+9+4+7+3=34

So this name has 34 characters in total but the buffer for “name” can hold only 32 characters. So in this case the last two characters “ls” in the name overflowed to the adjacent buffer belonging to variable “cmd”. We already know what this does. It submits the input to the command processor and returns output. The output for “ls” command. This is how buffer overflow occurs.

But how is it possible. Now, go back to something I told you ignore a while back. The warnings while compiling the program “hc_wyn.c”. Focus on the use of gets() function. At the end it says the usage of gets() is dangerous. That’s because gets() function doesn’t perform bounds checking. It copies all input from STDIN to the buffer without checking size. Exactly this happened when we entered the large name.

Posted on

Shellcode injection for beginners

Hello aspiring ethical hackers. In our previous blogpost, you learnt what is shellcode from a hacker’s perspective and different types of shellcode. In this article, you will learn about shellcode injection.

What is shellcode injection?

Shellcode injection is the process in which we inject our own shellcode into vulnerable programs to be executed. Basically, shellcode injection consists of three steps. They are,

  1. Creating the shellcode
  2. Finding the vulnerable program and injecting the shellcode
  3. Modifying the execution flow of this vulnerable program to execute our shellcode.

Let’s see shellcode injection practically. Metasploit has a shellcode injection module which can be used to inject shellcode into Windows processes in memory. Let’ s see how this module works. This works after gaining access to a Windows system and grabbing a meterpreter session on it. Background the current session and load the windows shellcode inject module as shown below.

For this tutorial, we will use Donut tool create a shellcode of the mimikatz program.

Set the SESSION ID and other options given below.

Set the interactive option to TRUE . We need to do this so that we are not taken directly to the mimikatz shell. We also need to set the correct target architecture.

After all the options are set, we need to just execute the module as shown below.

shellcode injection with Metasploit

As you can see in the above image, we are directly into mimikatz shell.

Let’s see another example. This time we will show you how to perform shellcode injection into Windows executables. Windows  binaries are those binaries that are already present by default on a Windows system. Just imagine you are pen testing a Windows machine and you want to gain access to it without bringing any third party malware to the target system. How about using the files already present on the target system to execute your payload. This is also known as file less malware.

Windows by default has some genuine binaries for its own functions. However, these can be utilized by malicious actors to execute their own payload which is not benign. Examples of these binaries are regsrvr32.exe, notepad.exe, calc.exe and rundll32.exe etc. Rundll32.exe is a binary used in Windows to link library for other Windows applications. Of course, readers know about Notepad and Calculator.

For this tutorial, we will be using a tool named CactusTorch. CactusTorch  is a shellcode launcher tool that can be used to launch 32 bit shellcode which can then be injected into any Windows binaries. CactusTorch can be cloned from GitHub as shown below from here.

Once the repository is cloned successfully, we need to create shellcode. Cactus torch is compatible with Metasploit and Cobalt strike. So let’s use msfvenom to create 32 bit shellcode.

The shellcode is successfully created and is stored in payload.bin file.

Next, encode this payload using base64 encoding as shown below.

shellcode injection

This shellcode can be hosted in different formats as shown below. These formats are already provided by Cactustorch.

Let’s see the example of HTA file. Open the cactustorch.hta file using any text editor.

We can specify the binary you want to inject this shellcode into. For example, here we want to inject shellcode into rundll32.exe. Copy the base64 encoded shellcode at  “Dim code”. Save the file. Start a Metasploit listener as shown below.

Next, all we have to do is make the user on target system execute the cactus torch.hta file. This can be done using social engineering. As soon as this file is executed, we will get a successful meterpreter session as shown below.

Similarly, this shellcode can be hosted in JavaScript and also VB script and VBA files to be injected.

Posted on

Installing MATE Desktop in Kali Linux

Hello readers. Today our readers will learn about installing mate desktop in Kali Linux. You all know the first release of Kali Linux this year, Kali Linux 2020.1 has been released in the month of January. The latest version brought many changes like not giving root user by default and some new tools. The most distinct change it brought is a single installer image for installation. Earlier we had different installation images for different desktop environments which include GNOME, KDE etc.
With 2020.1 release, there will be a single installation image for all these and users would have to select the desktop environment he/she needs while installing. The information about different desktop environments and their pros and cons can be seen here.

Today we will see a tutorial on how to install MATE Desktop environment in Kali Linux 2020.1. MATE Desktop although looks old fashioned is light and has a simple interface. Here’s how to install MATE desktop environment in Kali Linux 2020.1. We have performed this tutorial from a X11 terminal but all these commands can be run from any other desktop environment’s terminal. Power on the Kali 2020.1 virtual machine and login (since there is no root user you should login as a user you created or the default user:password i.e kali:kali).

Open a terminal and using nano open the file /etc/apt/sources.list. with sudo

Add these two lines of code to the file and save it.
deb http://kali.download/kali kali-rolling main non-free contrib
deb-src http://kali.download/kali kali-rolling main non-free contrib

To save the file hit CTRl+X and when it prompts select “Yes”.Run command sudo apt-get update

Now everything is ready to install MATE desktop. Run the command given below.
sudo apt-get install mate-core mate-desktop-environment-extra mate-desktop-environment-extras

installing mate desktop in kali

When the system prompts you for permission to install MATE and its related software, type “Y”.

The installation will take some time to finish. After the installation is finished, restart the system (the command is sudo reboot or reboot if you are doing it from terminal). Once the system reboots and takes you to the login screen, before logging in click on the “settings” icon beside the “Signin” button. There you will see all the desktop environments present on the system right now. Select MATE and then login.

Installing MATE desktop has been successfully finished with this.

Liked this article? Learn advanced ethical hacking tutorials in our Monthly Magazine. Enjoy Free for 3 months.

Posted on

Meterpreter archmigrate module

Hello aspiring ethical hackers. In our previous blogpost, you learnt all about the meterpreter payload. In this blogpost, you will learn about the archmigrate module of Metasploit. This module checks if the meterpreter architecture is the same as the Operating System architecture (OS) and if it’s incompatible it spawns a new process with the correct architecture and migrates into that process. It is a POST module.

What is architecture? As we all know there are two main system architectures 32bit and 64bit. Sometimes, we happen to select a 32bit meterpreter payload for a 64bit target system.

Sometimes there may be compatibility issues if we get a 32bit meterpreter session on a 64bit machine and vice versa. This is the exact scenario in which this module is helpful. To overcome the problems of incompatibility, we need to get a new 64bit meterpreter session or just use the archmigrate module to create a new process with the same architecture as the target OS and migrate to that process. Let’s see how this module works.

To use this module, we need to background the current meterpreter session using command “background”. Then load the archmigrate exploit as shown below. Type command “show options” to have a look at the options it requires.

meterpreter architecture migration from 32bit to 64bit and vice versa

We need to only set the session id of the meterpreter session we just sent to background and the exploit is good to go.

If you see in the above image, our exploit failed to run for the first time. This is because in the previous session we had system privileges and if we run this module we may lose the system privileges. But don’t worry, we can change the options to overcome this problem.

Set “ignore_system” option to true and you should be fine to go. This time the exploit ran successfully. As you can see in the above image, our target is a 64bit machine and our meterpreter migrated to a 64bit process successfully. Lets check by typing command “sessions -l” to see the available sessions. You can see we have a 64bit meterpreter session now. Job performed.

Posted on 1 Comment

Upgrade command shell to meterpreter

Hello aspiring ethical hackers. In our previous blogpost, you learnt everything about the power of meterpreter. However, in real-world, you are not so lucky to get a meterpreter session every time. Most of the times, you will get a normal command shell. Don’t worry. you can upgrade command shell to meterpreter. The good thing is we can do it from Metasploit only.

In this blogpost, we will be showing you how to do this. First thing we need to do after getting a normal command shell is to background the current command shell by hitting CTRL+Z. Be careful not to press “CTRL+C”. That will completely abort the session altogether. If it happened by mistake ( like it happened to me below), select “no” when it asks whether to abort a session. Then hit CTRL+Z and select Yes. Your session has been sent to background. Remember the session number. In our case, this is 3.B

Next, load the shell_to_meterpreter module as shown below. We need only one option for this module to work. The session id of the session we just sent to background and I told you to remember.

Image explaining about upgrading command shell to meterpreter

Specify the session id and run the exploit as shown below. We will get the meterpreter session.

Type command “sessions -l” to see all our sessions as shown below.

We can load the meterpreter session as shown below.

If you found that helpful. Please check out my monthly magazine. That is how we upgrade normal shell to meterpreter. Learn how to change x86 meterpreter to x64 and vice versa.