Posted on

Digital Forensics with Autopsy : Part 2

Hello aspiring Computer Forensic Investigators. This article is the second part of performing Digital Forensics with Autopsy. Read the first part here. So let’s continue answering the questions presented by the case.

11. When was the last recorded computer shutdown date/time?

The last recorded shutdown date and time can be found out in the following file in Windows.

“C:\WINDOWS\system32\config\software\Microsoft\WindowNT\CurrentVersion\Prefetcher\ExitTime”

digital forensics

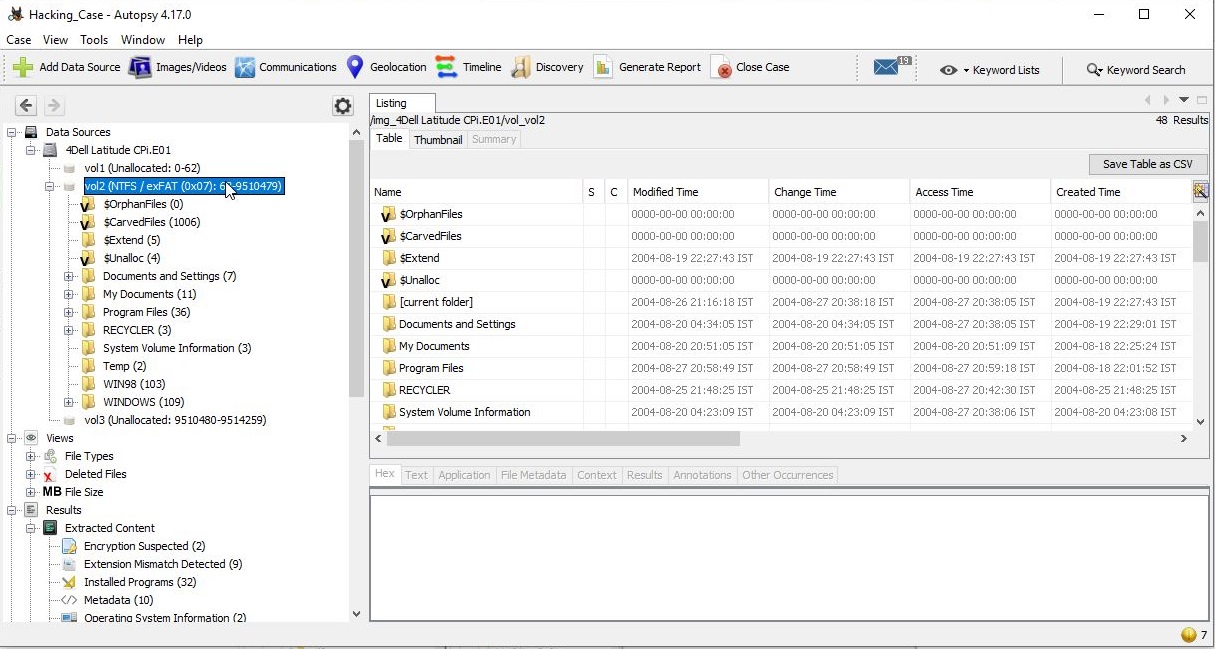
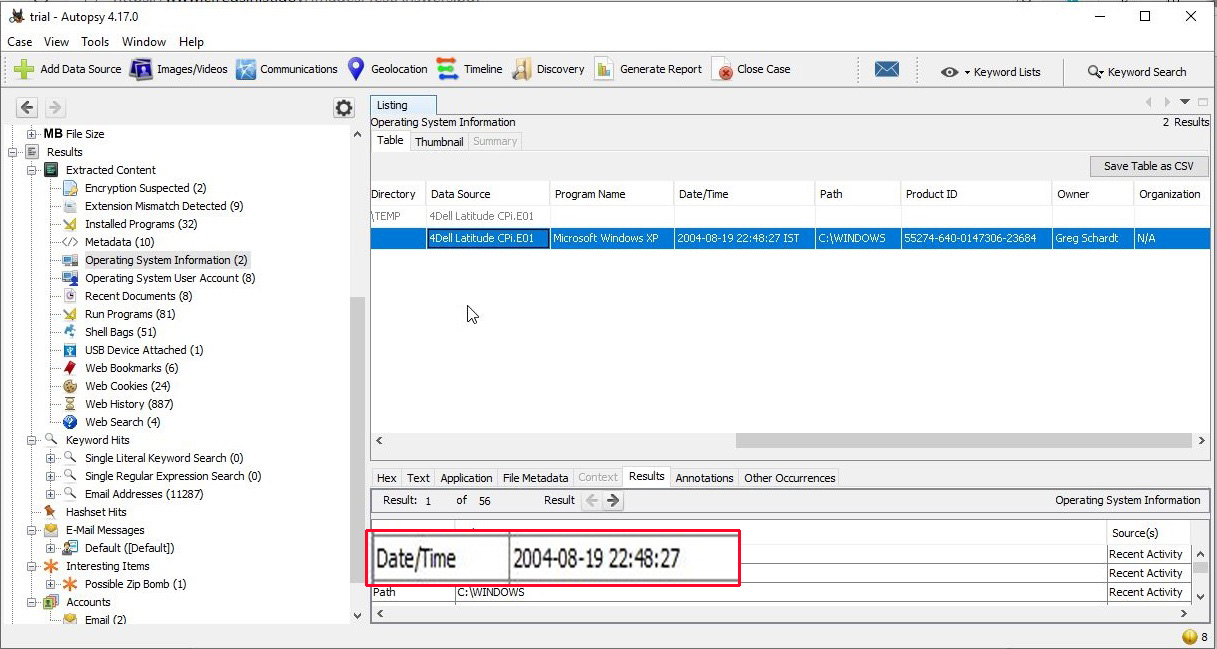
The shutdown date and time is 2004/08/27 10:46:27.

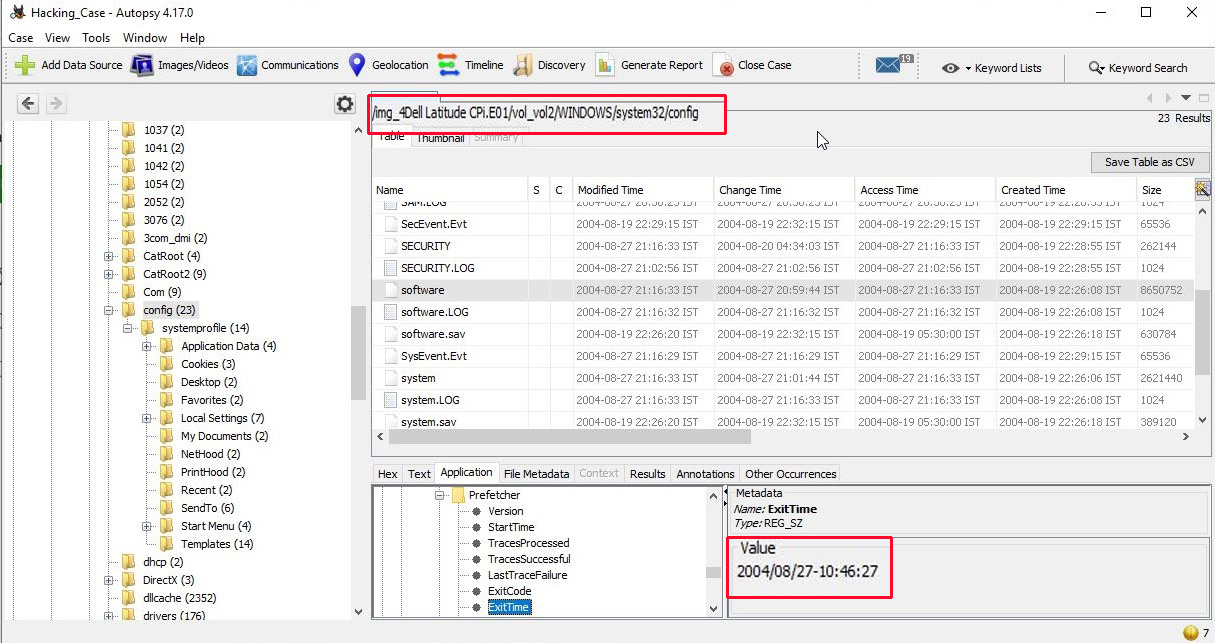
12. List the network cards used by this computer?

The information about the network cards on this computer can be found in the Windows file “C:\WINDOWS\system32\config\software\Microsoft\WindowNT\CurrentVersion\NetworkCards”

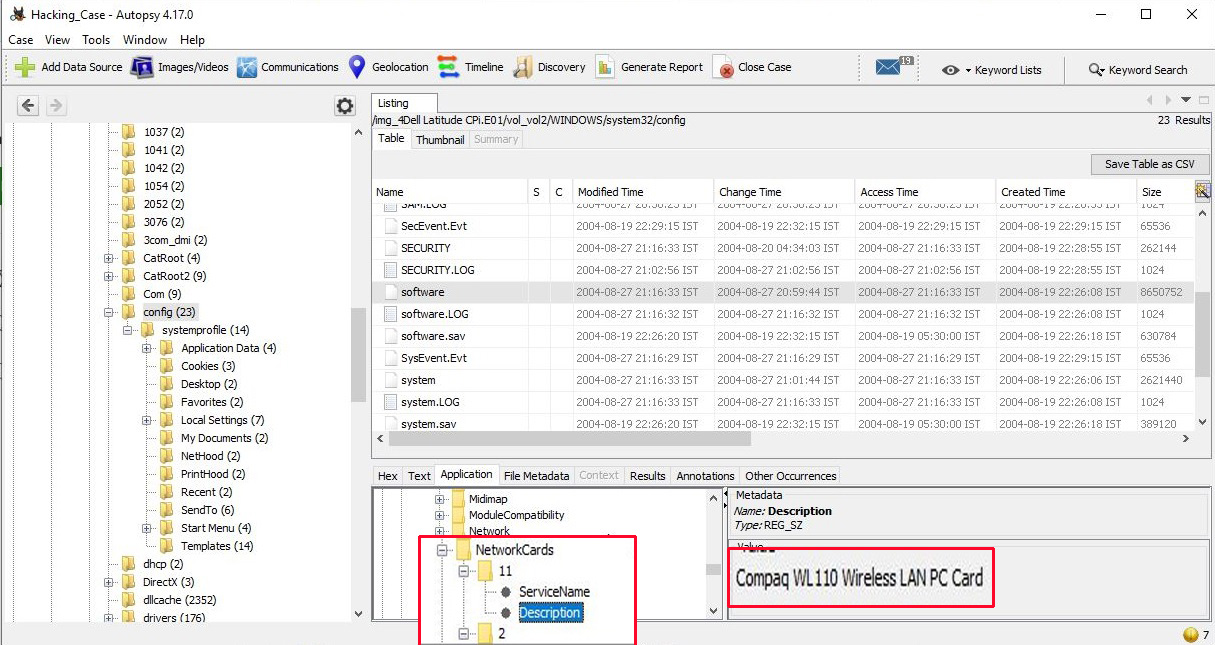
There are two network cards on this system. One is a Compaq WL 110 Wireless LAN PC Card and another is Xircom CardBus Ethernet 100 + Modem 56 (Ethernet Interface).

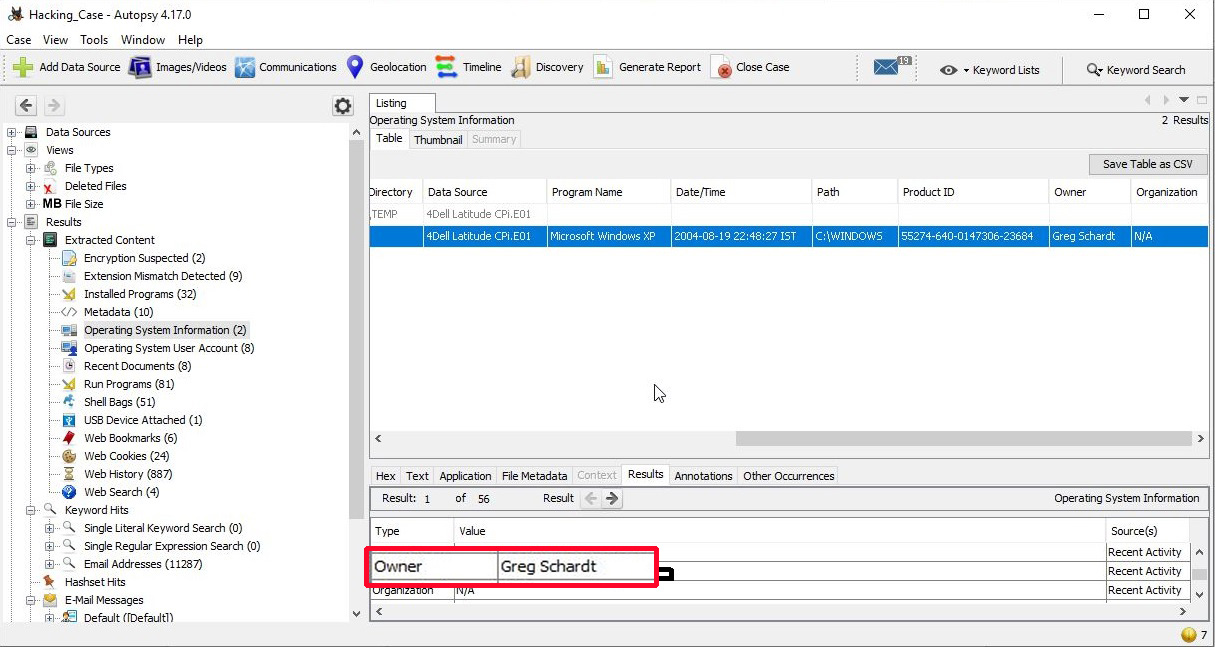
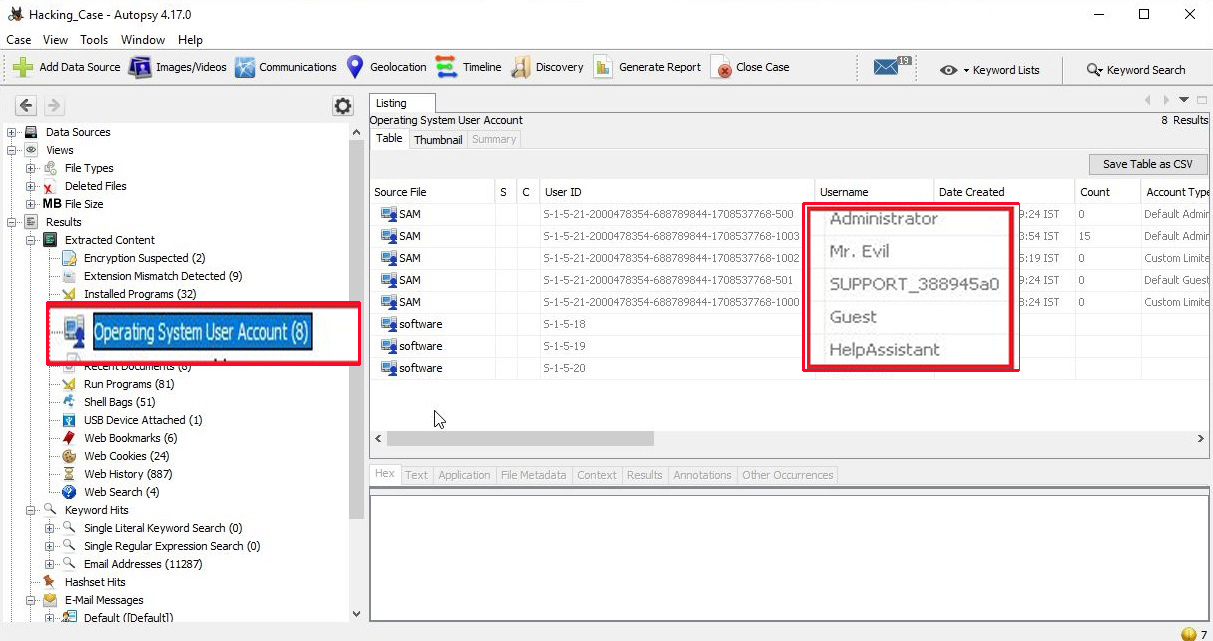
13. A search for the name of “G=r=e=g S=c=h=a=r=d=t” (The equal signs are just to prevent web crawlers from indexing this name; there are no equal signs in the image files) reveals multiple hits. One of these proves that G=r=e=g S=c=h=a=r=d=t is Mr. Evil and is also the administrator of this computer. What file is it? What software program does this file relate to?

The file that reveals all this information is “C:\Program Files\Look@LAN\irunin.ini”

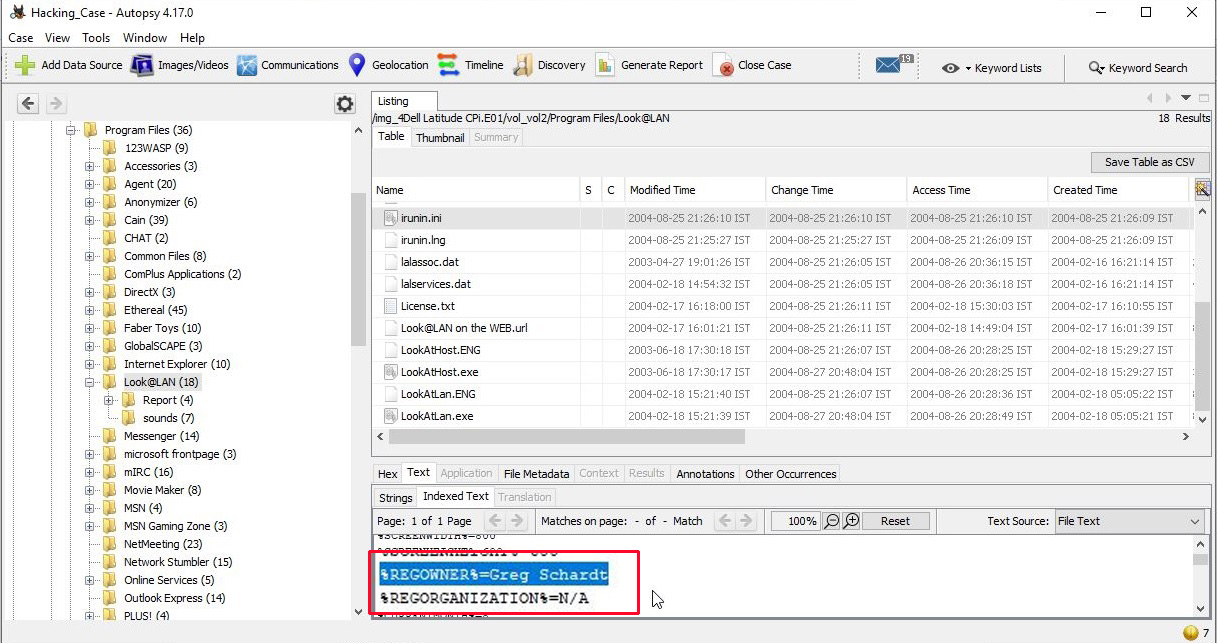
his file belongs to the program Look@LAN.

14. This same file reports the IP address and MAC address of the computer. What are they?

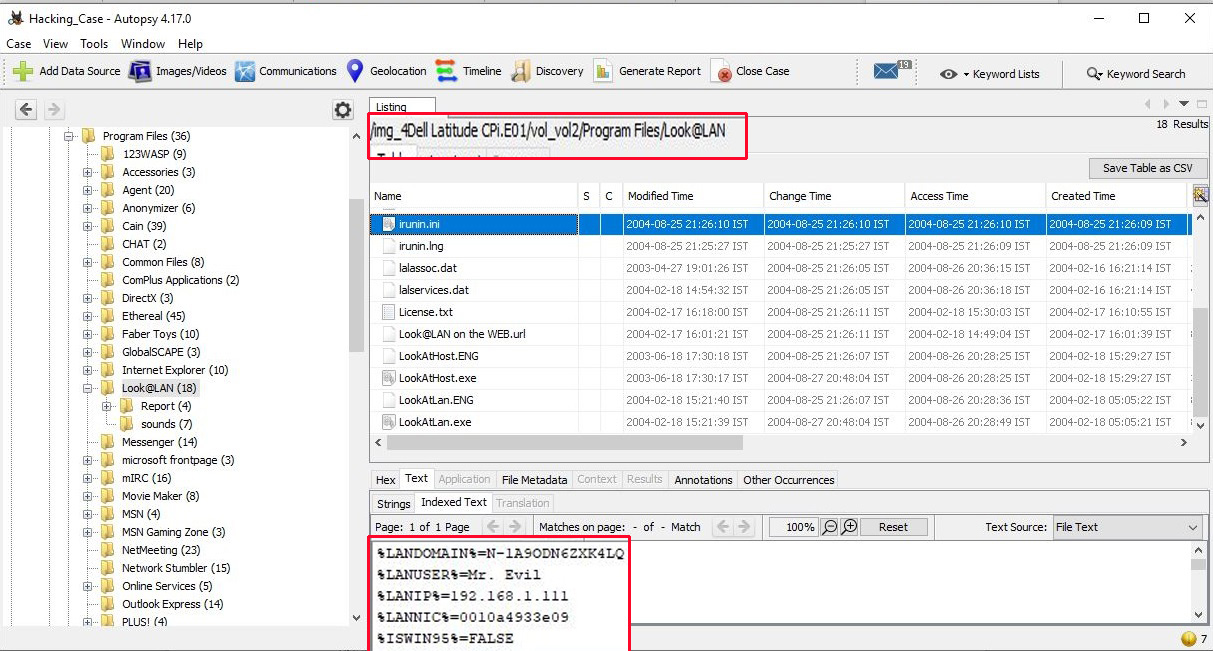
The IP address of this machine is 192.168.1.111 and the MAC address is 0010a4933e09. The LAN user is Mr. Evil. This confirms that Mr. Evil and Greg Schardt are one and the same.

15. An internet search for vendor name/model of NIC cards by MAC address can be used to find out which network interface was used. In the above answer, the first 3 hex characters of the MAC address report the vendor of the card. Which NIC card was used during the installation and set-up for LOOK@LAN?

Media Access Control (MAC) address or the physical address is a 12 digit hexadecimal number hardcoded to the NIC card. The first 3 hexadecimal characters reveal the vendor of the NIC card. There are many websites which offer this service of knowing the vendor of the NIC card. Pasting the MAC address of the computer reveals the vendor.

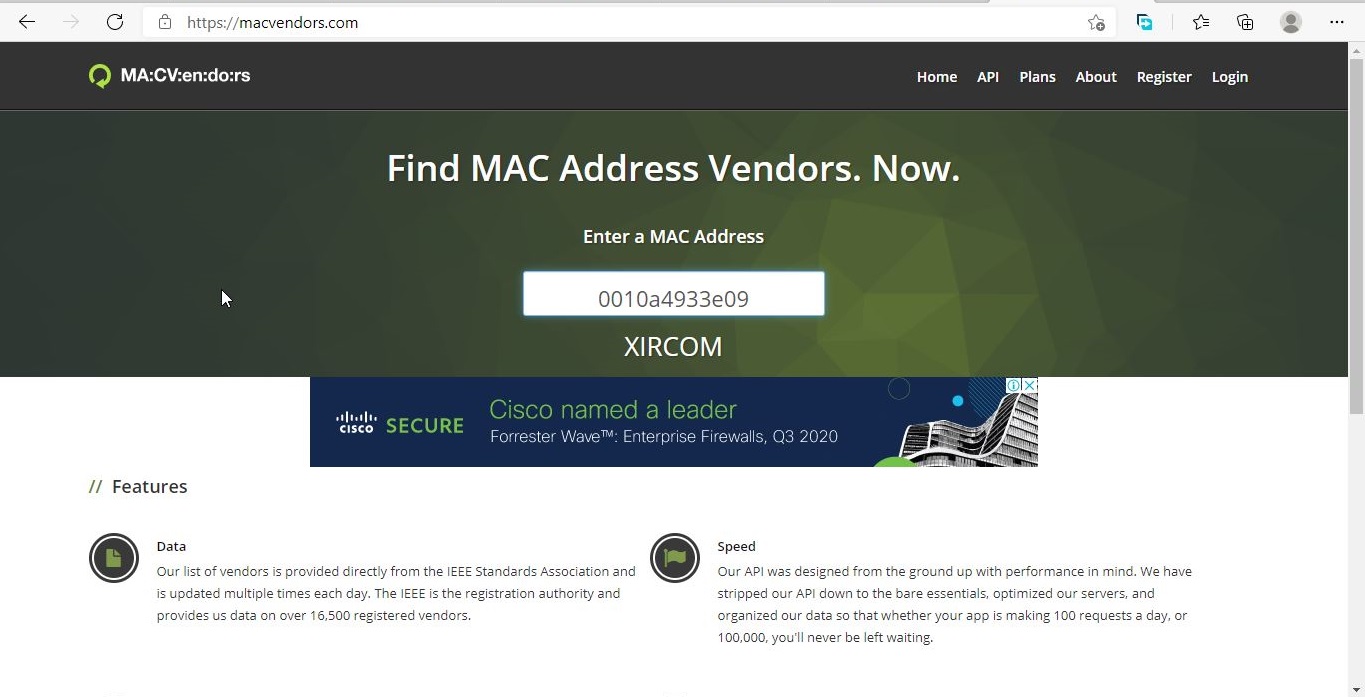
The Vendor of this NIC card is XIRCOM.

16. What is the SMTP email address for Mr. Evil?

SMTP or Simple Mail Transfer Protocol is a protocol used to send emails. The SMTP email address if present on the system can be found in “C:\Program Files \Agent\Data\AGENT.INI file”.

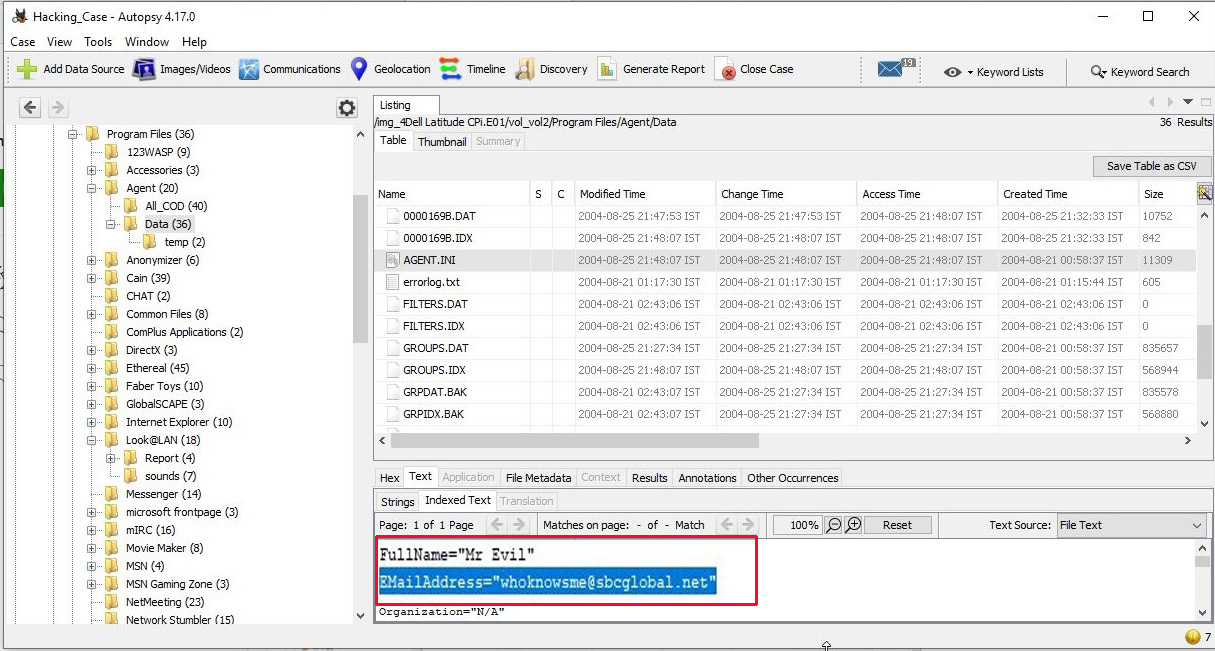
The SMTP email address is “[email protected]”.

17. What are the NNTP (News Server) settings for Mr. Evil?

This information can be found in the same file as above.

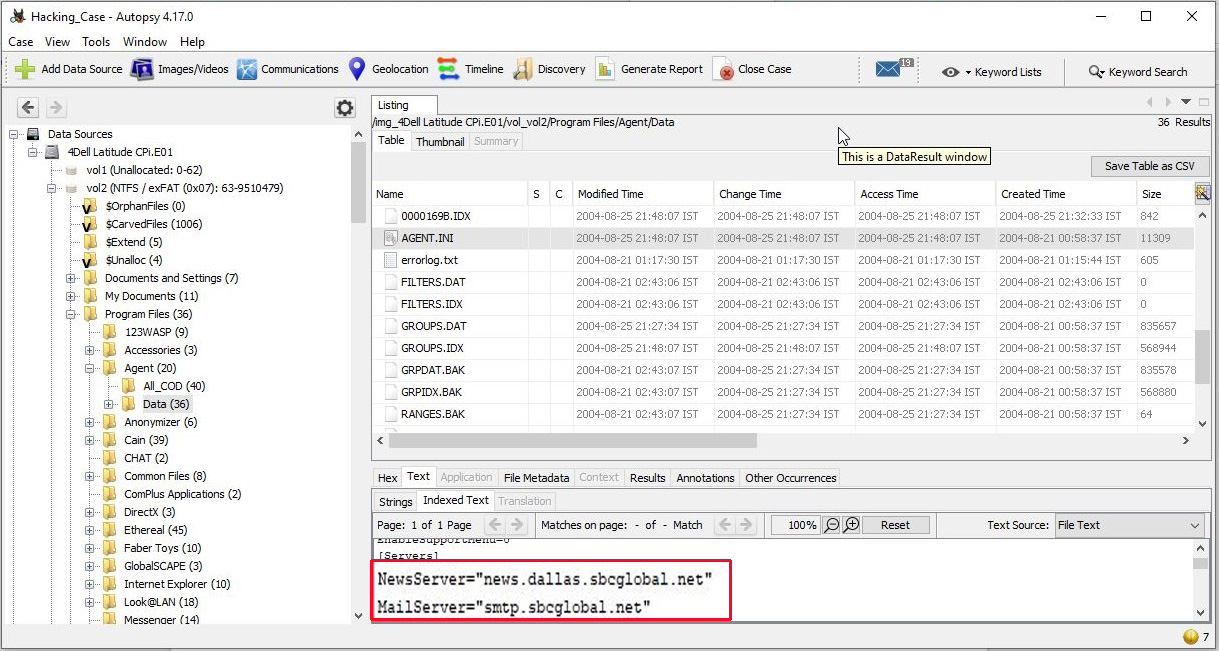
The news server being used is “news.dallas.sbcglobal.net”.

18. What two installed programs show this information?

We searched for local settings of all programs and found the information about this news server in the local settings of Outlook Express.

We found this information in the documents and settings file (and above shown path) of user Mr. Evil.

19. List 5 newsgroups that Mr. Evil has subscribed to?

We can find this information in the same file as above.

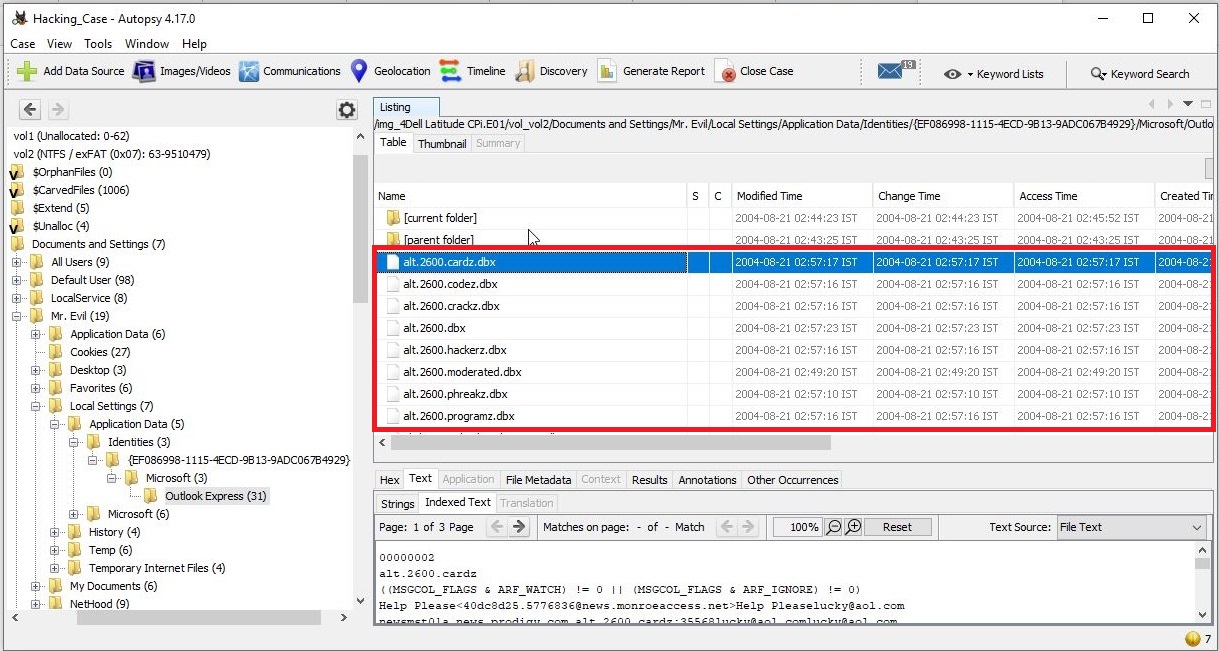
User Mr. Evil subscribed to over 23 news groups. The news groups subscribed by the user Mr. Evil are,

  1. Alt.2600.phreakz 2. Alt.2600 3. Alt.2600.cardz 4. Alt.2600codez 5. Alt.2600.crackz 6. Alt.2600.moderated 7. Alt.binaries.hacking.utilities 8. Alt.stupidity.hackers.malicious 9. Free.binaries.hackers.malicious 10. alt.nl.binaries.hack 11. Free.binaries.hacking.talentless.troll_haven 12. alt.hacking 13. free.binaries.hacking.beginner 14. alt.2600.programz 15. Free.binaries.hacking.talentless.troll-haven 16. alt.dss.hack 17. free.binaries.hacking.computers 18. free.binaries.hacking.utilities 19. alt.binaries.hacking.websites 20. alt.binaries.hacking.computers 21. alt.binaries.hacking.websites 22. alt.binaries.hacking.beginner 23. alt.2600.hackerz

20. A popular IRC (Internet Relay Chat) program called MIRC was installed. What are the user settings that were shown when the user was online in a chat channel?

We can find this information in the .ini file of the installed program MIRC. The path to this program is in “C:\Program Files\mIRC\mirc.ini”

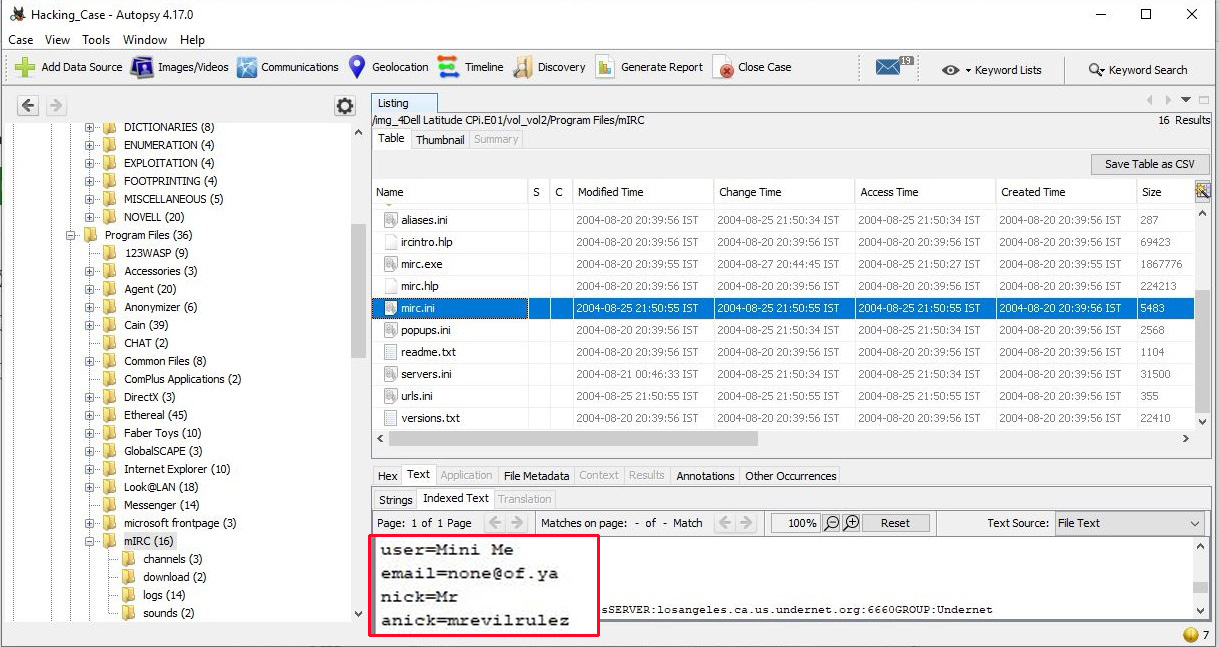
The user settings that were shown when the user was online and in a chat channel are
user = Mini Me
email = [email protected]
nick = Mr
anick = mrevilrulez

21. This IRC program has the capability to log chat sessions. List 3 IRC channels that the user of this computer accessed?

This information can be accessed from C:\Program Files\mIRC\logs file.

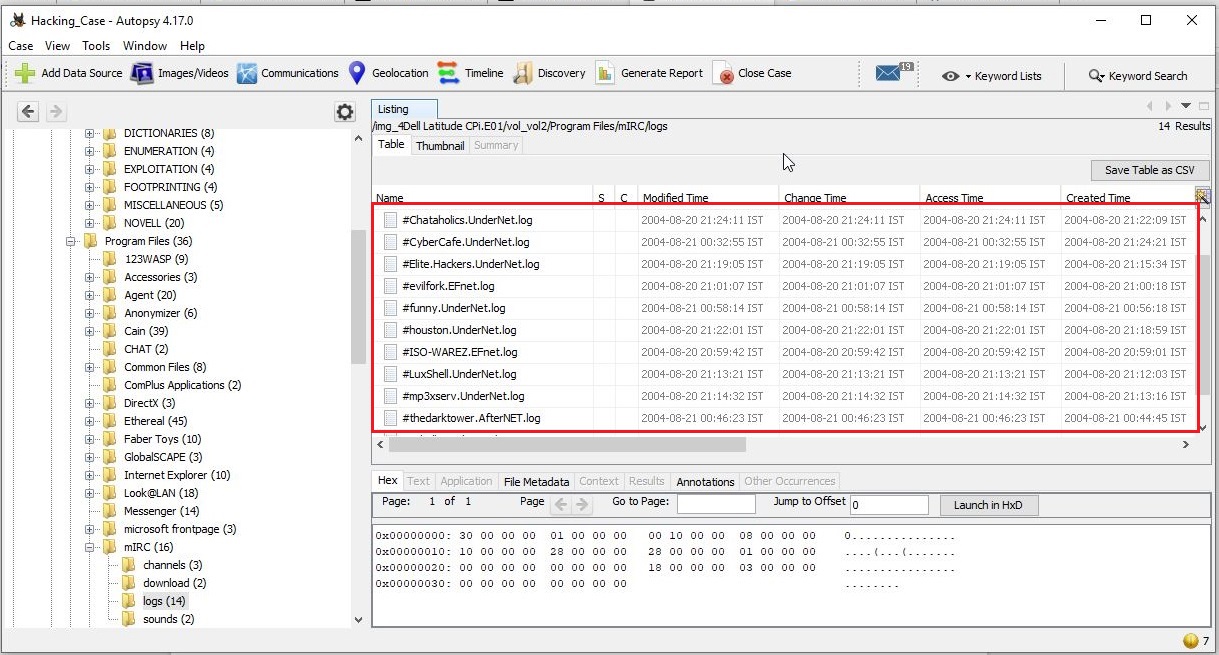
The IRC channels that this user accessed are
Ushells.undernet.log
Elite.hackers.undernet.log
Mp3xserv.undernet.log
Chataholics.undernet.log
Cybercafé.undernet.log
M5tar.undernet.log
Thedarktower.afternet.log
Funny.undernet.log
Luxshell.undernet.log
Evilfork.efnet.log
Iso-warez.efnet.log
Houston.undernet.log

22. Ethereal, a popular “sniffing” program that can be used to intercept wired and wireless internet packets was also found to be installed. When TCP packets are collected and re-assembled, the default save directory is that users\My Documents directory. What is the name of the file that contains the intercepted data?

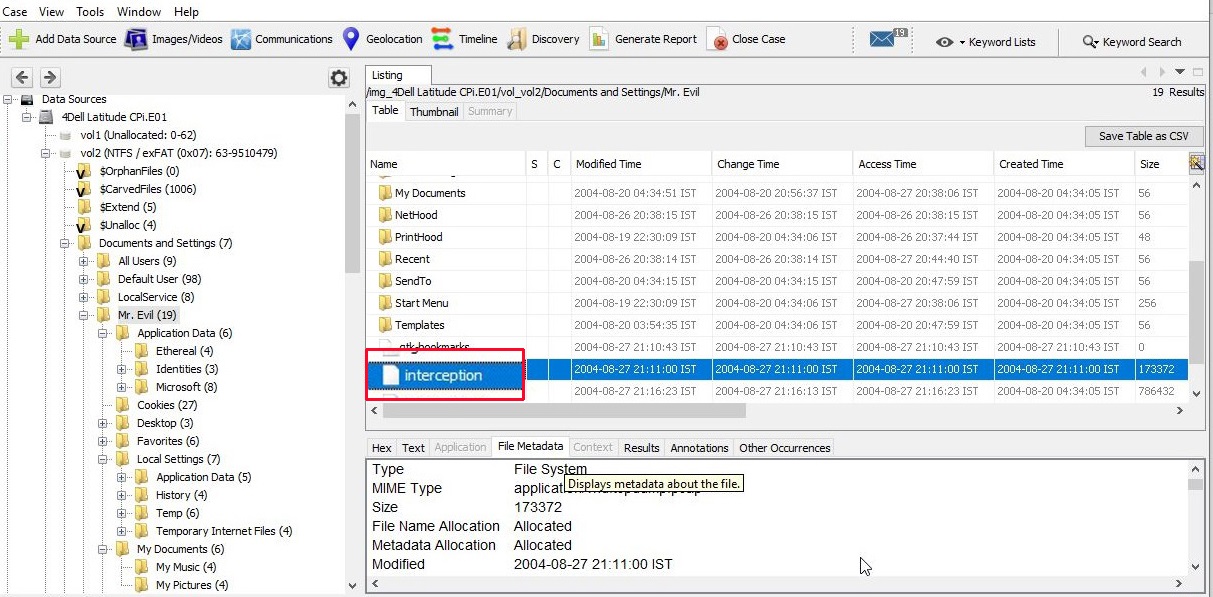
After going through the Documents folder, we found the file that contains the intercepted data. It’s name is “interception”.

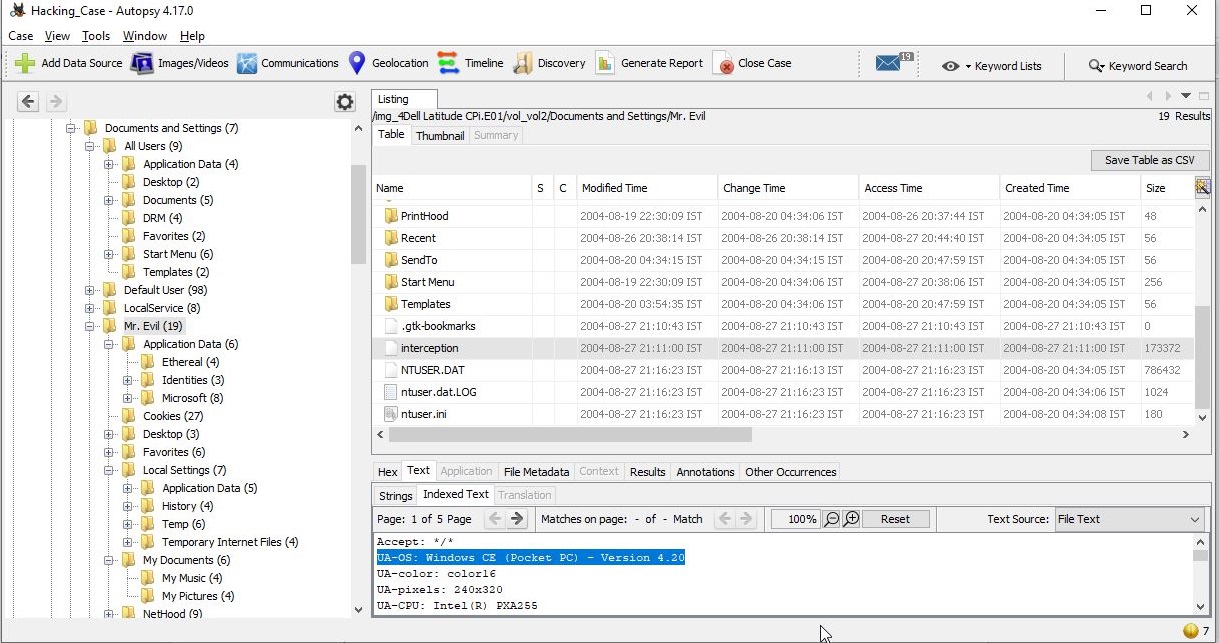
23. Viewing the file in a text format reveals much information about who and what was intercepted. What type of wireless computer was the victim (person who had his internet surfing recorded) using?

Viewing the file “interception” in text format revealed that the victim was using Windows CE Pocket PC wireless computer.

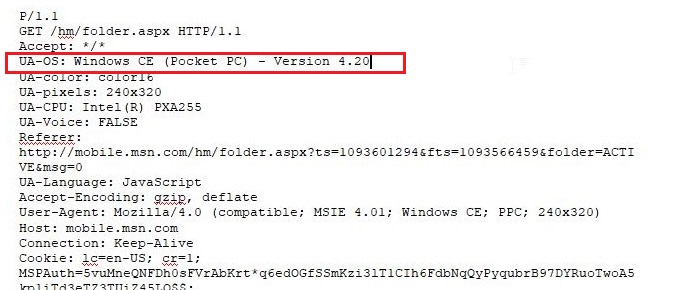
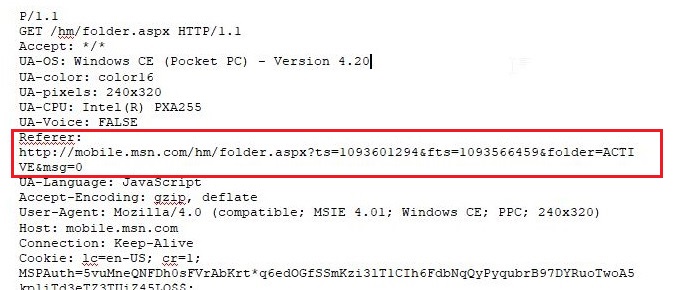
24. What websites was the victim accessing?

Even this information can be obtained from the same file “interception” which is a packet capture file. We found two websites the victim was accessing, Mobile.msn.com and MSN Hotmail Email.

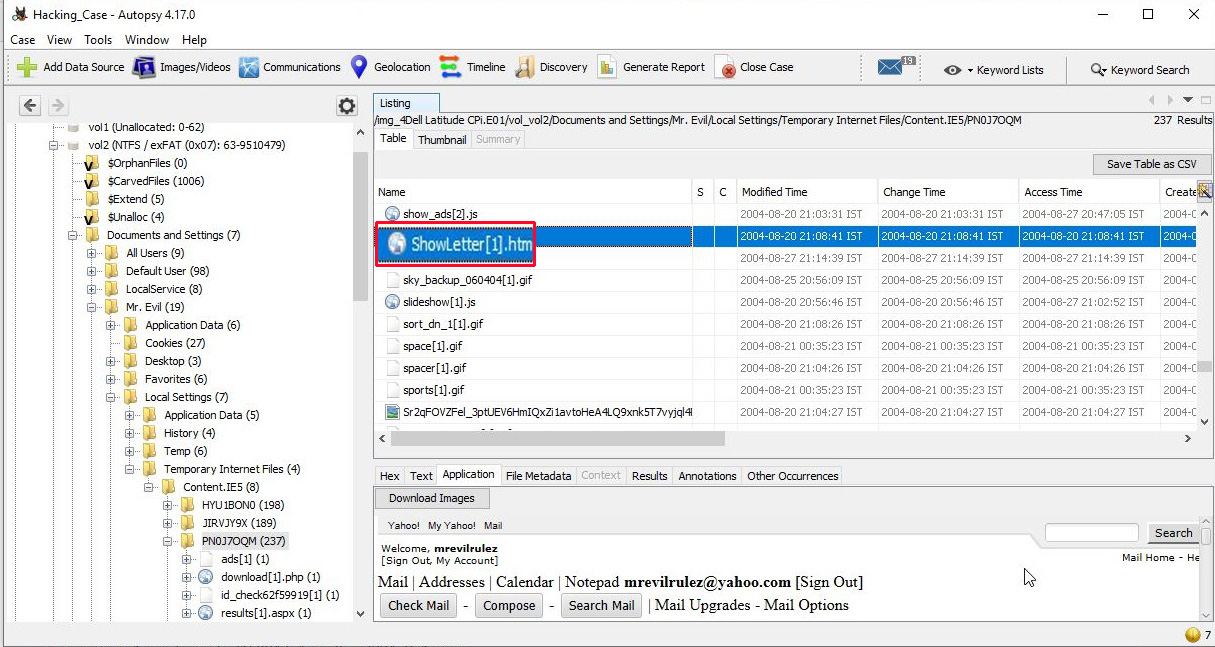
25. Yahoo mail, a popular web based email service, saves copies of the email under what file name?

Yahoo mail saves copies of email under the file name “ShowLetter[1].htm” which is in the temporary internet files folder of the user’s Documents and Settings.

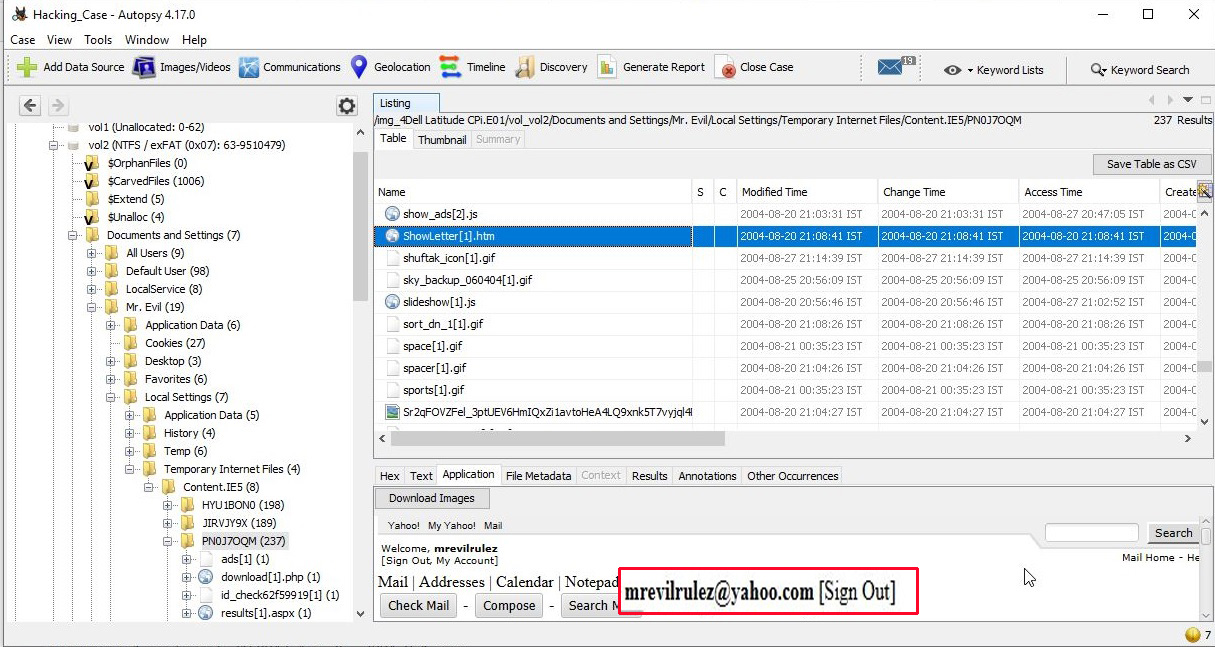
26. Search for the main user’s web based email address. What is it?

This information can be found out in the same file. The main user’s web based email address is [email protected].

27. How many executable files are in the recycle bin?

The contents in the Recycle bin can be found in the RECYCLER folder.

There are in total four executable files in the Recycle bin.

28. Are these files really deleted?

As most of our readers already know, the files that go to the Recycle Bin are not permanently deleted. They are only deleted temporarily and can be restored easily to their actual location in Windows.

29. How many files are actually reported to be deleted by the file system?

This information can be found out from the INFO2 file.

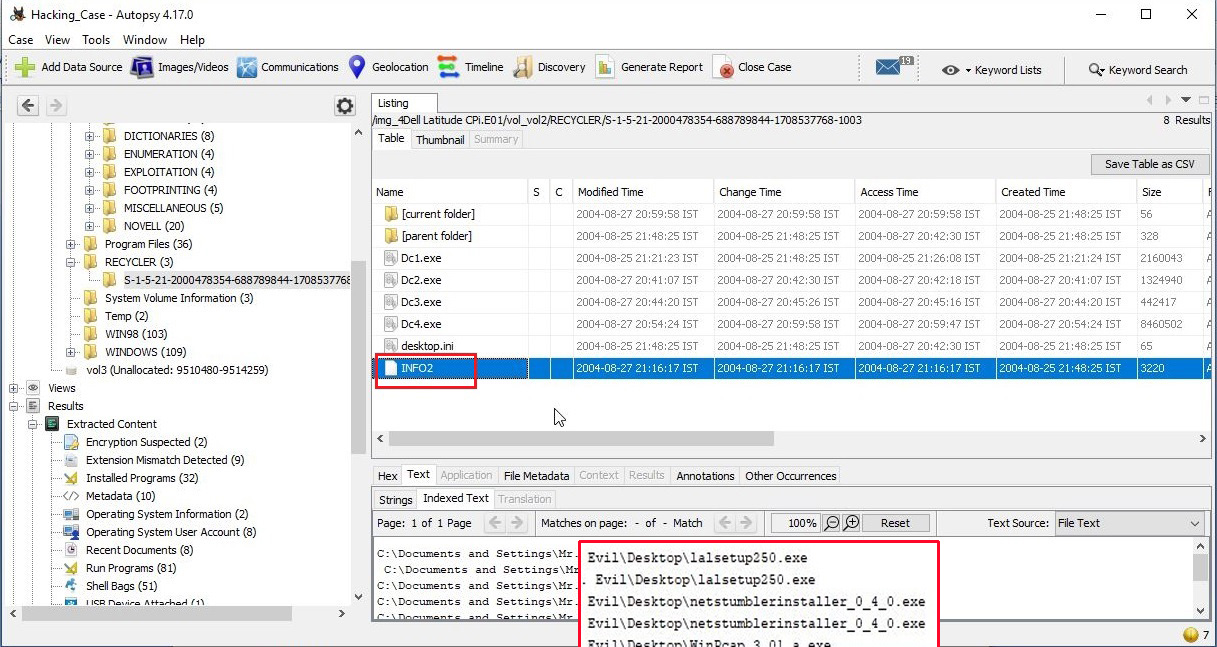
The actual files deleted are three.

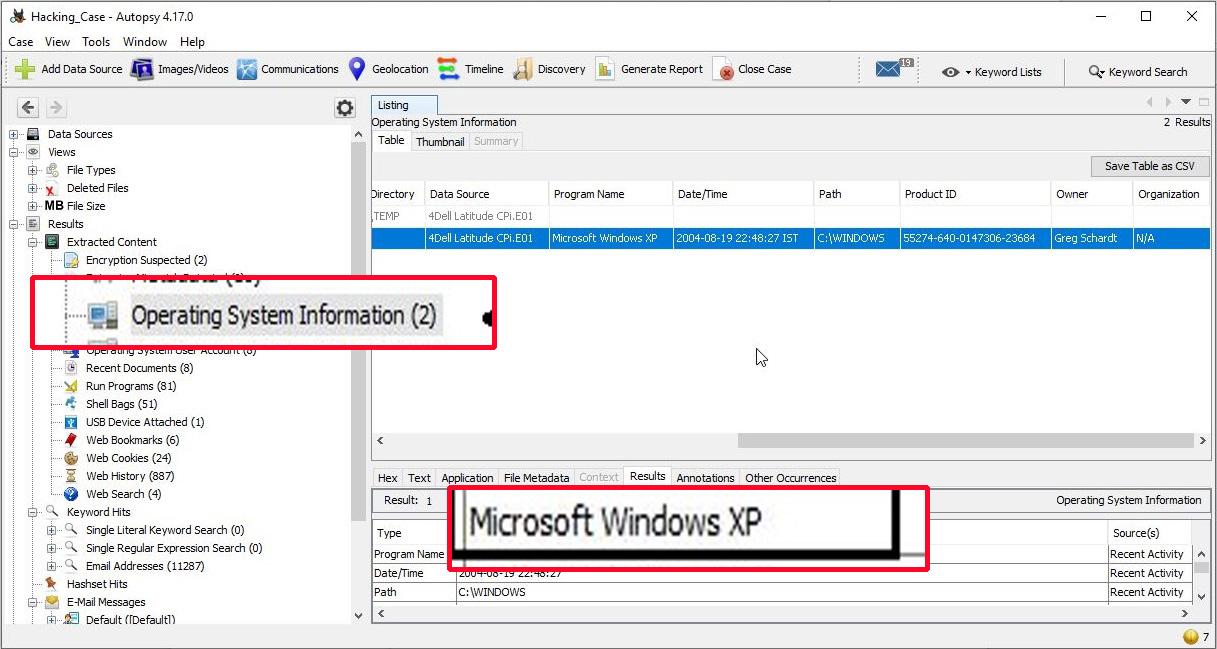
On being asked to find out any evidence that this laptop was used for hacking, we found in our forensic investigation that this laptop belonged to Greg Schardt who also has a online persona “Mr. Evil”. We found his operating system as Windows XP and he was running Ethereal, a packet interception program to capture network traffic. Apart from Ethereal, his system had six other programs which were used for hacking. He was active among many hacking related IRC channels and new groups. Corroborating this evidence with what his associates said about him, we can come to a conclusion that this laptop belonged to Greg Schardt and he was involved in hacking activities. This case can be closed now. Read how to perform forensics on a PDF File.

Posted on

Digital Forensics with Autopsy : Part 1

Hello aspiring ethical hackers. In this article, you will learn how to perform digital forensics with Autopsy. Autopsy is an open source digital forensics tool that acts as a graphical interface for SleuthKit. As our readers will soon see, it is fast and very easy to use this tool. The cross platform tool is used by law enforcement agencies, military agencies and corporate forensic analysts to find out about a hacking attack. It is installed by default in various pen testing distros.

But we have decided to use install Autopsy on a Windows 10 machine. Autopsy can be downloaded from here. After downloading the .msi file, install it just like any other Windows .msi file.

To perform digital forensics, we also need an image of a target computer or any other target device. For this we will use an Encase Image of a suspected Dell Latitude laptop named “Hacking Case” that can be downloaded from here. Here is a feel real back story about this image.

“On 09/20/04, a Dell CPi notebook computer, serial # VLQLW, was found abandoned along with a wireless PCMCIA card and an external homemade 802.11b antennae. It is suspected that this computer was used for hacking purposes, although cannot be tied to a hacking suspect, G=r=e=g S=c=h=a=r=d=t. (The equal signs are just to prevent web crawlers from indexing this name; there are no equal signs in the image files.) Schardt also goes by the online nickname of “Mr. Evil” and some of his associates have said that he would park his vehicle within range of Wireless Access Points (like Starbucks and other T-Mobile Hotspots) where he would then intercept internet traffic, attempting to get credit card numbers, usernames & passwords. Find any hacking software, evidence of their use, and any data that might have been generated. Attempt to tie the computer to the suspect, G=r=e=g S=c=h=a=r=d=t. A DD image and a EnCase image of the abandoned computer have already been made.”

The mission for us is to analyze this Encase Image and answer around 20 questions that solve this case. The questions are also provided by the same people who provided this Hacking Case to us. Let’s start analyzing this image and solve the case. Once the program is installed, open it and click on “New Case”.

autopsy

Give a name to the case. We have named it “Hacking_Case”.

Assign a number to the case and provide the name of the Forensic investigator. Our case number is 00 and the investigator is Luke_Reckah.

Next, select the type of source. Select “Disk Image”.

Select the Data Source. You need to download two Encase Images. Select the first part of the Encase images downloaded.

Next, select all the ingest modules you want to run. Ingest modules are all the tests that can be run on the image to gather information about it. These ingest modules include tests like hash lookup, email parsing etc. We selected all for this.

Autopsy will start analyzing the image. It may take some time to completely analyze the image. However, it will start displaying findings as soon as it finds them. Let the image analysis finish.

After the image analysis is finished, all the extracted information can be found on the left side of the program window.

It’s time to start answering questions related to the case.

1. What is the image hash? Does the acquisition and verification hash match?

In Digital Forensics, as soon as a image is acquired to perform analysis on it, a hash is calculated to check if the file integrity is intact and not compromised. If the acquisition and verification hash do not match, it means our forensic analysis has changed the image which is not at all intended. The image hash is “AEE4FCD9301C03B3B054623CA261959A”. It is found in the File Meta data section.

2. What operating system was used on the computer?

The operating system information can be found in the operating system information of the extracted content.

The operating system is Windows XP.

3. Who is the registered owner?

The information about the registered owner of the computer is found in the same operating system info section in extracted content.

The name of the owner of this computer is “Greg Schardt”.

4. When was the install date?

The install date can be found in the same operating system info section just below the OS information.

The OS on the computer was installed on 19-08-2004 22:48:27.

5. What is the computer account name?

The computer account name on this computer is found in the same section.

The computer account name is N-1A9ODN6ZXK4LQ.

6. How many accounts are recorded?

The information about the user accounts is found in the Operating system user account section.

There are total five user accounts on the target computer. They are Administrator, Mr. Evil, SUPPORT_388945a0, Guest and HelpAssistant.

7. What is the account name of the user who mostly uses the computer?

In the same section, the count section shows how many times the user logged in.

The user Mr. Evil has logged in 15 times while the others didn’t even log in once. So Mr. Evil is the user who mostly uses the computer.

8. Who was the last user to logon to the computer?

The information about the last user to logon to this computer can be found from the Date accessed column of the user account.

The last user to logon to this computer is Mr. Evil.

9. Find 6 installed programs that may be used for hacking?

The programs installed on the computer system can be found out from the Installed programs section of the extracted content.

There are total 32 programs installed on the computer and from them, there are seven programs that can be used for hacking. They are Ethereal 0.10.6 v.0.10.6, Network Stumbler 0.4.0, Look@LAN 2.50 Build 29, 123 Write All Stored Passwords, CuteFTP, Cain & Abel v2.5 beta45 and Anonymizer Bar 2.0.

10. Perform a Anti-Virus check. Are there any viruses on the computer?

Malicious files (if any) are found in the Interesting Items section of the extracted content.

There is one malware present on the computer system. It is a zip bomb.

Will be continued in Part 2.

Posted on

PEframe : Analysis of portable executable files

Hi Readers today we will see a PEframe Tutorial. These days hackers are using numerous ways to get into our systems. One of them is by sending a malicious portable executable file to us or make us download the malicious executable file and execute it on our system. We have seen one such Real World Hacking Scenario in the issue of Hackercool February 2017. In this scenario we have not only seen how hackers can make malicious executable files but also how they bypass antivirus and convince the innocent users to click on those malicious files. In this howto, we will learn how to perform analysis of portable executable files.

Analysis helps us to determine what the file was intended to do once clicked. There are two types of analysis: static analysis and dynamic analysis. In static analysis the sample is analyzed without executing it whereas in dynamic analysis the sample is executed in a controlled environment. Static analysis is performed on the source code of the sample portable executable. There are various tools which help us in static analysis of portable executables. One such tool is PEframe. PEframe reveals information about suspicious files like packers, xor, digital signature, mutex, anti debug, anti virtual machine, suspicious sections and functions and much more. PEframe is open source and can be installed in Kali Linux as shown below.

Open a terminal and type the command as shown below to clone PEFrame from Github.

After PEFrame is cloned successfully, a new directory is formed with name peframe. You are automatically taken into this directory. This tool requires simplejson (a subset of JavaScript). So install it using pip command. Next, we need to run the setup.py file from the directory. Since it is a python file, we need to run the command “python setup.py” install to install PEframe.

Once the installation is finished, type command “peframe -h” to see its simple usage

Before we analyze the portable executables, let us analyze some files we created for tutorials of our magazine. The first one is msf.pdf we created using Metasploit.

As you can see in the above image, we found not only an IP address but also an url hosting some executable file. It can be assumed that as we open this pdf file, another executable will be downloaded from the IP address and executed in our system. Let us now analyze a hta file created with Metasploit next. This file is analyzed as a HTML document with IP address and it has a library called kernel32.dll. This file probably opens a payload when clicked upon. Given below is another similar file in visual basic format.

Given below is a macro file. You can see all these files have an IP address where probably a listener is running.

Now let us analyze a portable executable file. Kali Linux has some exe files already stored in its windows-binaries folder. We will analyze the plink.exe file.

Plink.exe is a command line utility file similar to UNIX ssh. It is mostly used for automated operations. As you can see in the image given above, the program is giving more detailed information to us than the other files. The plink.exe has four sections and none of them appears to be suspicious. But the file has a packer, mutex and antidbg. The packer it used is Microsoft Visual C++ which is normally used for genuine programs.

Given above is its Antidbg and Mutex information. The dynamic link libraries it imports is also given. Given below are the apis (application programming interfaces) used by the file.

The filenames found in the portable executable are given in the image below. As you can see it has a big list of filenames.

Metadata is data about the data. Metadata reveals a lot of information about a file. Given below is the metadata of our portable executable. We can see that it is a part of Putty Suite.

Even the description of the file is given. Normally malware does not contain so much information about itself like this Plink file. Only genuine files contain so much information because they have no use to hide themselves. Now let us analyze another file. This file is also present in Kali Linux and it is a keylogger. It is klogger.exe present in the same windows-binaries folder.

As you can see in the above image, the file which has five sections has two suspicious sections and the packer it uses is ASPack v2.11. Let us have a look at its suspicious sections once.

Given below in the image are its api alerts and filenames. As you have observed, this file reveals very less information than the previous analyzed file. This in itself does not mean that the file is malicious but it gives a general idea about it. That’s all about Forensics using static analyzer PEFrame. We will be back with a new tool in our next howto.

Liked this article? Learn advanced ethical hacking tutorials in our Monthly Magazine. Enjoy Free for 3 months.

Posted on 5 Comments

PDF analysis for beginners

Hello, aspiring Ethical Hackers. In this blogpost you will learn how to perform PDF analysis on PDF files. In recent times, PDF files are back as initial attack vector. Many APT’s and cyber criminal groups have been seen using PDF files to gain initial access. So, I thought it is a good idea to make an article on PDF analysis. By the end of this article, you will be able to tell whether the PDF file you want to analyze is harmless or malicious.

For this howto, I will create a malicious PDF with Metasploit using the following exploit.

Pdf_analysis_1

As is well known, this exploit hides an exe within a PDF file. This PDF file can be sent to our target using any social engineering technique. When the target user clicks on it, we will get reverse_tcp connection. Another file we will be analyzing is a normal PDF file. Both of the files are shown below.

The first tool will be using is pdfid. Pdfid will scan a file to look for certain PDF keywords, allowing you to identify PDF documents that contain (for example) JavaScript or execute an action when opened. It will also handle name obfuscation.

Let us first analyze the pdf we created with Metasploit as shown below. As we can see below, the evil.pdf has JavaScript, Open action and launch objects which are indeed malicious.

Image explaining about Pdf forensics

Now let us analyze my monthly magazine as shown below.

As you have seen above, it’s totally clean. No JavaScript, nothing. That should calm my magazine readers.

Now coming to the malicious PDF, we can disable the malicious elements of the file using pdfid as shown below. Now the file is clean.

Now if we want to do further analysis on the malicious PDF, we can use another tool called pdf-parser. It will parse a PDF document to identify the fundamental elements used in the analyzed file.

Type command “pdf-parser /root/Desktop/evil.pdf” without quotes.

That will parse the entire PDF and its objects (We saw earlier that our malicious pdf contains 12 objects). On observation, objects 10 and 9 evoke some interest. We can also parse each object of the pdf file. Let us parse the object 10 as shown below.

We can see it has a launch action which launches the cmd.exe.

Similarly in object 9 we can see a JavaScript action.

Using pdf-parser with the ‘c’ option will display the content for objects without streams or with streams without filters.

On observation we can see a stream that looks like shellcode present in object 8.

That’s how we perform PDF analysis of a PDF file.

Posted on

Recover deleted messages from Android phones

Hello aspiring hackers. It’s been a long break for me from this website and I have decided to make a comeback with an interesting article. Ok guys, it often happens that we delete messages from our android phones whatever may be the reason and it also rarely happens ( especially if our time is bad ) that we need that messages back. So today we are going to see how to recover deleted messages from Android phones. Well, there are a lot of software which help us do it but we will use Wondershare Dr.Fone for its simplicity. Download the software from here and install it on your system. Once installed, open the program. It should look like below.

Now using a USB cord, connect your android phone.The USB debugging mode should be enabled on your android phone. It connects as shown below.

Once the phone is connected, it will prompt you to select whatever you want to recover. As you can see we can recover Contacts, messages, call history, Whatsapp messages, photos, songs, videos and documents.

In this case we will see how to recover deleted messages so select only that option and click on “Next”.

Click on “Start”.

The program will initially try to match your phone model as shown below.

Once your phone model is found out, it will try to analyze your phone for deleted messages. The device may restart during the process.

After restarting, the program may ask you to connect your phone once again. If it does so, disconnect the USB cord and connect again.

After we connect the phone, it starts scanning again as shown below.

After the scanning is over, it will show us the deleted messages as show below. As you can see, we have 415 deleted messages in the respective device. Click on the area shown below.

Then it will show us all the deleted messages from your phone. Select the required messages and click on “recover” to recover your messages but you will have to register the program for that. Hope that was helpful.

recover deleted messages from android