Posted on

Dirty Cow vulnerability: Beginners guide

Hello, aspiring ethical hackers. This blogpost is a beginner’s guide to Dirty COW vulnerability. Assigned CVEID, CVE-2016-5195, this vulnerability affects Linux kernel version 2.6.21 since 2007. To exploit this vulnerability, the hackers need to first gain initial access on the target system.

What is this Dirty COW vulnerability?

Dirty COW is a Linux privilege escalation vulnerability which is caused due to a race condition in the way the Linux kernel handled copy-on-write functions. The name Dirty COW came from this Copy-On-Write (COW). By exploiting this vulnerability, an unprivileged user can gain access to the read-only memory mapping subsequently elevating their privileges on the system.

Which kernels are vulnerable?

All the Linux kernels from versions 2.x to 4.x before 4.8.7 are vulnerable to this Dirty COW vulnerability. Let’s demonstrate this vulnerability on a Ubuntu 12 system. To exploit this vulnerability, the hackers need to first gain initial access on the target system.

Download this exploit from Github and extract its contents. It is a C program as shown below.

Compile this code using inbuilt GCC compiler in Ubuntu system. This exploit creates a new user named ‘firefart’ with root privileges on the target system by writing to the /etc/passwd file. Usually, creating an user with root privileges in not possible for low privileged users on Linux systems. But this is a privilege escalation vulnerability.

Now, let’s execute the exploit as shown below. It will prompt you to create a new password for the new user “firefart” it is creating.

Login as the newly created user to see if the exploit was successful in exploiting the vulnerability and creating the news user “firefart”.

As you can see, a new user named “firefart” has been created on the target system with root privileges.

Posted on

Privilege Escalation guide for beginners

Hello aspiring Ethical Hackers. In this blogpost, you will learn in detail and clearly about Privilege escalation. Privilege escalation is an act of gaining elevated access to resources that are normally restricted to an application or user. To understand privilege escalation better, you need to first understand about privileges. Since hacking mostly deals with exploiting of operating systems, let me explain you about how privileges in a operating system are assigned.

Since Operating Systems (OS) are meant for user interaction and perform some specific functions you should have noticed that different users are assigned different privileges on a system.

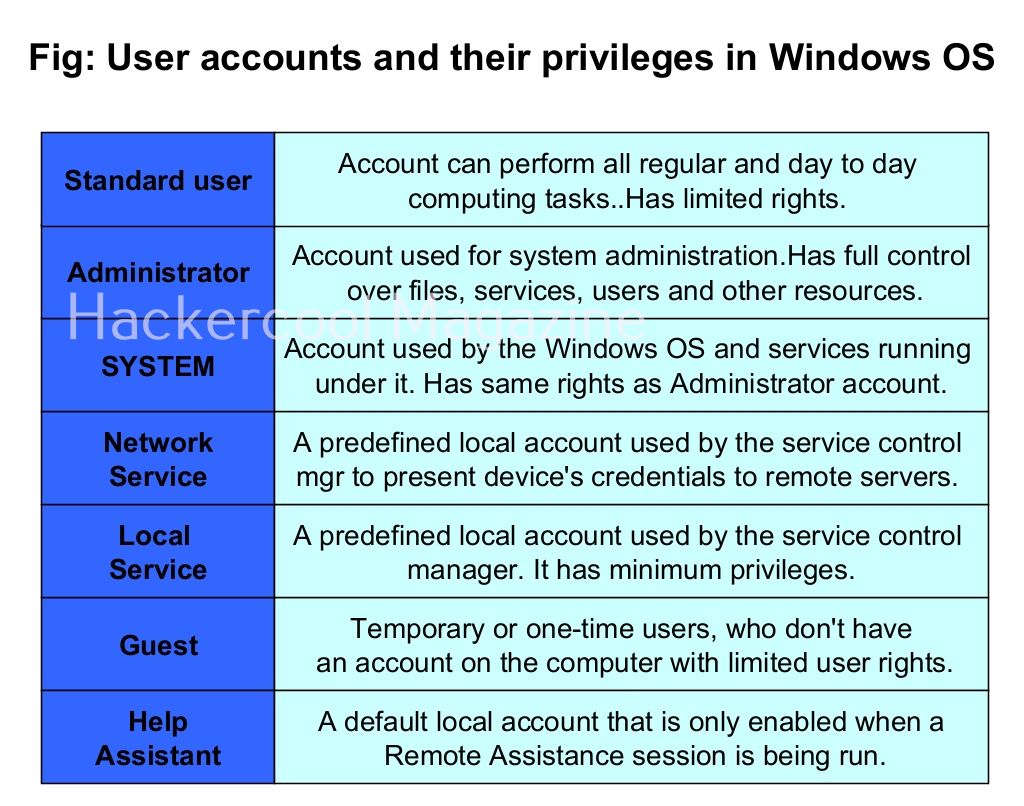
Let’s see the example of the Windows operating system. Windows OS has generally 7 types of accounts. When I am talking about accounts, I am talking about local user accounts instead of remote or online accounts. A local user account is defined locally on a device (computer) and are assigned rights and permissions on that particular device only. The types of Windows user accounts are given below.

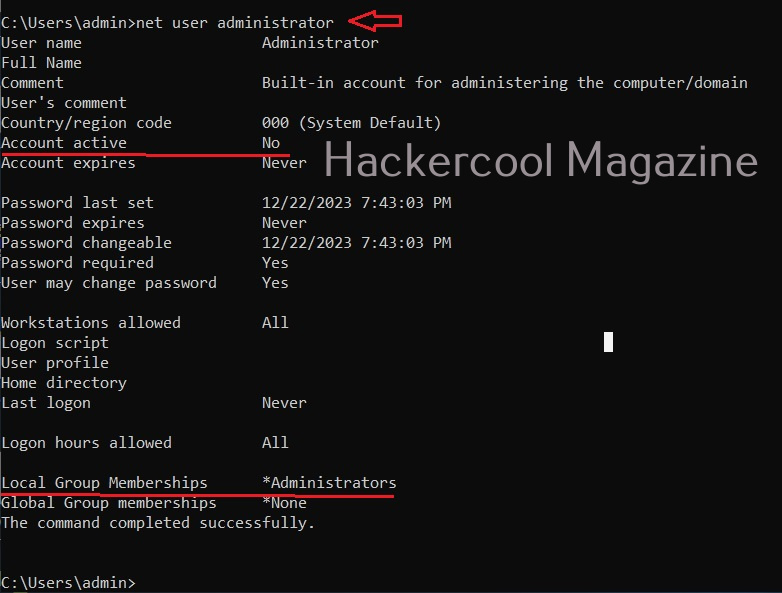
When you do a fresh installation of Windows (Windows 7 to 11), the first user account that is created during setup is the Administrator account, As the name suggests, the Administrator account is a default local user account (account created during Windows installation) used for system administration. This account has full control of the files, directories, services and other resources on the local device. As you might have experienced by now, an administrator account can create, delete and assign permissions to other users.

This default Administrator account can neither be deleted or locked but it can be disabled or renamed. Windows setup disables the built-in administrator account after installation of Windows and creates another local account that is a member of the administrators group.

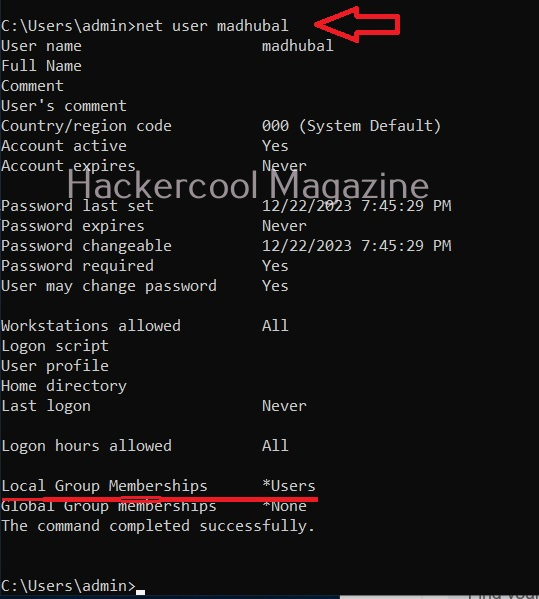
The newly created user belonging to the Administrator group has same powers as the default administrator account. Since this is too risky if some malicious user gains access to the system as Administrator user, Windows provides option to create an account called standard account. Most organization provide their workers a standard account. A standard account on Windows can run almost all application on a Windows system and perform all other day-to-day computing tasks.

However, to perform some tasks like installing programs or applications, making changes to the registry etc and other operations that require elevated privileges, the standard user is asked for credentials of Administrator of the system through the user Account control. Simply put, you cannot make any major changes to the operating system with standard account.

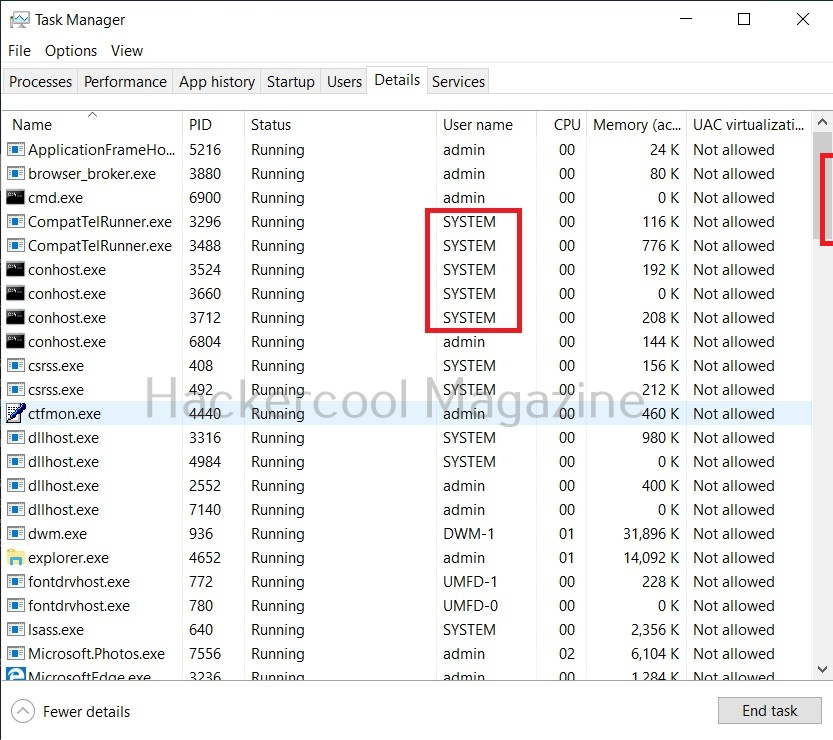
Apart from these two accounts, Windows has some default local user accounts that are automatically created while operating system is installed. They first one you need to learn about is the “SYSTEM” account. This account is used by the operating system and its services running under Windows. This account doesn’t show up in user manager which means you cannot login with this account.

It belongs to Windows and used by all Windows processes. You can view the processes running with this “SYSTEM” privileges from details tab of the Window Task Manager.

The ms08_067 vulnerability affected a process svchost.exe that runs with SYSTEM privileges. So, once you exploit it, you automatically get SYSTEM privileges. It can be exploited remotely and grant SYSTEM PRIVILEGS to attackers. No wonder it is considered very CRITICAL.

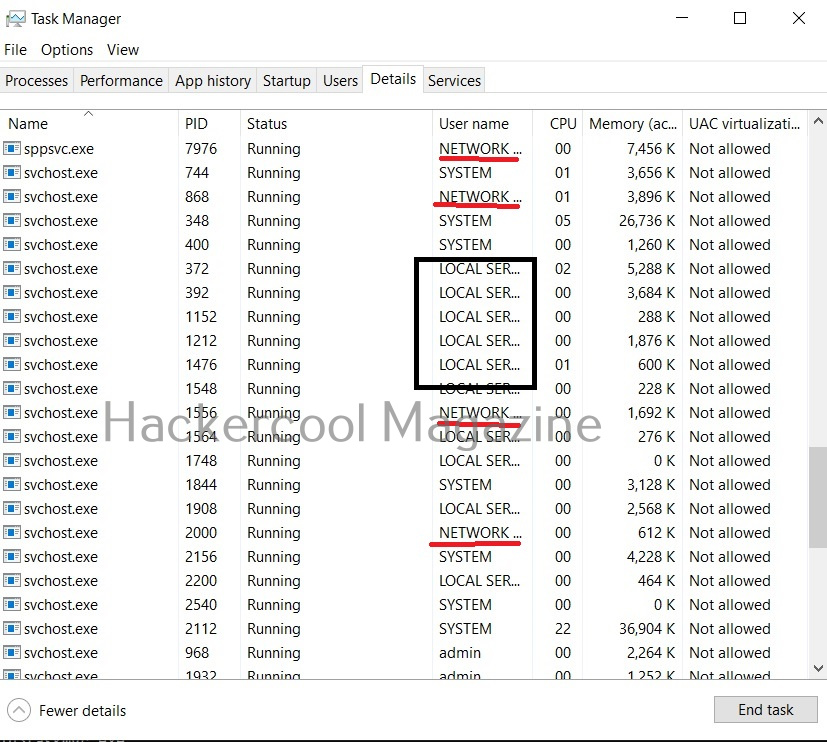
Another local default user account is the “Network service” account. This account is used by the service control manager (SCM). It is used to present the computer credentials while it is communicating with remote servers. Similarly, Windows has an account called “Local Service” which is also used by the service control manager. It has minimum privileges on the local computer.

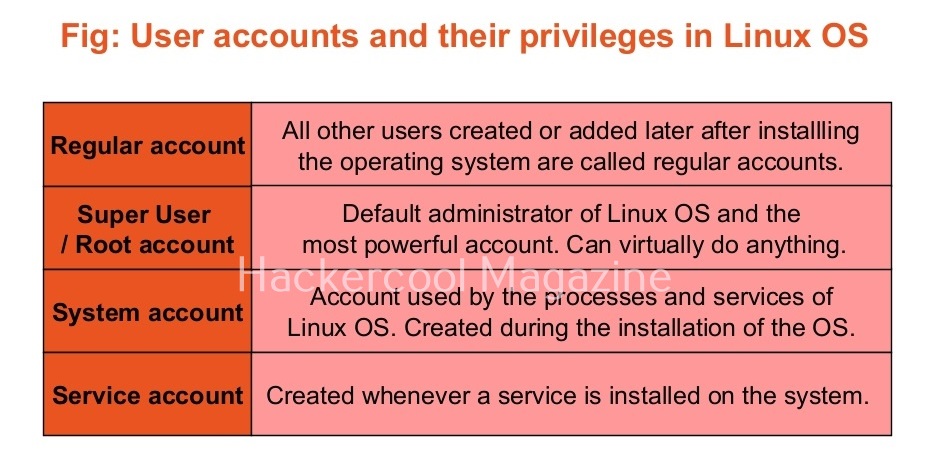
Linux systems too have different types of user accounts. They are 1) Super user account 2) Regular account 3) System account 4) Service accounts.

On Linux, the Super User account is the most powerful account and is the default administrator of the Linux system. This account is popularly known as root account. The root account has unlimited control on the Linux system and you can literally do anything you want with this account.

The root user in Linux has (#) symbol on their terminal. All other users who are later added are together known as regular accounts. Regular accounts are similar to “standard account” on Windows and to perform administrative actions on the OS, they need to use sudo or su command. Apart from these two accounts, Linux has “system account” and “service account” that are created during the installation of the OS and are by OS processes just like “SYSTEM account on Windows. However, these accounts don’t run with superuser privileges. Service accounts are created whenever a service is installed on the system.

Since you are now accustomed with privileges and user accounts with different privileges, you can now understand privilege escalation.

What is privilege escalation?

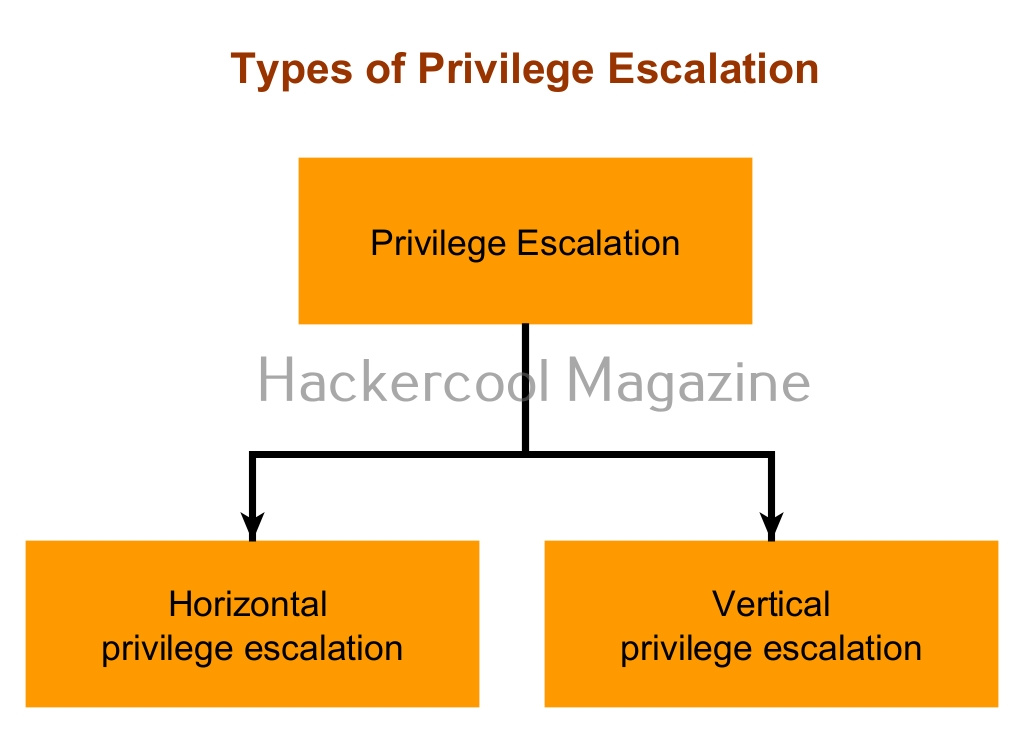
Privilege escalation is an act or process of gaining access to privileges of the other user account using any means or techniques. Normally privileges of user account with higher privileges are targeted by hackers.

Privilege escalation is of two types: They are,

  1. Horizontal privilege escalation.
  2. Vertical privilege escalation.

1. Horizontal Privilege Escalation:

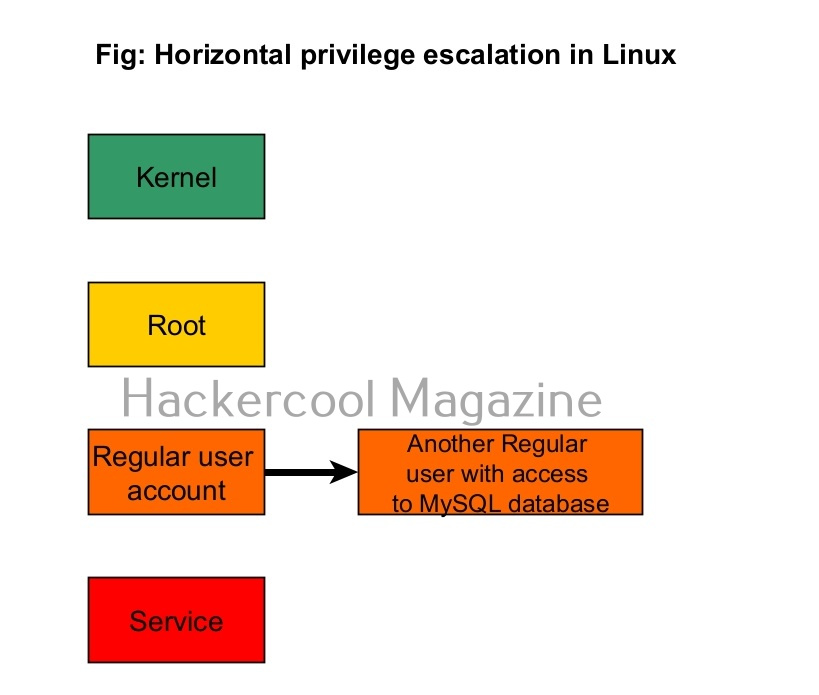
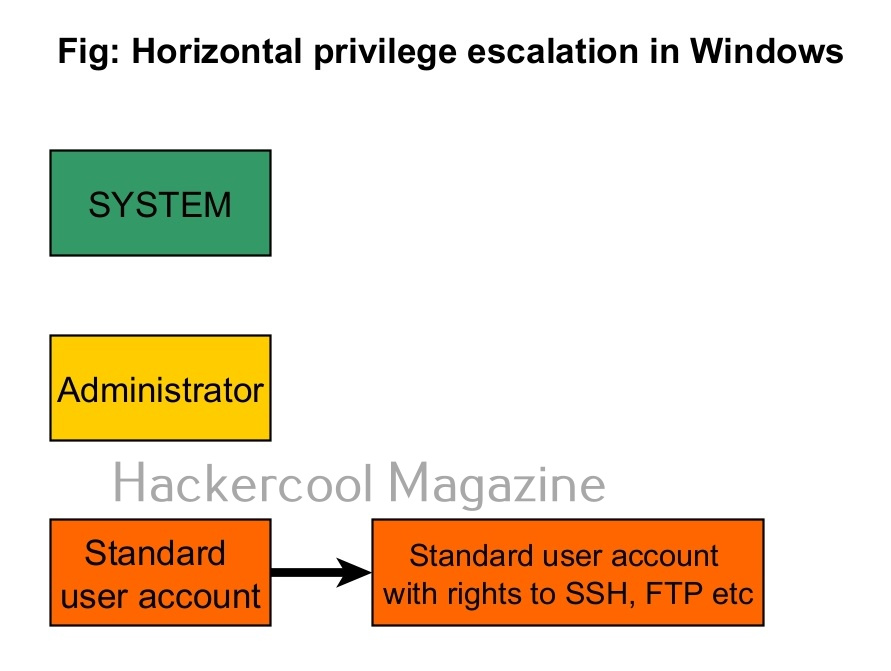
In horizontal privilege escalation, an attacker gaining access to the privileges of another user with same rights as him but with access to some other resources. For example, imagine on a Linux system, you gained access as a regular user (user_1). On the same system, there is another regular user (user_2) with same rights as him but with access to the MySQL databases. Elevating privileges to this user (user_2) can give you access to MySQL database.

2. Vertical Privilege escalation:

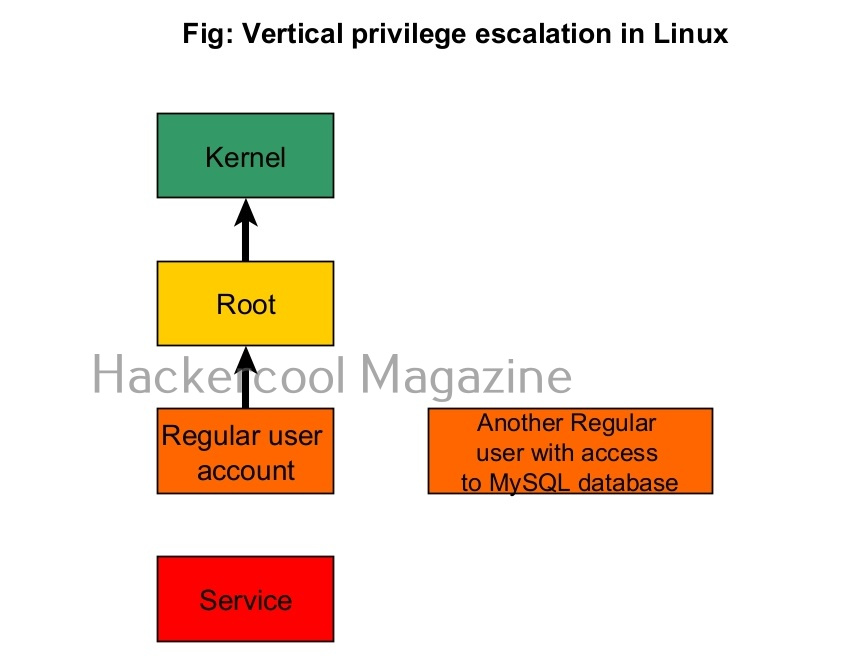
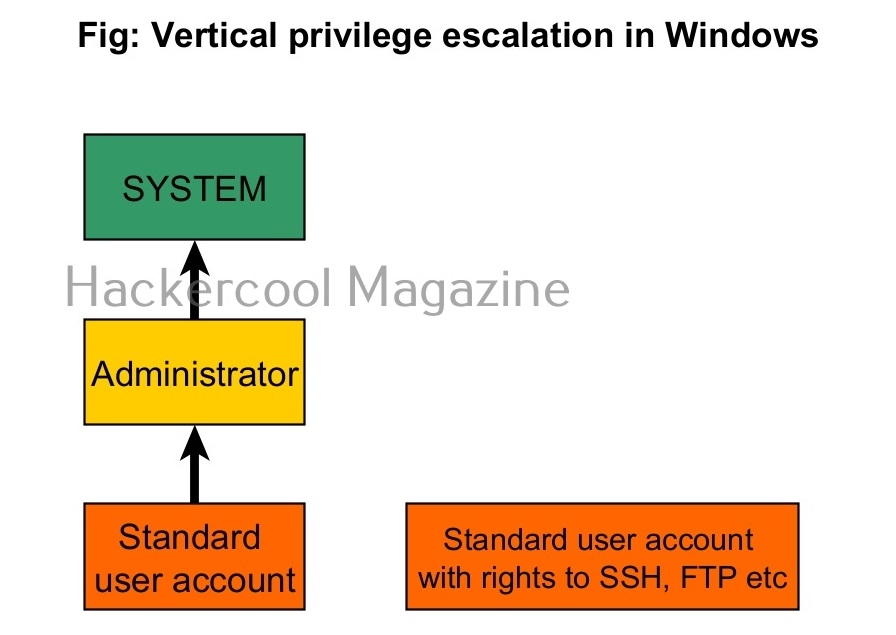
In cyber security or hacking, when anyone says “privilege escalation”, they are talking about this type of privilege escalation most of the time. In vertical privilege escalation, an attacker with low privileges tries to gain access to higher privileges.

Techniques used for Privilege escalation

Attackers use various techniques to elevate privileges. Some of the most general techniques are given below.

1. Social Engineering:

In Social Engineering, attackers somehow convince high privileges users to give access their credentials. These techniques include phishing, spear phishing attacks etc. For example, let’s say the attackers gained access to the email of the user with low privileges. From this email, he/she can send an email to the user with high privileges and somehow convince him/her to give any credentials.

In the first week top of September 2023, Okta, a company providing Identity services warned its users of social engineering attacks to obtain super administrator privileges on the organizations using Okta’s services. In these attacks, attackers performed social engineering attacks against IT service desk personnel by calling them and convincing them to reset multi-factor authentication (MFA’s) of high privileged users. Then attackers (allegedly APT Muddled Libra) abused these high privileged super admin accounts to impersonate users of the compromised organizations.

2. Password cracking:

Sometimes attackers crack the passwords of high privileged users to be used in privilege escalation.

3. Exploiting vulnerabilities:

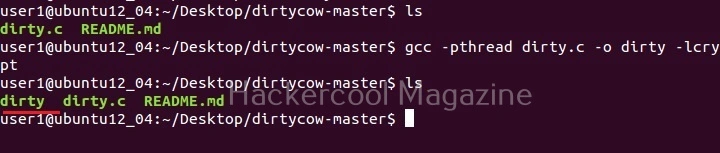
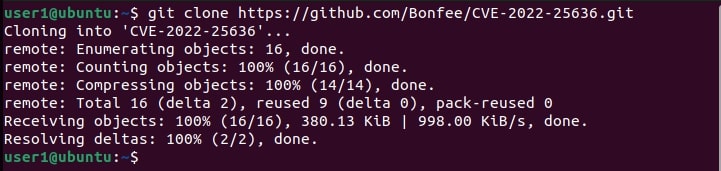
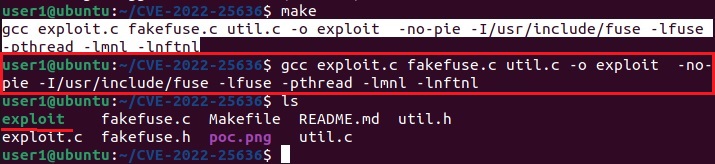
This is one of the popular methods of escalating privileges. In this technique, attackers exploit vulnerability in software installed on the target system to elevate privileges. For example, PrintNightmare, Zerologon, Fodhelper etc in Windows and Dirtypipe, DirtyCow, PWNKIT, Netfilter, Heartbleed and Looney Tunables.

4. Misconfigurations:

In this type of attack, attackers use any misconfiguration on the target system for privilege escalation. These misconfigurations can include weak passwords, setting empty string as password, unsecured network service, open ports and exposed services etc. Examples are exploiting cronjobs and exploiting SetUID bits etc.

Many APT’s and Threat Actors exploit the recently (before patches are applied) released local privilege escalation vulnerabilities to elevate their privileges.

Posted on

CVE-2022-25636 : Linux Privilege Escalation

Hello aspiring Ethical Hackers. In this article you will learn about another Linux Privilege Escalation vulnerability tracked as CVE-2022-25636 and its exploitation. I am saying another because this vulnerability comes immediately after recently discovered Linux Dirty Pipe vulnerability.

CVE-2022-25636 is a vulnerability that affects the Linux Netfilter component. What is netfilter? It is an open source framework provided by the Linux kernel that allows various networking-related operations to be implemented in the form of customized handlers. Its functions include packet filtering, network address translation and port translation. All Linux Firewall utilities i.e Iptables, nftables, ufw etc use Netfilter in their operations.

Exploitation of this vulnerability can give attackers root privileges on the target system, allow them to escape containers and in worst case induce a kernel panic. This vulnerability affects Linux kernel versions 5.4 to 5.6.10. The target OS include Ubuntu, Debian, RedHat etc.

However, there’s no clarity on which kernel versions are actually vulnerable. In my testing, this failed to work on Ubuntu 21.10 kernel version 5.13.0-10 but worked every time on Ubuntu 21.10 with kernel version 5.13.0-30 (without giving any panic). Let’s have a look at how the exploitation worked for me.

To exploit this privilege escalation vulnerability, anybody needs to have access on the target system with Low User Privileges as shown below.

Once I have a shell on the target, I download the exploit from Github as shown below.

Next, I navigate into the CVE-2022-25636 directory and compile the exploit as shown below.

Then I executed the exploit as shown below.

cve-2022-25636

As readers can see, I successfully got a shell with root privileges.

Posted on

Dirty Pipe vulnerability for beginners

Hello aspiring Ethical Hackers. In this article, we will explain you about the Dirty Pipe vulnerability and how it can be exploited to get root privileges. Considered to be more prevalent than the Dirty Cow vulnerability and more simpler to exploit, the Dirty Pipe vulnerability affects Linux kernels since 5.8. To make it worse, this vulnerability affects even Android as its OS is based on Linux. Dubbed as CVE-2022-0847, this vulnerability is fixed in kernel versions 5.16.11, 5.15.25 and 5.10.102.

To understand the Dirty Pipe vulnerability, readers need to understand a few concepts in Linux.

Pipe : A pipe is a data channel that is used for uni-directional inter-process communication in Linux.

Memory Page : Whenever some data is written to a pipe, a page is allocated to it. A page is ring of a struct pipe buffer implemented by the Linux kernel. The first write to any pipe is allocated a page which is over 4 kB worth of data. If the latest data written to a pipe does not fill the page completely, the following data written will be appended to the same page instead of being allocated a new page.

For example, let’s say 2Kb of data is written to a pipe for which a page is allocated. When the subsequent 1KB of data is written to a pipe, this 1KB of data is appended to the same page instead of being allocated a new page. Anonymous Pipe Buffers work like this.

Page Cache : Memory pages are handled by kernel subsystem called page cache. Whenever any file is read or being written, the data is put into the page cache. This is done to avoid accessing disk for any subsequent reads and writes. This data in the page cache remains for some time until the kernel decides it needs that space for a better purpose. A page cache becomes “dirty” when the data inside the cache has altered from what is on the disk. This is where the name of the vulnerability comes from.

Pipe Flag : The status and permissions for the data in the pipe are specified by Pipe Flags. For DirtyPipe vulnerability, a flag named PIPE_BUF_FLAG_CAN_MERGE plays an important role by specifying that the data buffer inside the pipe can be merged.

System Calls : System Calls or syscalls are methods that can send requests to the kernel from the user space (the portion of memory containing unprivileged processes run by a user). System Call is the fundamental interface between an application and Linux Kernel.

Splice() : Splice is a syscall that was introduced since Linux 2.6.16 that can move data between pipes and file descriptors without user space (the portion of memory containing unprivileged processes run by a user) interaction.

Now, since you have been explained the basic concepts that make this vulnerability work, let’s get into the vulnerability itself.

Whenever any data is copied from a file into the pipe using splice() function, the kernel will first load the data into the page cache as already explained above. Then kernel will create a struct pipe_buffer inside the page cache. However unlike anonymous pipe buffers, any additional data written to the pipe must not be appended to such a page because the page is owned by the page cache, not by the pipe.

Since the page cache is run by kernel (high privileges), any user with low privileges can exploit this vulnerability to take an action requiring high privileges. Enough theory. Let’s get into practical exploitation. We are going to try this on Debian 11 with kernel 5.10.0.

I will try to get a root shell by exploiting this vulnerability. For this, I will download a exploit as shown below.

I compile the exploit which is a C script.

Then I execute the exploit as shown below. This will create a new user named “rootz” with root privileges.

dirty pipe

Once you get the message saying “It Worked”, the exploitation is successful. All I have to do is login as the new user (rootz) as shown below.

Voila, I have a root shell. The exploitation is successful.

Posted on

PwnKit : Explained with POC

Hello aspiring ethical hackers. In this article, you will learn how to use PwnKit to elevate privileges on a Linux system. But first things first. What exactly is polkit?

Polkit is a component that controls system-wide privileges in Unix-like operating systems. Put simply, it provides an organized way for non-privileged processes in Linux to communicate with privileged processes. Known earlier as PolicyKit, it’s name was changed to polkit since version 0.105 which was released in April 2012 to emphasize the rewritten component and changed API.

In Linux, you use SUDO to usually execute commands with privileges of a root user. However, it can also be done with polkit by using command pkexec. But the fact is SUDO is more preferred as it is more easily configurable.

So how is this polkit exploited to elevate privileges on a Linux system. A memory corruption vulnerability PwnKit (CVE-2021-4034) was discovered in the pkexec command (which is installed on all major Linux distributions). The vulnerability is present in polkit since the original release of 2009.

The vulnerable targets include but may not be limited to Red Hat 8, Fedora 21, Debian Testing ‘Bullseye” and Ubuntu 20.04. Most of the systems would have now received patches but any OS with no updates should still be vulnerable.

The version of polkit installed can be checked as shown below.

We are testing it on Debian Testing 11.2 (BullsEye). There is another command apart from “pkexec” to interact with polkit from the command line. It is “dbus-send”. It is a general purpose tool used mainly for testing but installed by default on systems that use D-Bus. For example, on a Linux system, D-Bus can be used to create a new user named “hackercool” as shown below.

dbus-send –system –dest=org.freedesktop.Accounts –type=method_call –print-reply /org/freedesktop/Accounts org.freedesktop.Accounts.CreateUser string:hackercool string:”blackhat Account” int32:1

This is as simple as that. This command will manually send a dbus message to the accounts daemon to create a new user named “hackercool” with a description of “blackhat Account” and will make the new user a member of SUDO group (as we set the int32:1 flag). Then all that’s left is setting the password to the newly created user.

But before we do any of this, we need to check the time taken to run the above command? This can be done by prepending the time command to the above command as shown below.

It takes almost 7 seconds to execute this command. But wait, why do we need to check the time taken to execute this command? Because we have to kill it at the correct time. Once again why we need to kill it? Well, here’s the answer.

When you run the above command (without time) and terminate it after some time and then polkit asks dbus-daemon for the connection, dbus-daemon correctly returns an error. Here’s where polkit goes wrong. Instead of rejecting the request it treats the request as it came from root process and viola we have an authentication bypass.

However, the timing of the vulnerability is very difficult to detect. Hence we need to kill the command after over half time. Why? it seems polkit asks d-bus daemon for the terminated connection multiple times on different codepaths. Almost all the codepaths handle it correctly except one. We are looking for this one codepath. So if we terminate the command early, privilege escalation may not work correctly.

I hope everything is explained. Now, let’s get into practical exploitation. So what I want to do is run the same command as we ran above to create a new user named “hackercool” but this time killing the process after 5 seconds. As the command takes 7 seconds to complete, I have chosen to terminate this command after 5 seconds. i.e almost more than half time.

As you can see in the image below, a new user named “hackercool” is created and added into SUDO group.

Now, all we have to do is create a password for this user. Note that we have to create a SHA-512 hash. This can be done using OPenssl. Once the hash is created use the dbus-send command once again but this time to create the password for this newly created user. This can be done as shown below.

dbus-send –system –dest=org.freedesktop.Accounts –type=method_call –print-reply /org/freedesktop/Accounts/User1000 org.freedesktop.Accounts.User.SetPassword string:'<SHA-512 HAsh’ string:’Ask the pentester’ & sleep 5s; kill $!

pwnkit

It’s done. Let’s login as the new user.

As you can see, we successfully elevated privileges on a target system by creating a new user. To learn Real World Ethical Hacking, Please subscribe to our Monthly Magazine.