Posted on

How Windows authentication works?

Hello, aspiring ethical hackers. In this article, you will learn how Windows authentication works? Our readers have seen multiple instances where we have dumped Windows password hashes as part of our hacking tutorials. This should have brought some pertinent questions in the minds of the readers.
As to know how hashdump command of meterpreter, Mimikatz and cachedump module of Metasploit dump credential hashes, where are these hashes stored and why are they in the form of hashes, readers need to get a deep understanding of how Windows authentication works.

Windows Logon Process starts as soon as you go to the Login Screen of a Windows system. The Logon Process is different in different network scenarios for Windows. There are two network types into which a Windows system can be configured. They are,

  1. WorkGroup
  2. Domain

Windows systems in Workgroup network use Local Authentication whereas Windows systems connected in Domain network use Remote Authentication.

How Local Authentication works in Windows?

Let’s first see how Local Authentication takes place. In local authentication, the password hash is stored on the same computer on which users are trying to log on.
In Windows, the passwords are stored in the form of a hash in a file known as Security Accounts Manager (SAM) file. The SAM file is located in %SystemRoot%/system32/config/SAM location and it can neither be deleted nor copied while Windows is running.
This is because the Windows kernel obtains and keeps an exclusive filesystem lock on the SAM file which it will release only after the operating system has shut down or a “Blue Screen of Death” exception has been thrown. It is mounted on HKLM/SAM and SYSTEM privileges are required to view it. Readers have already learnt that passwords are stored in SAM file in encrypted form. These passwords are stored in two hash formats in SAM file.

1. Lan Manager Hash (LM Hash)

2. New Technology Lan Manager Hash (NTLM Hash)

LAN Manager Hash

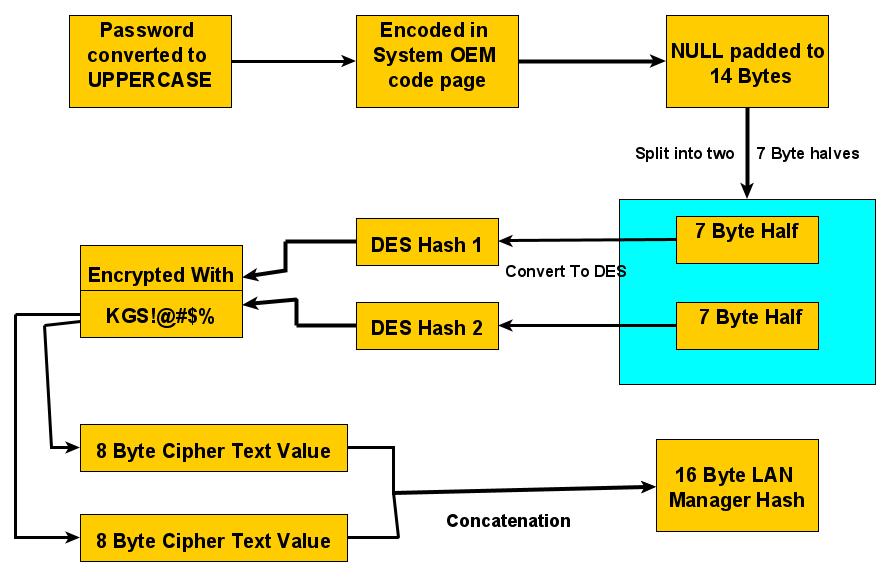
Lan Manager Hashing was used by Windows operating systems prior to Windows NT 3.1. In LM hashing, the password hash is computed as follows,

a. The user’s password is restricted to a maximum of fourteen characters.
b. The password of the user is converted to Uppercase.
c. Then user’s password is encoded in the System OEM code page.
d. This password is NULL-padded to 14 bytes.
e. This 14 bytes “fixed-length” password is then split into two 7-byte halves.
f. Both of these 7-byte halves are used to create two DES keys, one from each 7-byte half. This is done by converting the seven bytes into a bit stream with the most significant bit first and then inserting a parity bit after every seven bits (so 1010100 becomes 10101000). This is done to generate the 64 bits needed for a DES key.
g. Each of this two keys is used to DES-encrypt the constant ASCII string “KGS!@#$%” resulting in two 8-byte ciphertext values.
h. These two ciphertext values are then concatenated to form a 16-byte value, which is the final LM hash.

how windows authentication works

Security of LAN Manager Hash

LM Hash has several weaknesses. The major weaknesses are :

1. The maximum length of Password while using LM authentication can only be 14 characters.
2. All passwords in LM hash are converted into UPPERCASE before generating the hash value. This means LM hash treats ABcd1234, ABCD1234 and abCD1234 and AbCd1234 as same as ABCD1234. This reduces the LM hash key space to just 69 characters.
3. As already explained above, 14 character password is broken into two halves of 7 characters e- ach and then the LM hash is calculated for each half separately. This makes it easier to crack a LM hash, as the attacker only needs to brute-force 7 characters twice instead of the full 14 charact- ers.
4. As of 2020, a computer equipped with a high-end graphics processor (GPUs) can compute 40 billion LM-hashes per second. At that rate, all 7-character passwords from the 95-character set can be tested and broken in half an hour; all 7-character alphanumeric passwords can be tested and broken in 2 seconds.
5. If the password created is 7 characters or less than that, then the second half of hash will alway- s produce same constant value which is (0xAAD3B435B51404EE). Therefore, if a password is les- s than or equal to 7 characters long, it can easily be identified even without using any tools.
6. While using Remote Login over a network, the LM hash value is sent to servers without any salting, thus making it vulnerable to man-in-the-middle attacks.
7. Without salting, it is also vulnerable to Rainbow Table Attack.
To overcome this weaknesses, Microsoft Starting with Windows Vista and Windows Server 2008, Microsoft disabled the LM hash by default.

NT Hash

Also called NTLM, this is the hash many modern Windows systems store the password hashes. Introduced in 1993. The process of calculating NT Hash is,

1. The password is converted into Unicode characters.
2. Then MD4 encryption is run on these converted characters to get the NT hash which is then stored in SAM database or NTDS file (Domain). NTHash is case sensitive but it still doesn’t provide salting.

The Local Logon Process

1. The Windows authentication process starts from the Windows Login screen. LogonUI.exe han- dles the process by displaying correct logon input boxes depending on the authenticator put in place.
2. When users enter the password on the login interface, winlogon.exe collects those credentials and passes them to the lsass.exe (Local Security Authority Subsystem Service). Winlogon.exe is the executable file responsible for managing secure user interactions. The Winlogon service initiat -es the logon process for Windows operating systems by passing the credentials collected by user action to Lsass.
3. LsaLogonUser supports interactive logons, service logons, and network logons. The LsaLogon User API authenticates users by calling an authentication package which is most probably MSV1_ 0 (MSV) authentication package which is included with Windows NT.
4. The MSV authentication package is divided into two parts. In Local authentication, both parts run on the same computer. The first part of the MSV authentication package calls the second part.
5. The first part of the MSV authentication package converts the clear-text password both to a LAN Manager Hash and to a Windows NT hash. The second part then queries the SAM databas- e for the password hashes and makes sure that they are identical.
6. If the hash is identical, access is granted.

How Windows Domain Authentication takes place?

1. The Windows authentication process starts from the Windows Login screen. LogonUI.exe handles the process by displaying correct logon input boxes depending on the authenticator put in place.
2. When users enter the password on the login interface, winlogon.exe collects those credentials and passes them to the lsass.exe (Local Security Authority Subsystem Service). Winlogon.exe is the executable file responsible for managing secure user interactions. The Winlogon service initiates the logon process for Windows operating systems by passing the credentials collected by user action to Lsass.
3. LsaLogonUser supports interactive logons, service logons, and network logons. The LsaLogon User API authenticates users by calling an authentication package which is most probably MSV1_ 0 (MSV) authentication package which is included with Windows NT.
4. The MSV authentication package is divided into two parts. The first part of the MSV authentication package runs on the computer that is being connected to and the second part runs on the computer that contains the user account. When the first part of the MSV authentication package recognizes that network authentication is required because the domain name passed is not its own domain name, it passes the request to the Netlogon service. Netlogon service is a Authentication Mechanism used in the Windows Client Authentication Architecture that is used to verify logon requests. It registers, authenticates and locates Domain Controllers. It’s functions include,

a. Selecting the domain to pass the authentication request to.

b. Selecting the server within the domain.

c. Passing the authentication request through to the selected server.

5. The Netlogon service (client computer) then forwards the login request to the Netlogon service on the destination computer (i.e domain controller).
6. In turn, the Netlogon service passes the request to the second part of the MSV authentication package on that destination computer.
7. First, the second part queries the password hashes from the SAM database or from the Active Directory database. Then, the second part computes the challenge response by using the password hash from the database and the challenge that was passed in. The second part then compares the computed challenge response to passed-in challenge response.
8. If the hash is identical, access is granted.

That was all about how Windows authentication.

Posted on

Joomla enumeration with Metasploit

Hello, aspiring ethical hackers. In this article, you will learn how to perform Joomla enumeration with Metasploit. Although its share is less than WordPress in CMS usage, Joomla is still one of the top 5 used CMS. To further improve its features Joomla has components or extensions which can be installed by the web admin as per requirement. These are similar to plugins in WordPress. Metasploit has some modules which can be used to enumerate a website using Joomla.

Version Detection

The first Metasploit module you will learn about is the version detection module of Joomla. Prior to starting Metasploit, we open Shodan and search for “Joomla”. We will get many IP addresses where Joomla is running. We collect some.

Next, we start Metasploit and load the joomla_version auxiliary module given below. Type command “show options” to see the required options for this module.

We need to set two options for this module to do its job: RHOSTS (which are target IP addresses) and Targeturi. Set Targeturi as shown below. Coming to “RHOSTS” option, we copy and paste the IP addresses we got in our Shodan search giving space between each IP address as shown below. Here I have given five IP addresses.

Check whether all options are set correctly by typing command “show options“.

All the options are set. Next, it’s time to run our exploit. Type command “run” and you will get the results as shown below.

As readers can see, the versions of Joomla running on the target machines are displayed.

Plugin Enumeration

Once we know the version of Joomla running on the target website, the next important information to find out is about the extensions installed on the target Joomla. Metasploit has a module for that too. Since the Joomla extensions or components are similar to WordPress plugins, this module is called as Joomla Plugin enumeration module. Load the module as shown below.

Just like the earlier module, this module too can be used to scan multiple targets at once. Set the IP addresses of targets as shown below with space between each IP address.

Next, execute the module.

As readers can see, all the plugins installed on the target Joomla site are displayed. But how does this module scan for plugins? The list of plugins this module scans are in file “usr/share/metasploit-framework/data/wordlists/joomla.txt”.

If the plugin you want to scan for is not in this list, you can just add it manually by opening this file with any text editor.

Don’t forget to save changes after making them. I once again execute the module after applying changes and the result is shown below.

Webpage Enumeration

Metasploit also has a module for enumerating webpages on the Joomla target. This module can be useful in viewing pages of a Joomla website that can give further information about the website. Load the module as shown below. Type command “show options” to see the options we need to set.

We can set multiple IP addresses to scan for their pages with space in between as shown below. Set the targeturi.

Execute the exploit. We will get the result as shown below.

As readers can see, this module enumerated the webpages of our target. That is how we can perform Joomla enumeration with Metasploit. Read how to perform WordPress enumeration with Metasploit.

Posted on

Follina : Explained with POC

Hello aspiring Ethical Hackers. In this article, readers will learn about Follina, the latest Zero-Day vulnerability in Microsoft.

Vulnerability & Impact

Follina is the name given to a remote code execution (RCE) vulnerability in the Microsoft Support Diagnostic Tool (MSDT). This vulnerability allows a remote attacker to use a Microsoft Office document template to execute code via MSDT and download a malicious payload from a remote URL. It affects Office 2013, 2016, 2019, 2021, Office ProPlus and Office 365.

What actually is Follina?

Follina is a municipality that is located 60 kms northwest of Venice in Italy. Completely unrelated, the vulnerability has been named Follina as the malicious file was referencing to an executable that was named 0438. This is the area code of Follina, hence the zero-day has been named so.

What is MSDT?

Follina exploits MSDT but what is MSDT? Microsoft Support Diagnostic Tool (MSDT) is a service used for gathering diagnostic data about the system.

Proof Of Concept

Let’s see how to exploit Follina practically. For this let’s download a exploit from Github. Navigate into the cloned directory and you will files as shown below.

Two files are important in this directory. The “clickme.docx” is the file that uses MSDT to connect to a remote website and execute the exploit. The exploit is present in the “exploit.html” file. If this POC is successful, the exploit will popup calc.exe.

I tested this exploit on MS Office 2019 running on Windows 10. I hosted the exploit using Wamp server running on localhost.

I opened the clickme.doc and waited. Nothing happened. Then I saved it as clickme.rtf file as shown below.

This time when I clicked on clickme.rtf file, this happened,

And the calculator popped up. The Proof Of Concept Is Successful.

follina

Posted on

WordPress enumeration with Metasploit

Hello aspiring Ethical Hackers. In this article, readers will learn how to perform WordPress enumeration using Metasploit. WordPress is one of the most popular CMS available and as of 2021, 39.5% percent of websites are powered by WordPress. Hence gauging the security of WordPress installation is always important.

Metasploit has a few modules that can be used to perform WordPress Enumeration. Let’s see a few of them. The first module we will see is the WordPress Scanner module that scans for installed themes, installed plugins, installed WordPress version and more information about target WordPress.

Let’s see how this Module works. Start Metasploit and load the WordPress scanner module. Then, type command “show options” to see the options we require for this module. We are testing this module on WordPress installed on Ubuntu 20.

After all the options are set and the module is executed,

the module successfully detected the target WordPress version as 6.0. It also detected plugins installed on the target WordPress along with their versions. The module will also try to enumerate users although it failed to detect any users here.

This module can be useful to find if there are any vulnerabilities on the WordPress target. For example, one of the plugins installed on this target wp_pie_register has an exploit module related to it.

Some of the vulnerabilities in WordPress require credentials for successful exploitation. Metasploit also has a WordPress login enumeration module that not only helps in user enumeration but also brute forcing their password.

Load the WordPress user enumeration exploit as shown below. Type command “show options” to see the options this module requires.

Assuming we have no idea about any user credentials on the target machine, the first thing to do is enumerating and validating usernames. So set “bruteforce” option to false as shown below.

Validating usernames is a process where we check if a particular username is present on the target WordPress site. We can validate a single username or many usernames using a wordlist. For example, let’s use the wordlist “common.txt” as users file. We also want to set the STOP_ON_SUCCESS option to TRUE. This will stop the enumeration as soon as we get one valid username.

Let’s execute the module now.

The module found one valid username on the target. It’s “admin”. Since we have found one valid username on the target, lets try to find out the password for this user. For doing this, we need to set the options as shown below.

ENUMERATE_USERNAMES : FALSE

VALIDATE_USERS : FALSE

BRUTEFORCE : TRUE

We need to also set the password file for that is required for brute forcing. Since we now know the username, we set it using option “username” option.

We need to also set the password file for that is required for brute forcing. Since we now know the username, we set it using option “username” option.

wordpress enumeration

The module found one successful LOGIN using credentials “admin : admin”. See how to perform WordPress Enumeration with WPScan.

Posted on

Spring4Shell : Explained With POC

Hello, aspiring Ethical Hackers. In this article you will learn about Spring4shell, a new zero-day vulnerability that has been discovered in Spring Framework. Spring Framework is an open-source application framework for Java and is normally deployed with Apache Tomcat servers.

Vulnerability & Impact

There are two vulnerabilities affecting Spring Framework, one is in Spring Core and second is in Spring Cloud. The Spring Core RCE vulnerability impacts Java class objects. The vulnerability in Spring Core has been given name Spring4shell in the lines of Log4shell as both vulnerabilities affect a library. Although, it took its name from Log4shell, it is not as dangerous as its namesake.

This vulnerability affects all versions of Spring Core Framework running on JDK versions 9 and after. This vulnerability is tracked as CVE-2022-22965. There is another RCE in Spring Cloud Function versions <=3.1.6 and <=3.2.2.

Proof Of Concept

It’s time to see the exploitation of Spring4shell practically. Let’s create a new directory named spring4shell.

Clone the repository shown in the image below. This repository contains both vulnerable docker image and exploit.

Build the Docker image vulnerable to spring4shell as shown below.

You can check if the target is set or not by visiting the URL in browser.

If you get the above message, the target is ready. Run the exploit. The python exploit uploads a java web shell on the target after exploiting vulnerability.

spring4shell

The exploit completed successfully. The web shell can be accessed at above highlighted address.

The POC is succesful,