Posted on

Vulnerability scoring for beginners

Hello, aspiring Ethical Hackers. In our previous blogpost, you studied what is a vulnerability and different types of vulnerability scanning. In this blogpost, you will learn how is vulnerability scoring given and how are vulnerabilities scored.

What is vulnerability scoring?

Every time a vulnerability is identified or detected, its severity is needs to be estimated to understand the impact of this vulnerability after it is exploited. Based on this severity, a score is given to it.

How is this score given?

To give this scoring, an open framework named Common Vulnerability Scoring System (CVSS) is used. CVSS provides a numerical representation (ranging from 0 to 10) to the security vulnerability.

CVSS is maintained by the Forum of Incident Response and Security Teams (FIRST), which is a USA based nonprofit organization. Members of this organization come from all around the globe. Cybersecurity professionals of any organization use CVSS scores for vulnerability management and remediating them.

How CVSS scoring works?

A CVSS score is assigned to a vulnerability by considering three metrics. They are:

A. Base
B. Temporal and
C. Environmental.

A. CVSS Base Metrics

The base metrics of CVSS represent the characteristics of the vulnerability itself. These characteristics never change with time or any protection put in place by any organization to prevent its exploitation. CVSS base metrics comprise of three sub score elements. They are, 1) Exploitability 2) Scope and 3) Impact.

1. Exploitability

The sub-score exploitability is made up of four sub-components.

i). Attack Vector:

The score of attack vector is based on the level of access that is required to exploit the vulnerability. If the vulnerability can be exploited remotely, the score is higher and if local access is required to exploit the vulnerability, the score is lower. For example, ms08-67 has higher score than malicious USB attack.

ii). Attack Complexity:

This score depends on the additional work that has to be put by attacker to exploit the vulnerability. For example, exploiting EternalBlue does not need any additional work by attacker whereas to performing a Man-In middle attack requires additional work from the attacker. Usually, the additional work the attacker puts depends on factors which are out of control of the attacker.

iii). Privileges required:

This score depends on the privileges required to exploit the particular vulnerability. If the exploitation doesn’t need any credentials or privileges, its score is high and if he needs privileges or authentication, the score is low. For example, Spring4shell vulnerability has higher score then Dirtypipe vulnerability

iv). User Interaction:

This score depends on the level of user interaction needed to exploit the vulnerability. If the attacker can exploit a vulnerability without user interaction, the score is high whereas if attacker needs user interaction the score is low. For example, Heartbleed has higher score than ms14-100, Follina or Macro attack.

2. Scope

The second base metric of CVSS is “Scope” which relates to the reach of the vulnerability. In simple words, when a vulnerability in a component is exploited, does it affect other components? If exploitation of vulnerability in one component affects the operating system or a database, the CVSS score is higher and in the opposite case, it is lower. For example, SQL injection has higher score than Cross Site scripting.

3. Impact

Impact is the actual affect that occurs when a vulnerability is exploited. The sub metric “Impact” has three sub-components. They are: Confidentiality, Integrity and Availability.

i). Confidentiality:

This score depends on the amount of data the attacker gains access to after exploiting the vulnerability. The score is higher if all the data on the exploited system is accessed by attacker and lower if little to no data is accessed.

ii). Integrity:

This score depends on the ability of attacker to make changes on the system by exploiting a particular vulnerability. If the attacker can completely alter the exploited system, this score is high and if he can make few or no changes at all, this score is low.

iii). Availability:

This score depends on the availability of the system to authorized users after being exploited. If a system is not accessible to authorized users after exploitation, the score is high.

B. CVSS Temporal Metrics

The meaning of English word “Temporal” is temporary or constantly changing. Similarly, the CVSS temporal metrics of a vulnerability constantly change.

When a vulnerability is just disclosed, the chances of some one exploiting it are there but a little low. When a Proof-Of-Concept (POC) exploit is released, the chances increase, sometimes exponentially, As the POC exploit is further improved, the chances increase more. As patches and fixes are released, the exploitation attempts fall. As you can see the exploitation of a vulnerability constantly changing with time. CVSS Temporal metrics have three sub-components. They are, Exploit code maturity, Remediation level and Report Confidence.

1. Exploit code maturity

As the code of the exploit of the vulnerability becomes more stable and widely available, this score will increase.

2. Remediation Level

This score is more when the vulnerability is discovered, but as fixes and patches are applied this score keeps decreasing. If the vulnerability is fixed completely, this score decreases further.

3. Report confidence

This sub metric measures the level of validation that demonstrates that a vulnerability is valid and can be exploited by attackers.

C. CVSS Environmental Metrics

Environmental metrics of CVSS are used to allow an organization to modify the base CVSS score based on security Requirements and modification of Base metrics.

1. Security requirements

Security Requirements are used to characterize the asset in which a vulnerability is reported. For example, a vulnerability affecting the database server gets higher score that a vulnerability in a software being used on one of the workstations by an employee of the organization.

2. Modified Base Metrics

An organization or company changes the values of the Base CVSS metrics after putting some fixes, mitigations or patches. For example, we have discussed some vulnerabilities above which can be exploited remotely. If the system having that vulnerability is disconnected from the internet, the score can be decreased.

That’s how vulnerability scoring is assigned to vulnerabilities.

Posted on

OSI Model for beginners

Hello aspiring Ethical Hackers. In this blogpost you will learn about the OSI model. The OSI (Open Systems Interconnection) Model is a theoretical framework for the design and implementation of computer networks. It was developed by the International Organization for Standardization (ISO) and is used as a reference for the design of communication protocols and communication interfaces. As an ethical hacker, you need to have a proper understanding about basic structure of networks and the protocols and frameworks guiding it. The importance of the OSI Model lies in its ability to provide a common language for the design and implementation of computer networks.

OSI model

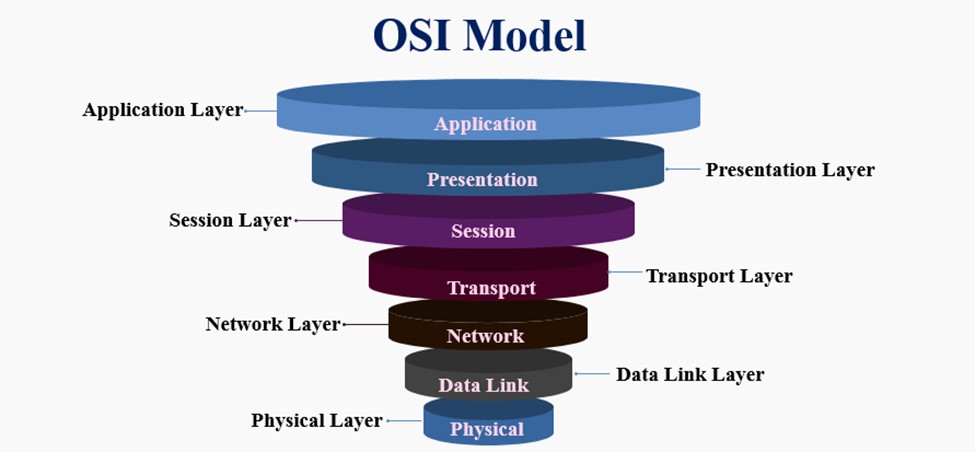
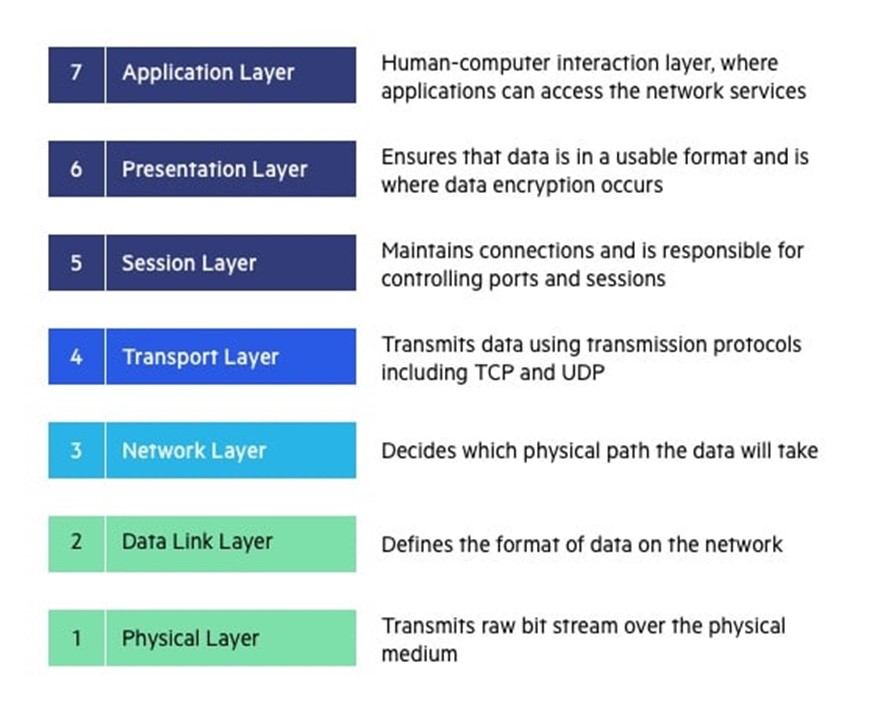
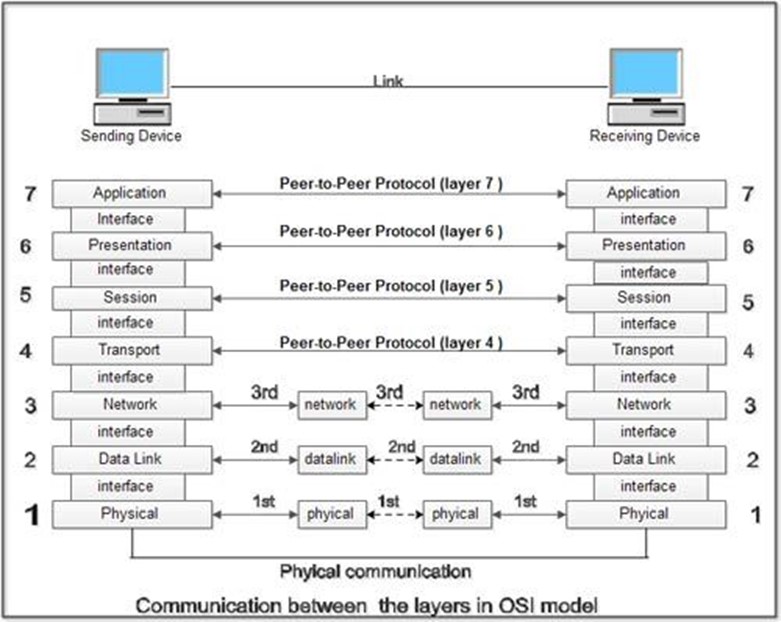
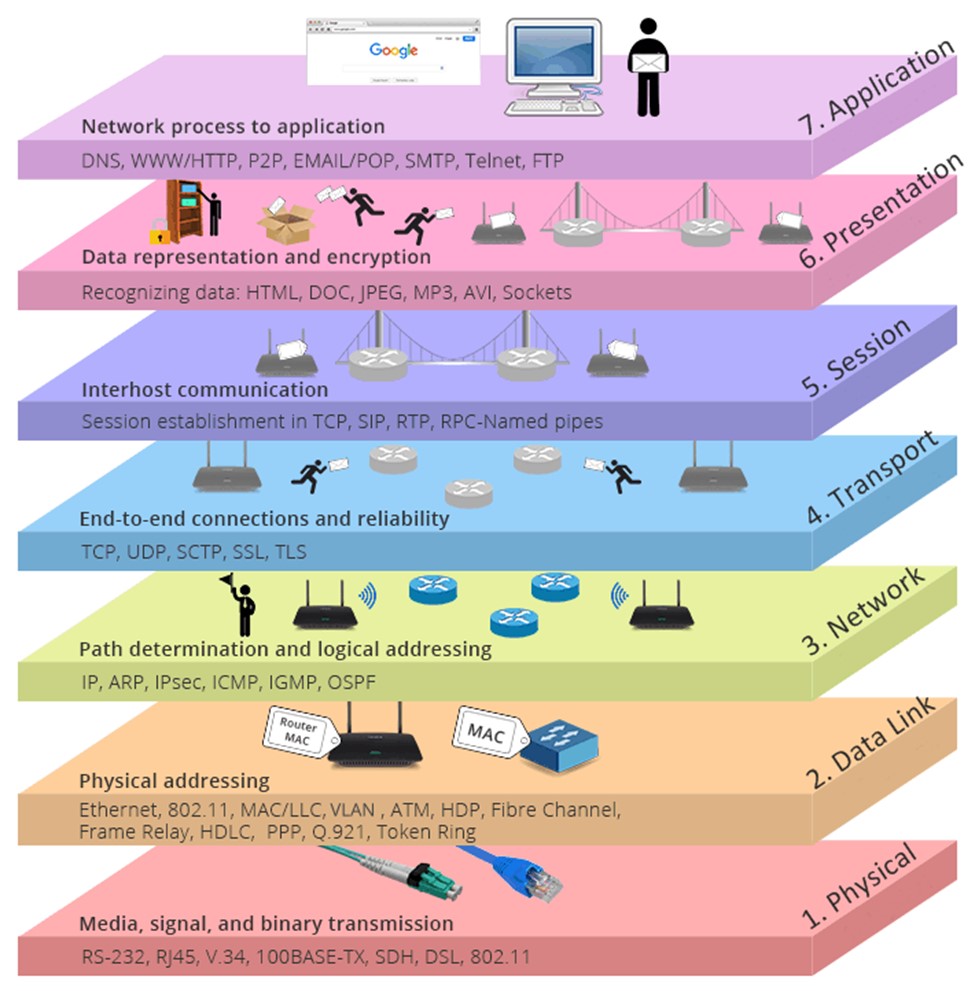
In OSI Model, the network is divided into seven layers. These layers from bottom to top are the Physical Layer, Data Link Layer, Network Layer, Transport Layer, Session Layer, Presentation Layer, and Application Layer. In this article, we will explore each of these layers in more detail.

OSI model for beginners

The OSI model outlines the process of transmitting information from a network device such as a router to its final destination via a physical medium and how the communication with the application is managed. In simpler terms, it establishes a standardized method of communication between various systems. It helps to ensure that communication between different computer systems is possible by breaking down the communication process into seven distinct layers, each with its own set of protocols and functions.

The seven layers of the OSI Model, from bottom to top, are the Physical Layer, Data Link Layer, Network Layer, Transport Layer, Session Layer, Presentation Layer, and Application Layer. In this article, we will explore each of these layers in more detail.

Layer 1: Physical Layer

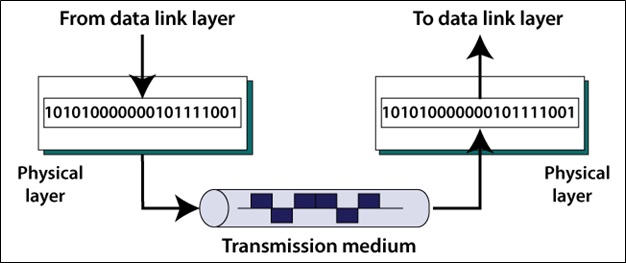
The Physical Layer is the first layer of the OSI Model and is concerned with the physical transmission of data between computers. It defines the electrical, mechanical, and functional specifications for the physical connection between devices.

The role of the Physical Layer in networking is to provide a stable and reliable connection between devices by specifying the electrical, mechanical, and functional requirements for data transmission. It also ensures that data is transmitted in a manner that is consistent with the data format defined in the other layers of the OSI Model.

The Physical Layer is responsible for several key functions, including:

  • Establishing and maintaining a physical connection between devices
  • Defining the electrical and mechanical specifications for data transmission
  • Encoding and decoding data for transmission
  • Defining the physical characteristics of the transmission medium

Some examples of Physical Layer technologies include Ethernet, Wi-Fi, and Bluetooth.

Layer 2: Data Link Layer

The Data Link Layer is the second layer of the OSI Model and is concerned with the delivery of data frames between computers. It provides error detection and correction functions and defines the format of the data frames that are transmitted between devices.

The role of the Data Link Layer in networking is to provide reliable data transmission by ensuring that data frames are delivered to the destination device in a timely and accurate manner. It also provides error detection and correction functions, which help to ensure the accuracy of the data that is transmitted.

The Data Link Layer is responsible for several key functions, including:

  • Defining the format of the data frames that are transmitted between devices
  • Error detection and correction
  • Flow control and media access control
  • Media-independent transmission of data frames

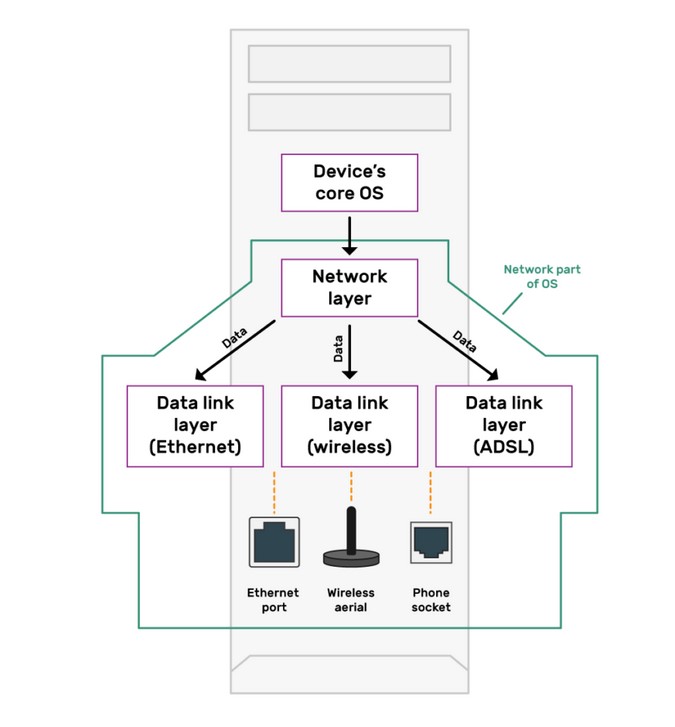
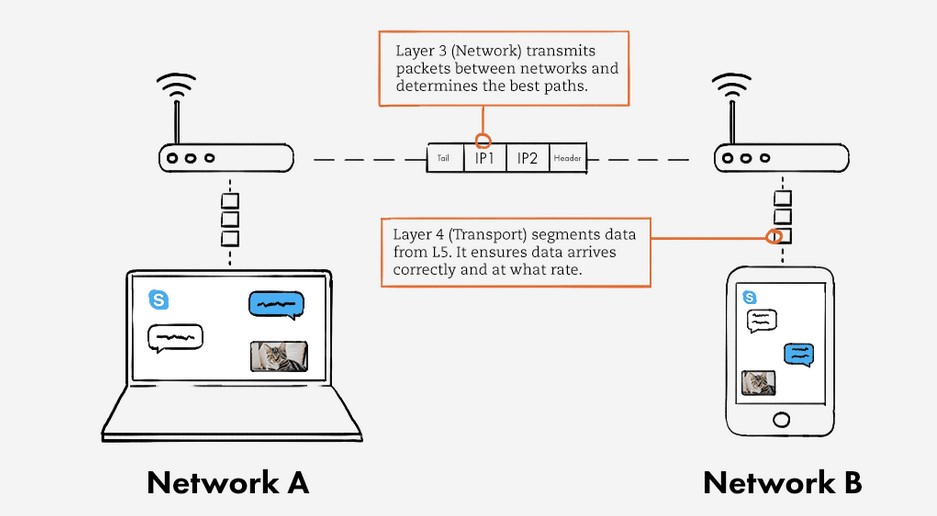
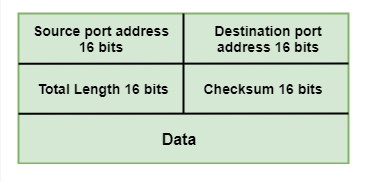
Layer 3: Network Layer

The Network Layer is the third layer of the OSI Model and is concerned with the routing of data between computer networks. It provides the means for transmitting data from one network to another and ensures that data is delivered to its intended destination.

The role of the Network Layer in networking is to provide an efficient and reliable means of transmitting data between computer networks. It also ensures that data is delivered to its intended destination by routing it through the network in an efficient and effective manner.

The Network Layer is responsible for several key functions, including:

  • Routing data between computer networks
  • Providing end-to-end connectivity between devices
  • Encapsulating data for transmission between networks
  • Ensuring the reliability and efficiency of data transmission

Some examples of Network Layer technologies include IP (Internet Protocol) and ICMP (Internet Control Message Protocol).

Layer 4: Transport Layer

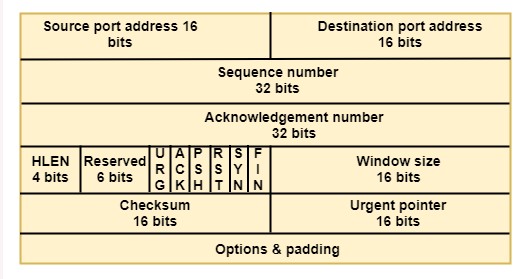
The Transport Layer is the fourth layer of the OSI (Open Systems Interconnection) Model and is responsible for reliable data transfer between end systems. It is the layer that divides data into manageable segments and ensures that each segment reaches its destination without any errors or lost data.

The Transport Layer is critical to the functioning of a network as it ensures the reliability of data transmission. It does this by dividing data into segments, which are then transmitted and reassembled at the destination end. This layer also provides flow control, which prevents the sender from overwhelming the receiver, and error control, which detects and corrects any errors that may occur during transmission.

The Transport Layer performs several key functions, including:

  • Segmentation: The Transport Layer divides data into segments for transmission.
  • Flow Control: This function ensures that data is transmitted at a rate that the receiver can handle.
  • Error Control: The Transport Layer checks for errors in the data and ensures that any errors are corrected.
  • End-to-End Connectivity: The Transport Layer provides end-to-end connectivity between applications running on different end systems.

There are two main types of Transport Layer protocols:

  • TCP (Transmission Control Protocol): This is a reliable, connection-oriented protocol that ensures that data is transmitted accurately and completely.
  • UDP (User Datagram Protocol): This is an unreliable, connectionless protocol that does not guarantee the delivery or accuracy of data. It is used for applications that do not require reliable data transmission, such as video streaming.

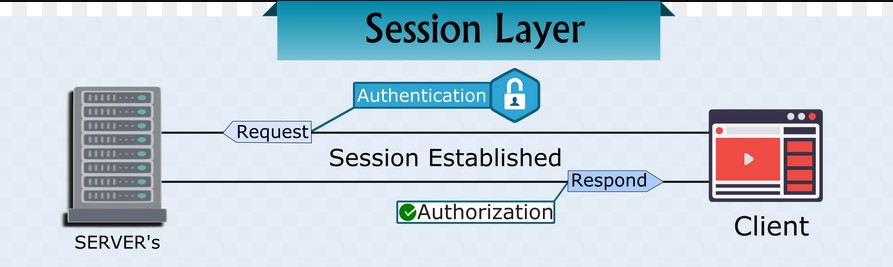
Layer 5: Session Layer

The Session Layer is the fifth layer of the OSI Model and is responsible for establishing, managing, and terminating communication sessions between applications. A session is a continuous exchange of information between two applications and can involve multiple data transfers.

The Session Layer provides a framework for applications to communicate with each other. It coordinates the communication process between the applications and ensures that the data is transmitted in an orderly and synchronized manner. The Session Layer also ensures that the communication between the applications is maintained until it is terminated by either the sender or the receiver.

The Session Layer performs several key functions, including:

  • Session Establishment: The Session Layer establishes a communication session between two applications.
  • Session Management: The Session Layer manages the communication session by maintaining the synchronization of data transfer.
  • Session Termination: The Session Layer terminates the communication session when it is no longer needed.

There are several Session Layer protocols, including:

  • NFS (Network File System): This is a popular protocol for sharing files over a network.
  • RDP (Remote Desktop Protocol): This is a protocol for remote access to a desktop.
  • SSH (Secure Shell): This is a protocol for secure remote access to a computer.

Layer 6: Presentation Layer

The Presentation Layer is the sixth layer of the OSI Model and is responsible for providing a common format for data exchange between applications. The Presentation Layer is responsible for converting data from the Application Layer into a standardized format that can be understood by both the sender and receiver.

The Presentation Layer is responsible for data representation and encryption/decryption of data. It ensures that the data transmitted between applications is in a standard format and can be understood by both the sender and receiver. The Presentation Layer also provides a means for data compression and decompression to reduce the amount of data transmitted over the network.

The Presentation Layer performs several key functions, including:

  • Data Conversion: The Presentation Layer converts data from the Application Layer into a standard format that can be understood by both the sender and receiver.
  • Data Compression/Decompression: The Presentation Layer can compress data to reduce its size for transmission over the network and decompress it for use by the recipient.
  • Data Encryption/Decryption: The Presentation Layer can encrypt data for transmission over the network and decrypt it for use by the recipient.

There are several Presentation Layer protocols, including:

  • MIME (Multipurpose Internet Mail Extensions): This is a protocol for the representation of multimedia content.
  • SSL (Secure Sockets Layer) and TLS (Transport Layer Security): These are protocols for securing data transmission over the internet.

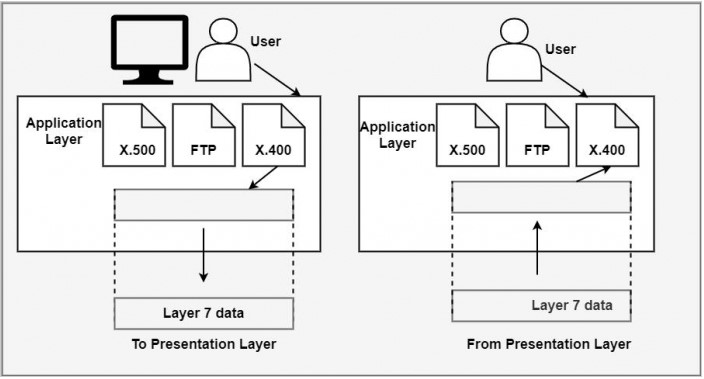
Layer 7: Application Layer

The Application Layer is the top layer of the OSI Model and is responsible for providing a user interface for network applications. It is the interface between the network and the user, allowing applications to request and receive network services.

The Application Layer is responsible for providing network services to applications. It is the interface between the network and the user, allowing applications to request and receive network services. The Application Layer provides a means for applications to interact with the network and access the services provided by the lower layers of the OSI Model.

The Application Layer performs several key functions, including:

  • Network Services: The Application Layer provides network services to applications, including file transfer, email, and other network-based applications.
  • User Interface: The Application Layer provides a user interface for network applications, allowing the user to interact with the network.
  • Network Resource Access: The Application Layer provides a means for applications to access network resources, such as databases or file servers.

There are several Application Layer protocols, including:

  • HTTP (Hypertext Transfer Protocol): This is the primary protocol used for web browsing and web application access.
  • FTP (File Transfer Protocol): This is a protocol for transferring files between systems.
  • SMTP (Simple Mail Transfer Protocol): This is a protocol for sending email.

In conclusion, the Application Layer is the top layer of the OSI Model and is responsible for providing network services to applications. Its functions of network services, user interface, and network resource access provide a means for applications to interact with the network and access the services provided by the lower layers of the OSI Model. The Application Layer is crucial for the operation of network-based applications and services.

The OSI Model in Real-World Networking

The OSI Model is widely used in real-world networking, as it provides a standardized framework for understanding and designing networks.

This model is used in a wide variety of applications, including:

1. Network Design:

The OSI Model is used as a reference for network design, helping network engineers to understand the various components and protocols involved in a network.

2. Network Troubleshooting:

The OSI Model provides a standardized framework for troubleshooting network problems, making it easier for network technicians to diagnose and resolve issues.

3. Network Optimization:

The OSI Model is used to optimize network performance by helping network engineers to identify bottlenecks and other performance issues.

4. Importance of understanding the OSI Model for network technicians:

Understanding the OSI Model is critical for network technicians, as it provides a standardized framework for network design and troubleshooting. Network technicians who understand the OSI Model are better equipped to diagnose and resolve network problems, as well as to design and optimize network performance.

Advantages of OSI Model

There are several advantages to using the OSI Model for network design and troubleshooting, including:

Standardization: The OSI Model provides a standardized framework for network design, making it easier for network engineers to understand the various components and protocols involved in a network.

Modularity: The OSI Model is modular in design, making it easier for network engineers to understand the different layers and protocols involved in a network.

Troubleshooting: The OSI Model provides a standardized framework for troubleshooting network problems, making it easier for network technicians to diagnose and resolve issues.

Understanding the OSI Model is essential for anyone working in the field of computer networking. This standardized framework provides a means of understanding and designing networks, as well as diagnosing and resolving network problems. Network technicians who understand the OSI Model are better equipped to optimize network performance and provide network services to users.

In conclusion, the OSI Model is a critical component of computer networking, providing a standardized framework for understanding and designing networks. Network technicians who understand the OSI Model are better equipped to diagnose and resolve network problems, as well as to design and optimize network performance.

Posted on

How Windows authentication works?

Hello, aspiring ethical hackers. In this article, you will learn how Windows authentication works? Our readers have seen multiple instances where we have dumped Windows password hashes as part of our hacking tutorials. This should have brought some pertinent questions in the minds of the readers.
As to know how hashdump command of meterpreter, Mimikatz and cachedump module of Metasploit dump credential hashes, where are these hashes stored and why are they in the form of hashes, readers need to get a deep understanding of how Windows authentication works.

Windows Logon Process starts as soon as you go to the Login Screen of a Windows system. The Logon Process is different in different network scenarios for Windows. There are two network types into which a Windows system can be configured. They are,

  1. WorkGroup
  2. Domain

Windows systems in Workgroup network use Local Authentication whereas Windows systems connected in Domain network use Remote Authentication.

How Local Authentication works in Windows?

Let’s first see how Local Authentication takes place. In local authentication, the password hash is stored on the same computer on which users are trying to log on.
In Windows, the passwords are stored in the form of a hash in a file known as Security Accounts Manager (SAM) file. The SAM file is located in %SystemRoot%/system32/config/SAM location and it can neither be deleted nor copied while Windows is running.
This is because the Windows kernel obtains and keeps an exclusive filesystem lock on the SAM file which it will release only after the operating system has shut down or a “Blue Screen of Death” exception has been thrown. It is mounted on HKLM/SAM and SYSTEM privileges are required to view it. Readers have already learnt that passwords are stored in SAM file in encrypted form. These passwords are stored in two hash formats in SAM file.

1. Lan Manager Hash (LM Hash)

2. New Technology Lan Manager Hash (NTLM Hash)

LAN Manager Hash

Lan Manager Hashing was used by Windows operating systems prior to Windows NT 3.1. In LM hashing, the password hash is computed as follows,

a. The user’s password is restricted to a maximum of fourteen characters.
b. The password of the user is converted to Uppercase.
c. Then user’s password is encoded in the System OEM code page.
d. This password is NULL-padded to 14 bytes.
e. This 14 bytes “fixed-length” password is then split into two 7-byte halves.
f. Both of these 7-byte halves are used to create two DES keys, one from each 7-byte half. This is done by converting the seven bytes into a bit stream with the most significant bit first and then inserting a parity bit after every seven bits (so 1010100 becomes 10101000). This is done to generate the 64 bits needed for a DES key.
g. Each of this two keys is used to DES-encrypt the constant ASCII string “KGS!@#$%” resulting in two 8-byte ciphertext values.
h. These two ciphertext values are then concatenated to form a 16-byte value, which is the final LM hash.

how windows authentication works

Security of LAN Manager Hash

LM Hash has several weaknesses. The major weaknesses are :

1. The maximum length of Password while using LM authentication can only be 14 characters.
2. All passwords in LM hash are converted into UPPERCASE before generating the hash value. This means LM hash treats ABcd1234, ABCD1234 and abCD1234 and AbCd1234 as same as ABCD1234. This reduces the LM hash key space to just 69 characters.
3. As already explained above, 14 character password is broken into two halves of 7 characters e- ach and then the LM hash is calculated for each half separately. This makes it easier to crack a LM hash, as the attacker only needs to brute-force 7 characters twice instead of the full 14 charact- ers.
4. As of 2020, a computer equipped with a high-end graphics processor (GPUs) can compute 40 billion LM-hashes per second. At that rate, all 7-character passwords from the 95-character set can be tested and broken in half an hour; all 7-character alphanumeric passwords can be tested and broken in 2 seconds.
5. If the password created is 7 characters or less than that, then the second half of hash will alway- s produce same constant value which is (0xAAD3B435B51404EE). Therefore, if a password is les- s than or equal to 7 characters long, it can easily be identified even without using any tools.
6. While using Remote Login over a network, the LM hash value is sent to servers without any salting, thus making it vulnerable to man-in-the-middle attacks.
7. Without salting, it is also vulnerable to Rainbow Table Attack.
To overcome this weaknesses, Microsoft Starting with Windows Vista and Windows Server 2008, Microsoft disabled the LM hash by default.

NT Hash

Also called NTLM, this is the hash many modern Windows systems store the password hashes. Introduced in 1993. The process of calculating NT Hash is,

1. The password is converted into Unicode characters.
2. Then MD4 encryption is run on these converted characters to get the NT hash which is then stored in SAM database or NTDS file (Domain). NTHash is case sensitive but it still doesn’t provide salting.

The Local Logon Process

1. The Windows authentication process starts from the Windows Login screen. LogonUI.exe han- dles the process by displaying correct logon input boxes depending on the authenticator put in place.
2. When users enter the password on the login interface, winlogon.exe collects those credentials and passes them to the lsass.exe (Local Security Authority Subsystem Service). Winlogon.exe is the executable file responsible for managing secure user interactions. The Winlogon service initiat -es the logon process for Windows operating systems by passing the credentials collected by user action to Lsass.
3. LsaLogonUser supports interactive logons, service logons, and network logons. The LsaLogon User API authenticates users by calling an authentication package which is most probably MSV1_ 0 (MSV) authentication package which is included with Windows NT.
4. The MSV authentication package is divided into two parts. In Local authentication, both parts run on the same computer. The first part of the MSV authentication package calls the second part.
5. The first part of the MSV authentication package converts the clear-text password both to a LAN Manager Hash and to a Windows NT hash. The second part then queries the SAM databas- e for the password hashes and makes sure that they are identical.
6. If the hash is identical, access is granted.

How Windows Domain Authentication takes place?

1. The Windows authentication process starts from the Windows Login screen. LogonUI.exe handles the process by displaying correct logon input boxes depending on the authenticator put in place.
2. When users enter the password on the login interface, winlogon.exe collects those credentials and passes them to the lsass.exe (Local Security Authority Subsystem Service). Winlogon.exe is the executable file responsible for managing secure user interactions. The Winlogon service initiates the logon process for Windows operating systems by passing the credentials collected by user action to Lsass.
3. LsaLogonUser supports interactive logons, service logons, and network logons. The LsaLogon User API authenticates users by calling an authentication package which is most probably MSV1_ 0 (MSV) authentication package which is included with Windows NT.
4. The MSV authentication package is divided into two parts. The first part of the MSV authentication package runs on the computer that is being connected to and the second part runs on the computer that contains the user account. When the first part of the MSV authentication package recognizes that network authentication is required because the domain name passed is not its own domain name, it passes the request to the Netlogon service. Netlogon service is a Authentication Mechanism used in the Windows Client Authentication Architecture that is used to verify logon requests. It registers, authenticates and locates Domain Controllers. It’s functions include,

a. Selecting the domain to pass the authentication request to.

b. Selecting the server within the domain.

c. Passing the authentication request through to the selected server.

5. The Netlogon service (client computer) then forwards the login request to the Netlogon service on the destination computer (i.e domain controller).
6. In turn, the Netlogon service passes the request to the second part of the MSV authentication package on that destination computer.
7. First, the second part queries the password hashes from the SAM database or from the Active Directory database. Then, the second part computes the challenge response by using the password hash from the database and the challenge that was passed in. The second part then compares the computed challenge response to passed-in challenge response.
8. If the hash is identical, access is granted.

That was all about how Windows authentication.