Posted on

Complete guide to cryptography

Hello, aspiring ethical hackers. In this blogpost, you will learn about cryptography or in the cybersecurity sense about encryption. The word cryptography came from a Greek word kryptos which means “hidden secret” and it plays a very important role in cybersecurity.

What is cryptography?

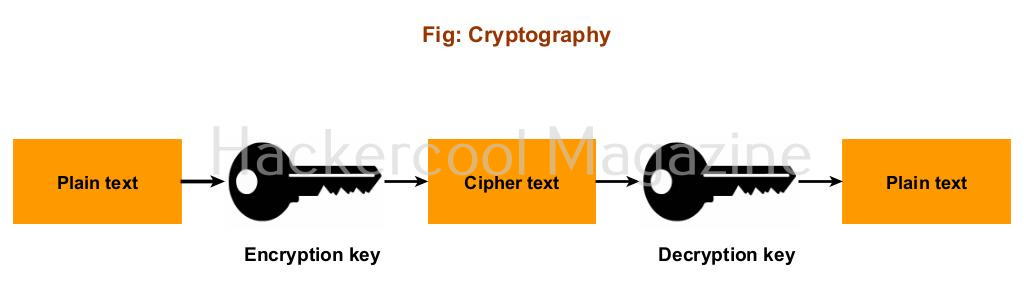
Cryptography is the study of secure communication techniques. It is closely associated with encryption which is an act of taking an ordinary text and scrambling it to transform it in to cipher text. The aim of this encryption is to make sure that the message is only understood by someone which it is intended to.

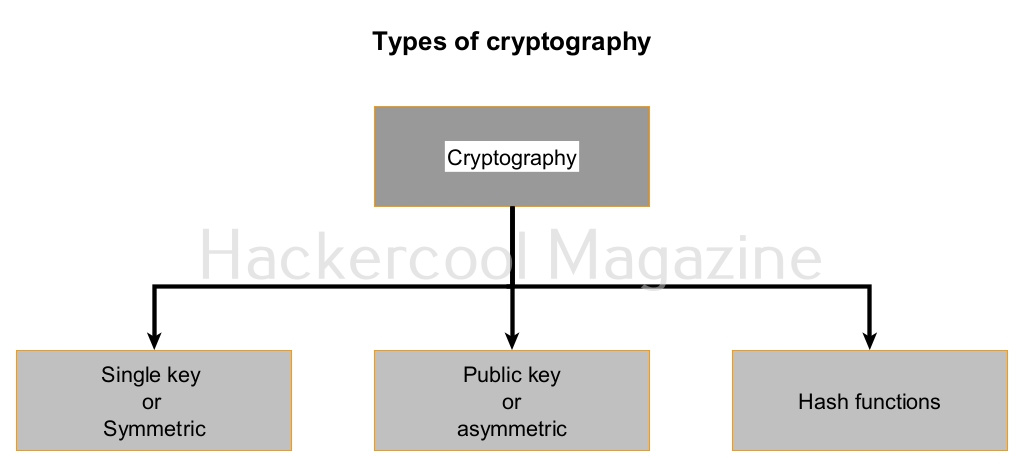
Types of Cryptographic techniques

There are three types of cryptographic techniques. They are,

  1. Single key cryptographic system (Symmetric encryption)
  2. Public key cryptographic system (Asymmetric encryption)
  3. Hash Functions.

What is a cryptographic key?

A cryptographic key is a string of characters used with an encryption algorithm to transform data into a scrambled form or cipher text.

What is an encryption algorithm?

An encryption algorithm is the method used to transform plain text to cipher text.

1. Symmetric encryption (Single key cryptographic system)

In symmetric encryption, a single key is used to both encrypt and decrypt data.

Hence it is known as single key cryptographic system. Symmetric encryption is very fast and hence used wherever speed is required for encryption. For example, it is used for encrypting credit card information and other confidential information, making malware and virus Fully Undetectable (FUD) etc. There are various encryption algorithms. The most popular encryption algorithms are DES, 2DES, 3DES, AES, IDEA, RC4, RC5, RC6, Blowfish etc.

2. Public key cryptographic system or asymmetric encryption (PKCS):

Also known as asymmetric encryption, Public key cryptographic system (PKCS) uses two keys: Public key and Private key. The data is encrypted with the Public key and can only be decrypted with private key or vice versa.

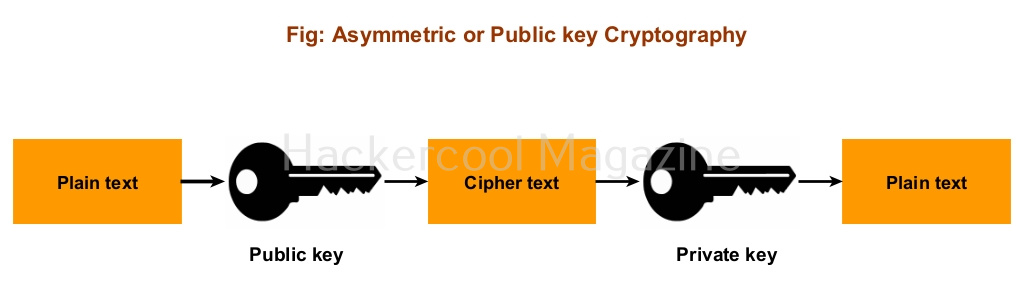
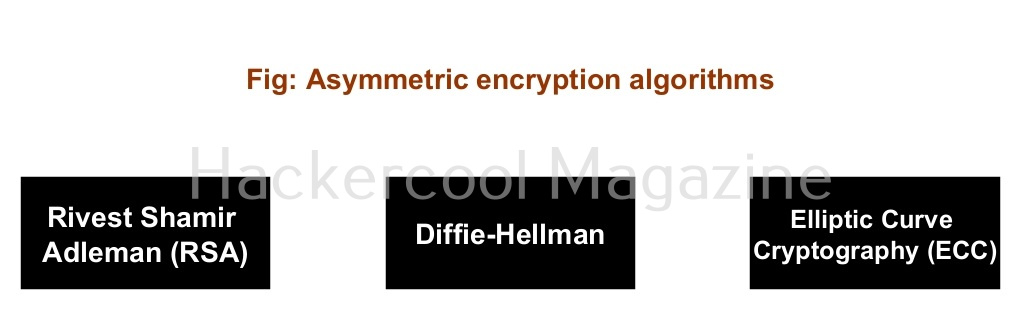
Since two different keys are used for encryption and decryption, even if any attacker knows about the key used for encryption there is no threat to any data. It is more secure than the single key cryptographic system but a bit slow. This is used in online communications like HTTPS, digital signatures etc. Example of Public key cryptography system algorithms are RSA, Diffie-Hellman etc.

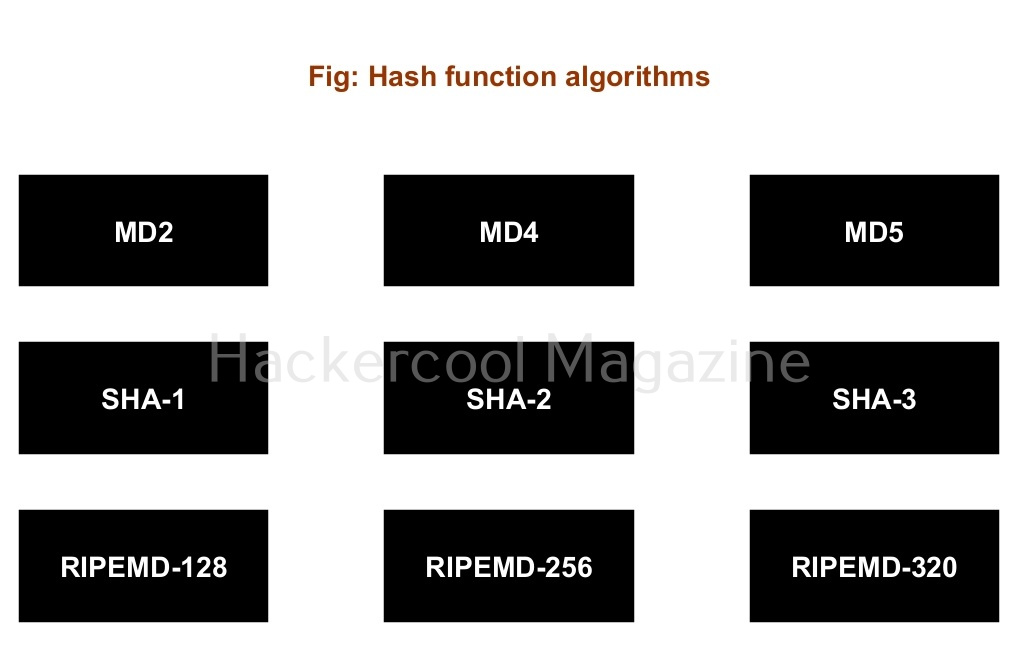
3. Hash Functions or Message Digests:

A hash function is a versatile one-way cryptographic algorithm that converts plain text to a fixed length of encrypted text which is known as a message digest or simply a hash. A hash is known as a one-way function since once it encrypted it cannot be decrypted but (or decrypting it is very complex and difficult). Hash functions and message digests are used whenever the decrypting is not needed like hashing the passwords etc. Example of hash functions are MD5, SHA-1, SHA-512, RIPEMD etc.

Posted on

Beginners guide to IoT security

Hello, aspiring ethical hackers. In this blogpost you will learn about IoT security or Internet of Things (IoT) security. But before you understand IOT security, you need to understand what Information of Things (IOT) is.

What is Information of Things (IoT)?

A few years back, getting an internet connection to our home was a bit rare and costly. I remember most of my friends had a computer at home but nobody had internet. Nowadays, even device (that once existed without the need of internet) can be connected to the internet.

These devices include lightbulbs, security cameras, fans, Refrigerator, Washing machine and almost all the devices of a smart home. They are connected to internet to add comfort to humans. All these devices are together known as Internet of Things (IOT).

Unlike your computer, laptop or mobile, these devices don’t need any human interaction to connect to internet.

What is IoT security?

As you should have figured out by now, IoT security is ensuring the security of these devices to protect your network.

What are various threats to IoT security?

Every device that is connected to internet is vulnerable to hacking. MIRAI botnet proved it. Internet of Things (IoT) devices are built with usability and human comfort in mind. The most common threats to IOT devices are.

1. Firmware vulnerabilities:

Every digital device has a firmware which is similar to a operating system on a computer. However, it cannot by easily updated as a operating system. So, once a vulnerability is detected in the firmware and exploited in an IOT device, it is difficult to upgrade or patch it.

2. Credential attacks:

Although IoT devices come with credentials, these are default credentials that hat are insecure and easy to guess. In most IoT devices, these credentials cannot even be reset or changed. So, any attacker can easily guess the credentials, take control of the devices.

3. Man-in-the-Middle attacks:

Man in the middle (MiTM) attacks are just not limited to computers and servers. It is also possible to perform packet sniffing and password sniffing between the IOT device and the server it is connecting to. If the transmission is taking place in clear text, hackers can sniff on it.

4. Physical access attacks:

Most IoT devices are placed in easily accessible locations. If hackers can get hold of this device, they can take control of the device.

Posted on

Complete guide to DNSrecon

Hello, aspiring ethical hackers. This is a complete guide to dnsrecon tool. In our previous blogpost on DNS enumeration, you read what DNS is, what are the various types of DNS records, what is the information about the network can DNS enumeration reveal to a pen tester or a Black Hat Hacker. DNSrecon is one such tool used for enumerating DNS.

DNSrecon is written by Carlos Perez. He wrote it initially in Ruby to learn about that programming language and about DNS way back in 2007. As time passed by, he wanted to learn python and he posted dnsrecon tool to python.

The features of DNSrecon tool are,

  1. Checks all NS Records for Zone Transfers.
  2. Enumerates general DNS Records for a given domain (MX, SOA, NS, A, AAAA, SPF and TXT).
  3. Performs common SRV Record enumeration.
  4. Top Level Domain (TLD) expansion.
  5. Checks for Wildcard resolution.
  6. Brute forces subdomains and host A and AAAA records given in a domain and a wordlist.
  7. Performs PTR record lookup for a given IP Range or CIDR.
  8. Checks a DNS server’s cached records for A, AAAA and CNAME.
  9. Records provided a list of host records in a text file to check.

Let’s see how to enumerate DNS with DNSrecon. DNSrecon is installed by default in Kali Linux. To use DNSrecon, all we have to do is use the command below.

dnsenum -d <domain>

–name_server (-n)

By default, DNSrecon will use SOA of the target server to enumerate DNS. You can use a different server, you can use it using this option.

-a

This option is used to do a zone transfer along with standard enumeration performed above.

As expected it failed.

-y, -b, -k

Similarly, you can perform yandex (-y), bing(-b), crt.sh (-k) enumeration along with standard enumeration.

-w

This option is used to perform deep whois record analysis and reverse lookup of IP ranges found when doing standard enumeration.

-z

This option is used to perform a DNSSEC zone walk along with standard enumeration.

–dictionary (-d)

This option is used to use a dictionary file containing subdomains and hostnames to use for brute force.

–range (-r)

Specify a IP range to perform reverse lookup.

–type (-t)

This option is used to perform a specific type of enumeration only. The various possible types of enumeration that can be performed using dnsrecon are,

  • Std: all SOA, NS, A, AAAA, MX and SRV.
  • rvl: reverse lookup
  • brt: brute force using a given dictionary
  • srv: SRV records.
  • axfr: zone transfer from NS server.
  • bing: Bing search for hosts and subdomains.
  • Yand: Yandex search for hosts and subdomains.
  • Crt: crt.sh enumeration for subdomains and hosts.
  • Snoop: cache snooping argument at NS server.
  • tld: test against all TLD’s registered with IANA.
  • Zonewalk: perform DNS sec Zone using NSEC records.

Saving results

You can save the results of the found records to a database (-db), XML (-X), CSV (-c) and Json(-j) files.

–lifetime

This option is used to set the time the tool has to wait until the target server responds. The default time is 3 seconds.

–threads

This option is useful to specify the number of threads to be used while performing reverse lookup, forward lookup, brute force and SRV record enumeration.

That’s all about DNSrecon.

Posted on

Complete guide to DNSenum

Hello, aspiring ethical hackers. In the previous blogpost on DNS enumeration, you learnt what DNS service is used for, different types of records it has, what information can DNS enumeration reveal to hackers or pentesters. In this blogpost you will learn about a tool named DNSenum that can be used to enumerate DNS. DNSenum is a multithreaded perl script that is used to gather information from target DNS servers.

The features of DNSenum are,

  1. Get the host’s address (A record).
  2. Get the nameservers (NS).
  3. Get the MX record (MX).
  4. Perform axfr queries on nameservers and get BIND VERSION.
  5. Get extra names and subdomains via google scraping (google query = “-www site:domain”).
  6. Brute force subdomains from file, can also perform recursion on subdomain that have NS records.
  7. Calculate C class domain network ranges and perform whois queries on them.
  8. Perform reverse lookups on netranges (C class or/and whois netranges).

Let’s see how to perform DNS enumeration with DNSenum. DNSenum is included by default in Kali Linux. If you want to enumerate a domain with DNSenum. all you have to do is supply a domain name as shown below.

dnsenum <domain>

When run in default mode, DNSnum first enumerates the host address, then the name servers, then MX records, ACFR queries, extra names and subdomains via google scraping, brute forces subdomains from them, calculates the class C IP network ranges from the results and performs whois queries on them and performs reverse lookup on these IP addresses.

–dnsserver

In some cases, the result from the enumeration can vary depending on the server that is queried. Using DNSenum, we can perform a query by using another DNS server as shown below.

When you first use dnsenum on a domain to perform enumeration, you will notice that there will be a considerable delay at some stages. The delay occurs while dnsenum is brute forcing the subdomain names and then while performing reverse lookup on the IP address range.

While brute forcing the subdomain names, there is a delay because the file used by DNSenum (“/usr/share/dnsenum/dns.txt”) has over 1506 entries. So, until the tool checks all the entries, there will definitely be a delay. Can we reduce this data? Yes, by using another file instead of the default one. For example, we can create our own “dns.txt” file with entries of subdomains gathered from other type of enumeration.

–file(f)

We can specify this custom file with the (-f) option as shown below.

–subfile

We can also save the output of subdomain brute forcing in a file using the subfile option as shown below.

–noreverse

Coming to reverse lookup, while performing reverse lookup on 512 IP addresses (in this case) definitely takes time. But don’t worry. We can skip the reverse lookup by using the normal option.

–private

This option enumerates and saves the private IP addresses of a domain in the file named <domain_name>_ips.txt.

–timeout (-t)

The default timeout option of TCP queries and UDP queries for dnsenum is 10 seconds. The timeout option allows us to change it.

–threads (va)

This option is used to specify the number of threads to perform different queries.

–verbose (-v)

You already know what this option does. It reveals more information. See the differences.

–scrape (-s)

Used to specify the number of subdomains to be scraped from Google.

Here’s the result.

–page (-p)

While scraping the subdomain with dnsenum above, you should have noticed that it queries Google search pages for subdomains related to the domain. By default, it is 20 pages. Using this option, it can be changed. For example, lets set it to 10.

–recursion (-r)

This option can be used to perform recursion on subdomain gathering.

–whois (-w)

As you might have expected, this option is used to perform whois queries on class C network ranges. It can be time consuming. Use wisely. Learn what is whois footpriting.

–delay (-d)

This option is used to specify the maximum delay between each whois query. The default delay is 3 seconds.

That’s all about DNSenum.

Posted on

Beginners guide to footprinting websites: Part 2

Hello aspiring ethical hackers. In Part-1 of website footprinting, you learnt how to gather information about a website by using methods like grabbing banners, directory scanning and spidering. In this Part-2, you will learn about some more techniques for footprinting websites.

4. Website mirroring

Either you are directory scanning or spidering, you are sending a lot of requests to the website (especially if the website is very large) which may raise suspicions or on the target side or you will be blocked. What if there was an effective workaround for this. Actually, there is. Instead of sending requests to the target website, we can download the entire website to your local device. This is known as website mirroring. For example, let’s mirror a website using wget as shown below.

5. Footprinting websites using online services

A website is constantly updated. The information that is displayed on the website last year may not be there today. What if there was a way to go back in time to view the past versions of a website for gathering information. Actually, there is a way for this. By using the website archive.org. Archive.org collects the snapshot of the website at different points in time from the time the website existed and stores it. So, you can go there and view how the website looked 10 years back ago or three years ago. For example, this is how our website looked way back in 2018.

Better, you can constantly monitor the updates being made to the websites using a website known as website watcher.

Website watcher automatically checks webpages for any updates and changes.