Posted on

Wifi pentesting with Android

Securing your company’s wireless network is different and more challenging than securing the wired network. Many factors come into consideration when setting up and securing a wi fi network. Regular pen testing of your wifi network is also very important. Today we are going to see how to perform a pen test on a wifi network using android phone. WiFi pentesting with android simplifies the process of pen testing. For this we are going to use the tool Wifinspect tool available on google playstore. We need a rooted phone to install this application. Once you install this app on your android phone, connect to your wifi network. I am using a wifi network whose SSID is “shunya” for this howto.

Now click on your app.( I think “click” would be a misnomer here, so from here on I will use the word “touch”). We will get a display as below.

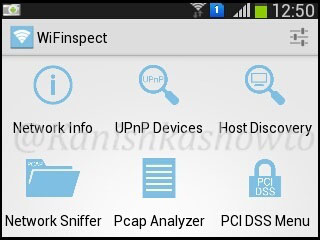
We see six options. Starting with the first option, we will see each and every option.
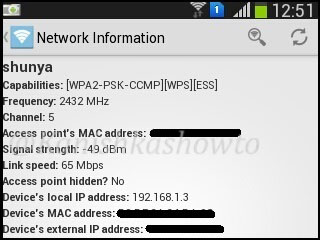
1. Network Info

Touch on network info. We will get a lot of information about the wifi network like the encryption used, frequency and the channel it is operating on and whether our access point is hidden or not as shown below.

2. UPnP Device Scanner

The second option as its name implies scans for universal plug and play devices in our network.
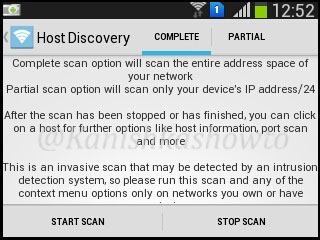
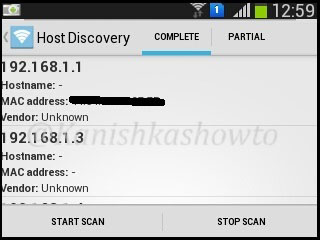
3. Host Discovery

The third option is for host discovery. This option is used to find out about OS and other information about devices in the wifi network. There are two options for host discovery, complete and partial scan. As shown below, compete scan option will scan the entire address space of your network while the partial scan option scans only your devices IP address/24. I am selecting complete scan option. Touch on “start scan” option.

The result will show all the devices and any information about them in the network as shown below.

wifi pentesting with android

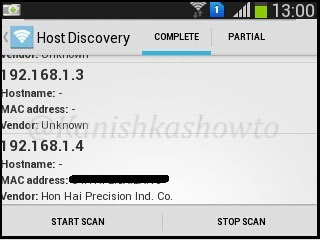
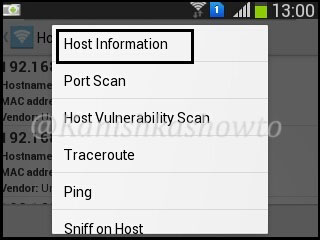
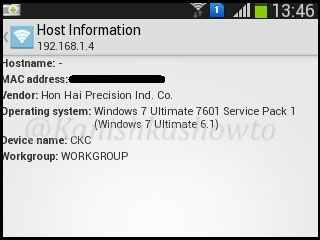
If you want to further analyze any host, long click on it to see more sub options. For example, I am gonna further analyze the device with IP address 192.168.1.4 because it is the only one whose vendor has been shown.

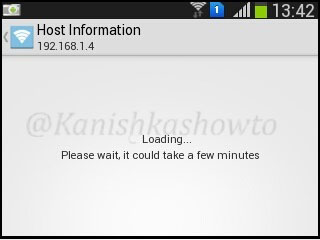
First we will see the host information of 192.168.1.4. Touch on that option. The analysis of host information will take some time as shown below, so don’t lose patience.

After some time, the result will be shown

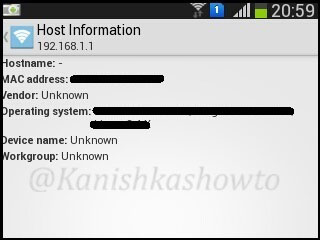
The same result for my gateway( the wifi router) is shown below.

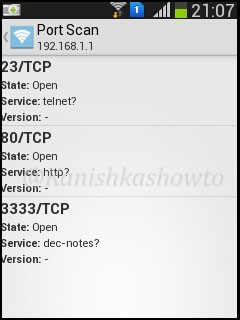
The next option is port scan. Let’s do a port scan on the gateway(192.168.1.1) to see if any ports are open. We can see that some ports are open.

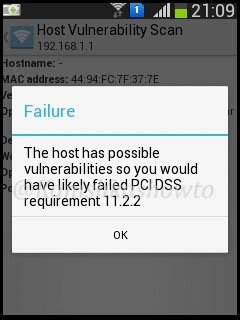
When I do a host vulnerability scan on the gateway i get the below message. It seems my gateway is vulnerable. We will see more about it later.

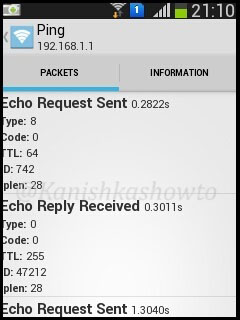
Below are the results for traceroute and ping respectively

4. Sniffer

The next option is sniffing. Start sniffing by touching on it. It will give you a warning as shown below.

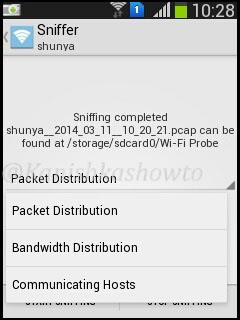
Touch on “Start sniffing”. Sniffing will start. After it collects sufficient packets, touch on “stop sniffing”.

We have many options to analyze the pcap file as shown below.

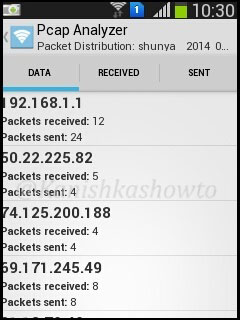
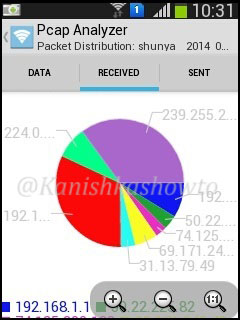
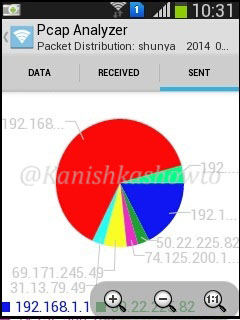
Packet distribution analysis shows packets sent and received by the devices.

The bandwidth distribution analysis will show the bandwidth consumed by each host.

Communication hosts analysis show the packets and bandwidth exchanged between different hosts.

5. Pcap Analyzer

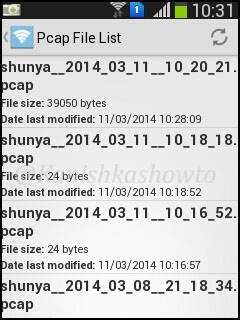
Our pcap files are stored in wi-fi probe folder on our phone. We can even analyze the pcap files later using the pcap analyzer.
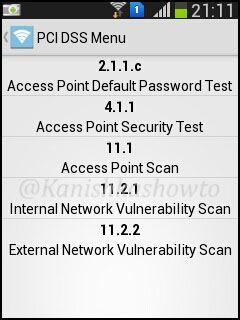
6. PCI DSS Menu

PCI DSS stands for payment card industry data security standard. If you want to know more about PCI DSS go here. This option will check our wifi network’s compliance with PCI DSS.

Touch on the first option. Start the test. A brief description about this test is shown.

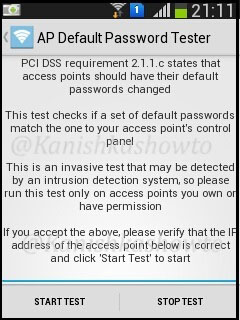
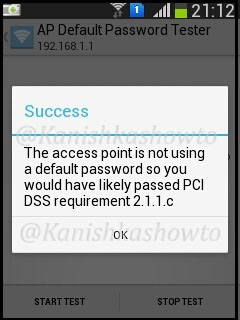
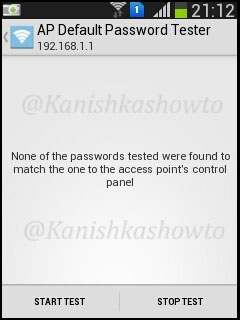
Touch on “start test”. This test checks if our wifi router is using default passwords for authentication.

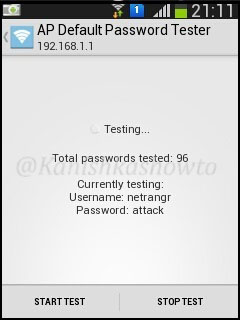
I am not using any default password and i get the below result.

The “Access Point Security Tester” tests if our wifi network is using strong encryption. Touch on “start scan”.

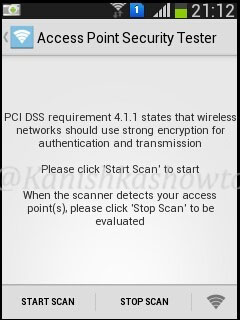
The result will be as below. It says my access point is secure as it is using WPA i guess.

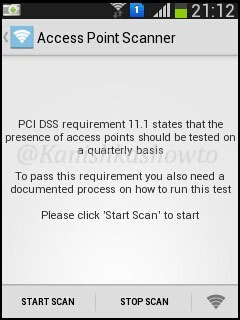
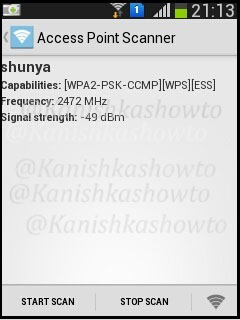
The “Access point Scanner” test tests the wifi network’s compliance with PCI DSS requirement 11.1 as shown below.

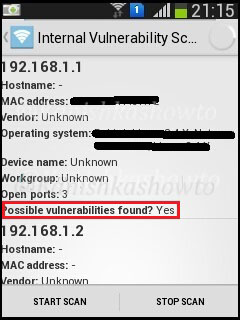
The “internal vulnerability scanner” test checks if there are any of the devices in our wifi network have any vulnerabilities. It turns out that my gateway has some vulnerabilities as shown below.

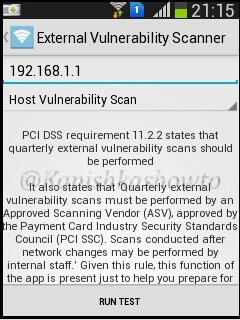
There is also a “external vulnerability scanner” option available to scan for external vulnerabilities.

Hope this was helpful.

Posted on 2 Comments

SQL Injection with Sqlmap : Step by step guide

Hi Friends. Today we will see how to perform SQL injection with Sqlmap. Sqlmap is an “open source penetration testing tool that automates the process of detecting and exploiting SQL injection flaws and taking over of database servers “. It is pre-installed in Kali Linux. For this tutorial I am using Vulnerawa as target and it is necessary to setup a webapp pentest lab with it. See how to set up a webapp pentest lab.

If the webapp pentest lab is all ready. Open the browser in Kali linux and type the address as shown below.( the ip address may differ for you ). You should see the Vulnerawa web page as shown below. Click on “About”.

The below webpage will open. It shows about the founders of Vulnerawa.

Click on “founder 1”. It will show brief details about him as shown below.

Similarly go back and click on “Founder 2” and “Founder 3”. The result will be as below. Now if you have observed, the “id” parameter in the URL changes as we click on different users. For founder 1, it is 1 and sequentially.

Now introduce a single quote( ‘ ) character in the URL. after the number as shown below.

Click on “Enter” and the page will show an error as shown below. “You have an error as shown below……..”. This is a clear sign that the webpage is vulnerable to SQL injection.

Now open SQLmap from the path as shown below.

Now copy the vulnerable url and type the following command the terminal. Here -u stands for url.

The result will be as shown below. It will reveal the website technology and the scripting language used.

SQL injection with sqlmap

Now let’s grab the banner of the website. Type the following command and hit “Enter”.

You can see the banner as shown below.

To see the current user of the website, type the following command.

The current user can be seen as below.

Now let us see the current database used by the website. Type the following command.

We can see that the current database is “Vulneraw”.

Now let us see all the tables present in the database “Vulneraw” by using following command.

We see that we have only one table in the current database. The table is “users”.

Now lets see the number of columns in the table “users”. Type the following command.

We see there are four columns in table “users”.

Now let’s dump the values of two columns username and password by typing the following command.

The result is as below. we got the username and passwords.

\

If we want to dump all the entries of the table, type the following command.

Here are the entries.

Now let’s see if we are lucky enough to get the shell of the target. Shell is the target machine’s command line or terminal. Type the following command.

It will prompt us to enter the application language being used by the website. We already know it is PHP. Enter its value. Next it will prompt you to enter the writable directory. You cam choose your option wisely. I chose the default root directory for Wamp server. Hit on “Enter”.

I successfully got the os-shell. Now let’s try some commands. Type “dir” to see the contents of the root directory. It works as shown below.

Let’s see how many users are there on the system. Type the command “net user” . We can see the users listed as below. Happy hacking practice.

To find sites vulnerable to this sql injection use google dork “site:.com inurl:id=1” or similar dorks. That’s all in this tutorial.

Posted on 4 Comments

How to spoof your IP address in Kali Linux

Kali Linux is the most advanced penetration testing distribution with a number of tools. While using these tools a measure of anonymity is required. Today we are going to see how to spoof your IP address in Kali Linux. First, check your IP address by visiting any website which shows your IP address (http://www.whatismyip.com). Then go to the site www.vpnbook.com.

Download the Euro1 Server OpenVPN certificate bundle as shown below. Note down the username and password given. We will need it in later steps.

When you click on the download link, the following window opens. Since it is a zip package, system will prompt whether to open it with unzip ( the default option ). Click on “OK”.

Open the terminal and navigate to the directory where the contents of the zip archive have been unzipped. Type the command “ls” to see the unzipped files. We are going to use the vpnbook-euro1-udp53.ovpn package.

OpenVPN has been installed by default in the Kali Linux distribution. Type the command “openvpn vpnbook-euro1-udp53.ovpn” to start the process.

spoof your ip address in kali linux

The installation starts. Enter the username and password we noted above when prompted.

After a short time, the process is completed. Check your IP address again. If everything goes well, your IP address will be changed.

Posted on

Banner grabbing for beginners

Hello, aspiring ethical hackers. In this blogpost, you will learn about banner grabbing. Banner grabbing plays a very important role in ethical hacking for penetration testers and hackers alike. To understand what is banner grabbing, you need to understand what is a banner first.

What is a Banner?

A banner is the information displayed by software or service running on a specific port. This information involves the type of software running, version of the software running etc. This information is displayed by default by every software running for marketing purposes.

What is Banner grabbing?

Banner grabbing as its name implies, is grabbing this banner. A banner when displayed to a common user may provide information to the user. In the same way, by grabbing this banner, hackers and penetration testers can get information about the software running on it and the version of the software running. This allows them to search or research for any vulnerabilities in the software.

Types of Banner grabbing

Banner grabbing can be performed in two ways: Active & passive.

  1. Active banner grabbing: In active banner grabbing, a hacker or penetration tester interacts with the software & target services to grab the banner.
  2. Passive banner grabbing: In passive banner grabbing, a hacker or penetration tester doesn’t interact with the target service while grabbing the banner. This can be done by packet sniffing on the network traffic of the network.

Although banner grabbing can be performed on almost all services running on all ports, the most common services that are used for banner grabbing are,

FTP-Port 21
SSH-Port 23
SMTP-Port 22
HTTP-Port 80

Tools used for Banner grabbing:

  1. Telnet, wget, curl etc

Apache:

Imagine I have set up a website named www.shunya.com on an Apache server. A hacker can easily find Information about the web server in different ways. For example, a hacker can visit the website and and try to open a webpage which is not existent on my server, like below.

banner grabbing

In the above example, hacker tried to open page named “admin.php” which was not available on my server and in turn the server responded with a type of web server, the target OS and the scripting language. This is giving out too much information.

The traditional and popular way of fingerprinting is through telnet. A hacker opens command line or terminal. and types the command “telnetwww.shunya.com 80″. When the screen goes black, type “HEAD / HTTP/1.0″and this will give the server information.

There are also many fingerprinting tools available. I am gonna show you only one, Id serve. Let’s see how to banner grab using Id serve.

Now what are the preventive measures we can take in Apache server to disable or atleast prevent fingerprinting to some extent. Apache web server has a configuration file called “httpd.conf” where we can make changes to fight fingerprinting. Go to httpd.conf and change the value of the option “Server Signaturetooff”.This will not display any information about server when an nonexistent page has been accessed.

In the httpd.conf file, changing the value of “Server Tokens”from “Full” to “Prod” will only show the minimum server information as shown below.

This still discloses that our web server is Apache but it doesn’t show the version. In Kautilya’s words this is delaying the march of enemy. Here are the options we set.

IIS 8:

Now imagine we changed our www.shunya.com website from Apache server to the latest version of Microsoft web server, IIS 8. To prevent error pages form revealing any information in IIS server, we can set custom error pages. Now let’s use IDserve tool to fingerprint the IIS 8 server.

It shows the server version. Now how can we prevent this. Microsoft provides a tool named UrlScan freely available for download which can be used easily to process HTTP requests. Download this tool and install it. ( See how to configure Urlscan for IIS 7.5 and IIS 8 ). Then go to the configuration file of UrlScan, “UrlScan.ini” located at “C:WindowsSystem32inetservUrlscan”by default and change the value of “RemoveServerHeader’ from “0″ to “1″.

This will not reveal the server version information as shown below.

We can further mislead the attacker by setting our server name to some other value different than our original one. This can be done by setting the value of “RemoveServerHeader” to “0 “and changing the value of “AlternateServerName” to the value we want to specify ( in our example Nginx ).

So when the attacker tries to fingerprint our website, he will be misleaded.

Note: Taking this preventive measures will not stop a determined hacker to find out our server information.

That’s all in webserver banner grabbing and countermeasures.

Posted on 2 Comments

Configure UrlScan on IIS7.5 and IIS8

UrlScan is a security tool used to restrict types of HTTP requests that IIS will process. It is a simple tool which is very helpful in blocking harmful requests to the server. It seemingly supports only IIS 5.1, IIS 6.0, and IIS 7.0 on Windows Vista and Windows Server 2008. It has been deprecated since IIS 7.5 and IIS 8. It is said that Microsoft has included the features of UrlScan in request filtering option for IIS 7.5 and IIS 8. But it definitely is not a match for the simplicity of UrlScan. Today I am going to show you how to configure UrlScan in IIS 7.5 and IIS8. (IIS 7.5 is available in Windows server 2008 R2 and IIS 8 is available in Windows Server 2012 and Windows 8 ).

I am going to configure this in Windows server 2012 i.e IIS 8 but do not worry the configuration steps are similar in IIS 7.5. First and foremost install Web Platform Installer in your machine. This will help us to install all the components we require in simple steps. From web platform installer, select component IIS 6 metabase compatibility. This is compulsory to install URLscan.

Then, select IIS ISAPI Filters. (ISAPI filters may already be installed in IIS 7.5 ).

Click on Install. You are shown a review of components you selected to install. Click on I accept.

The components are installed and will show you a Finish screen. Click on Finish.

We are all set to install UrlScan. Download Urlscan and click on the msi package. On the window, select the option “I select the terms of license agreement” and click on “Install”.

The installation is very quick. Once it finishes,click on “Finish”.

Now open IIS Manager. Click on ISAPI filters.

If everything went well, we should see a filter already set like below.

Click on it. We can see that there is already a filter named URLscan 3.1 linking to the executable urlscan.dll.

urlscan

Before configuring UrlScan, let’s try a little banner grabbing to check whether UrlaScan is working or not. For this, we will use tool Idserve to fingerprint the server on which we have configured UrlScan. (www.shunya.com is fictional website i set on my server ).

We can see that the version is Microsoft-IIS/8.0. Now let’s go to the configuration file of urlscan (urlscan.ini) to make some changes to it. It is located by default at “C:WindowsSystem32inetservurlscan”and change the value of “RemoveServerHeader” to “1” from “0”. Save the file.

Now let’s again try to banner grab using Idserve. Restart the web server.

urlscan

We can see that the server version has not been disclosed hence our UrlScan is working successfully. Hope it was helpful.