Posted on

Beginners guide to Social Engineering

Hello, aspiring ethical hackers. In this blogpost you will learn about Social Engineering. Social Engineering is one of the most important techniques in Black Hat Hacking. It is used by APTs and Threat Actors even now.

What is Social Engineering?

Social Engineering is the art in which a human is convinced to perform actions which he is not intended to or shouldn’t be performing under normal circumstances. Hackers use social engineering to grab credentials, gather any required information about the organization or to gain initial access etc. It exploits human emotions like intention to trust, curiosity and other emotions.

Types of Social Engineering

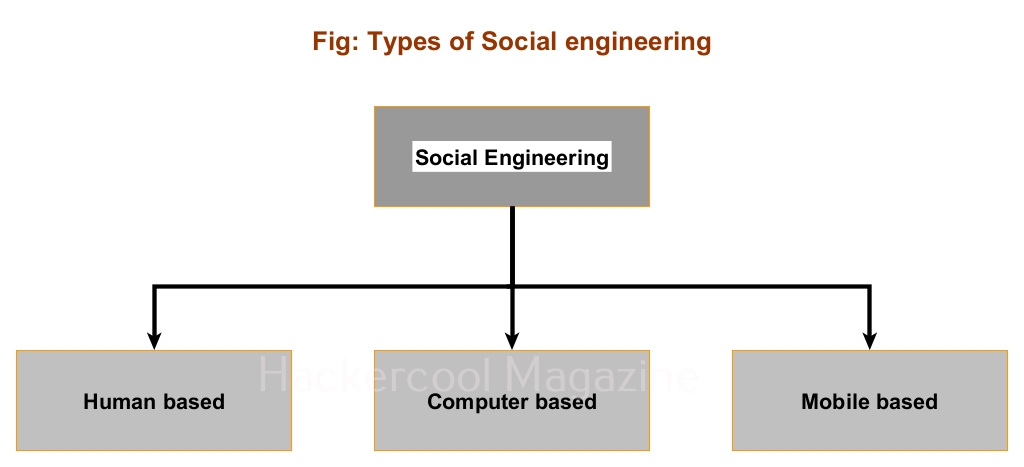
Social Engineering can be classified into three types. They are: Human based, Computer based and Mobile based.

social_engineering

Human based Social Engineering

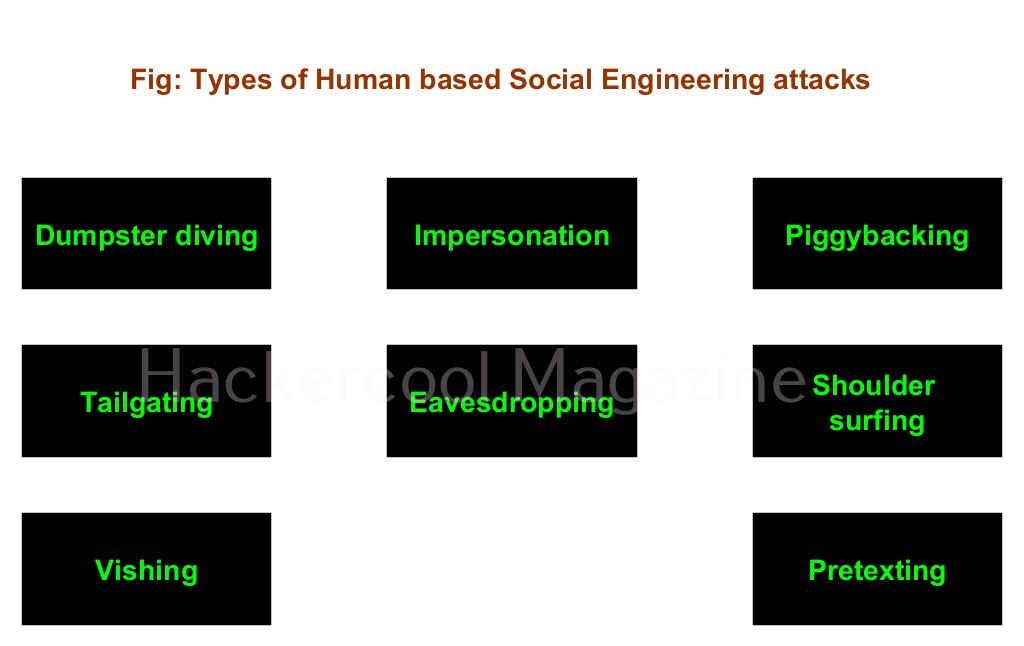
In human based social engineering, hacker interacts with a human personally to perform the attack. There are many types of social engineering attacks. Some of them are,

1. Dumpster diving:

Dumpster diving is a technique in which a hacker searches the dump or dustbin to gather any information about the organization.

2. Impersonation:

In this attack, attacker impersonates as another user to gather important information about any organization or performing hacking attacks. Any information obtained in dumpster diving can be useful in this stage. Obviously, an attacker will impersonate as a legitimate user of the organization or a person of authority or anyone else who has a chance to enter a company physically or virtually.

In June 2023, hacking group tracked as “Pink Drainer” impersonated journalists in phishing attacks to gain access to 1932 Discord and Twitter accounts. They stole approximately $29,97,707 worth of cryptocurrency.

3. Piggybacking:

Piggybacking is used to gain access to the premises of a company or organization. In piggybacking, a genuine employee of an organization allows access to the attacker because he/she thinks that the attacker has genuine reason to be on the organization’s premises. It usually happens when the hacker impersonates as anyone who is allowed into company’s premises. For example, delivery boy, technician etc.

4. Tailgating:

In tailgating, which is another social engineering techniques to gain illegal access to the company’s premises, a hacker tries to gain access to the company’s premises by quickly following behind a legitimate or genuine user immediately after he/she gains access into company’s premises.

5. Eavesdropping:

Eaves dropping is secretly listening to the conversation of employees of the organization etc. This can happen anywhere but mostly happens at recreational spots.

6. Shoulder surfing:

Shoulder surfing is the technique in which an attacker spies on the legitimate users of the organization by staying behind them. Shoulder surfing is normally used to see the legitimate user is entering his credentials but it can also be used to gather any valuable information.

7. Vishing:

In vishing, also known as voice phishing, a hacker uses voice over a phone or a VOIP call to perform social engineering.
In July 2020, hackers used vishing to trick Twitter employees into revealing account credentials of 130 Twitter account including that of Barack Obama, Joe Biden and Kanye West. The share value of Twitter plummeted by 7% after this incident.

8. Pretexting:

In pretexting, attacker creates specific scenarios or events by which the user he is targeting reveals information he/she makes.

Computer based Social Engineering

When a computer is used in an engineering attack, it is known as computer based social engineering attack. There are two types of computer based social engineering attacks. They are,

1. Phishing:

In phishing, attackers create a fake website (impersonating a genuine website) and divert the target users to this fake website to grab their credentials or make them download malware. There are multiple examples of hackers creating a fake phishing website to steal credentials, credit card information or other sensitive information. In August 2023, Supreme Court (the highest court of India) warned users about a fake website impersonating website of the Supreme Court trying to solicit personal details and confidential information from users.

2. Spear Phishing:

In spear phishing, a hacker selects specific users as targets and sends them an email with malware attached to the email and luring them to download and execute the attached payloads or take some other action. In February 2022, Russian hacking group known as Gamaredon, targeted Ukrainian government agencies and NGO’s with a spear phishing email campaign with malware laden emails.

Mobile based Social Engineering

If an engineering attack uses mobile it is known as mobile based social engineering. SMishing is a type of mobile based social engineering attack.

1. SMishing:

SMishing or SMS phishing is a phishing attack which is performed by sending a SMS to the target user’s mobile phone with a link to the fake website attacker created. In 2020, cyber criminals sent SMS messages to various user’s mobile phones asking them to click on a link to view important information about an upcoming delivery from United States Post Office (USPS). When users clicked on the links in these SMS, it took them to a malicious website that was designed to steal user’s Google account credentials.

Posted on

Password sniffing tutorial for beginners

Hello, aspiring Ethical hackers. In this article, you will learn about password sniffing. You should have observed that almost all the websites you have visited recently have a padlock sign and begin with HTTPS now. Google started giving minor ranking boost to websites with HTTPS enabled since year 2014. As you will learn by the end of the blogpost, there is a good security reason behind this.

What is Password sniffing?

Password sniffing or Credential sniffing is sniffing or capturing of credentials (or any other data) while they are in transit from one machine to another machine (usually from client to server). Password sniffing is only possible when plain text protocols are in use. Plain text protocols are those protocols in which confidential information like usernames and passwords are passed to the server in complete plain text and without any encryption.

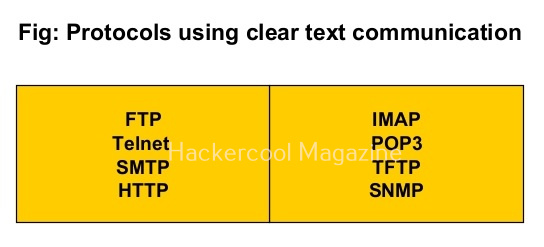
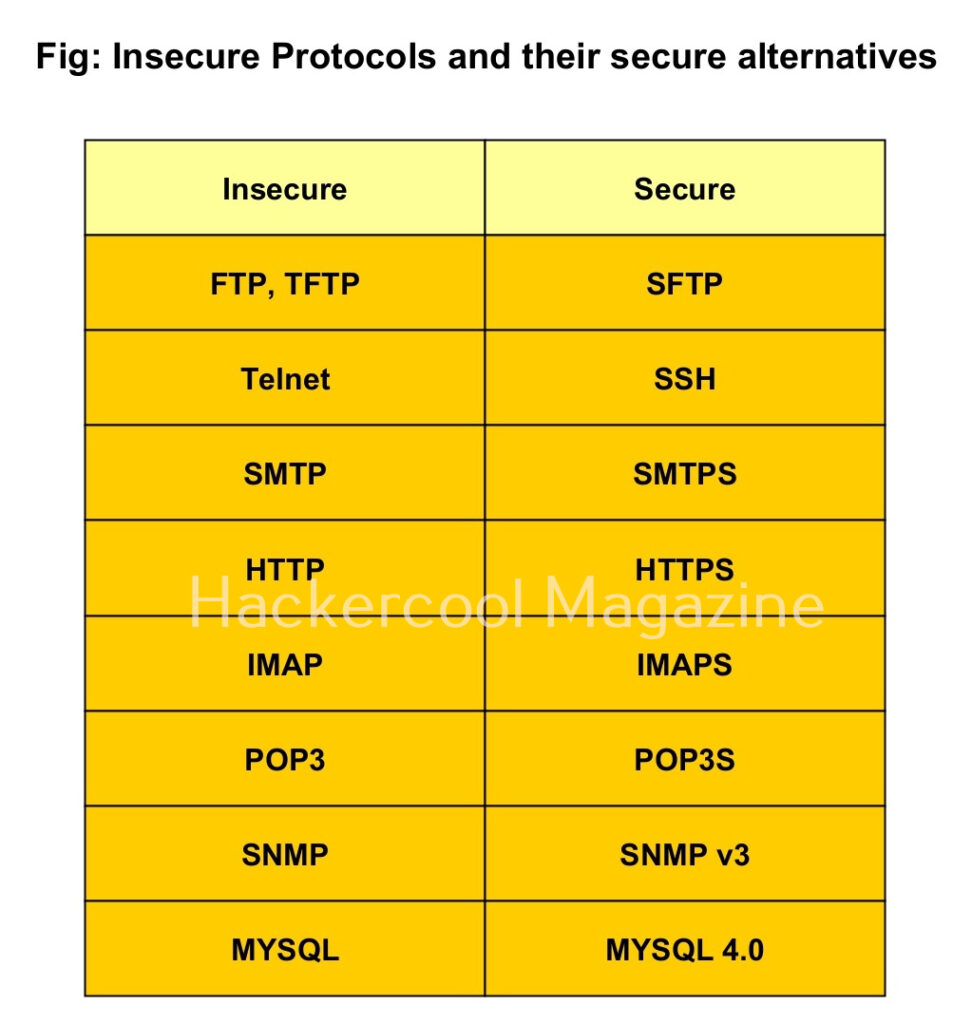
This allows anyone in middle to sniff on these usernames and passwords. Examples of plain text or clear text protocols are FTP, Telnet, SMTP, HTTP, IMAP, POP3, TFTP etc. Let’s see password sniffing practically. In this article, we will demonstrate the basic level of password sniffing on plaintext protocols. For this, we will be using three virtual machines which are on the same network.

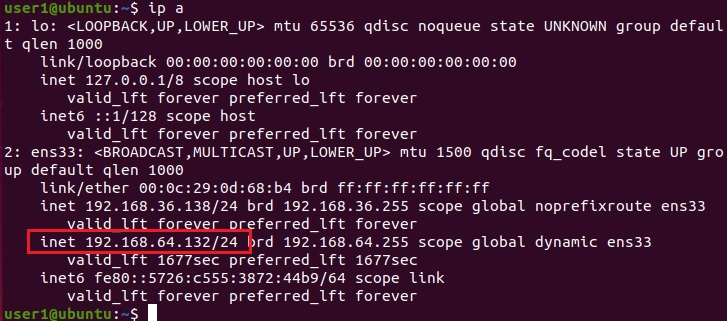
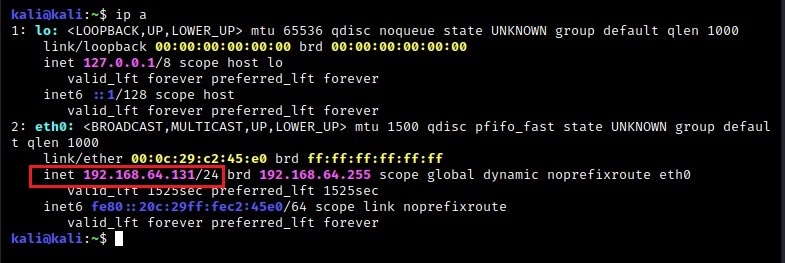
They are Metasploitable 2 which acts as server, Ubuntu which acts as client and of course Kali as our Attacker system. As you can see, the IP addresses of the three machines are

Metasploitable2 – 192.168.64.128 (Server)

Ubuntu – 192.168.64.132 (Client)

Kali – 192.168.64.132 (Attacker system)

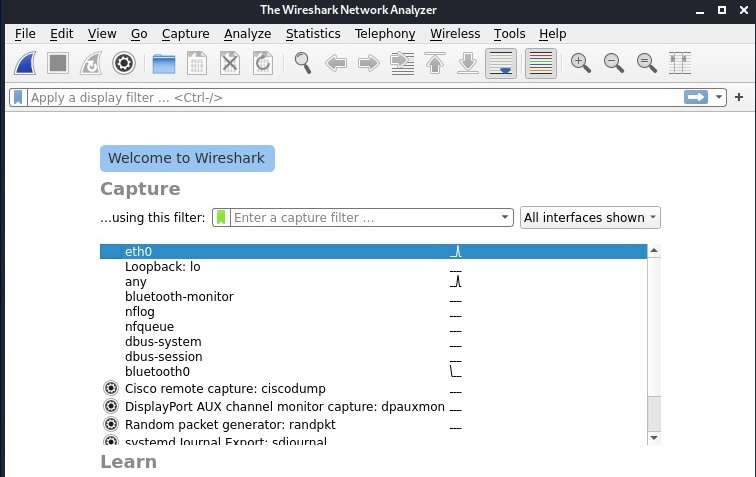
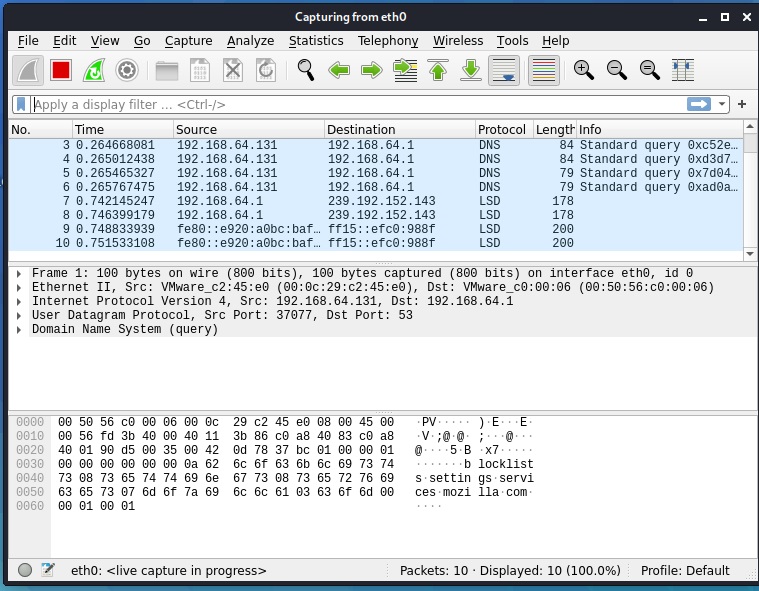
Let’s start Wireshark on the attacker machine (on interface eth0). It starts capturing packets on the network.

The reason why we are using Metasploitable 2 as our target is that it already has many services that we need for this tutorial preinstalled. The first service we will be using is Telnet. It is a protocol that is used for remote access on another system. On most Linux systems, Telnet clients are installed by default.

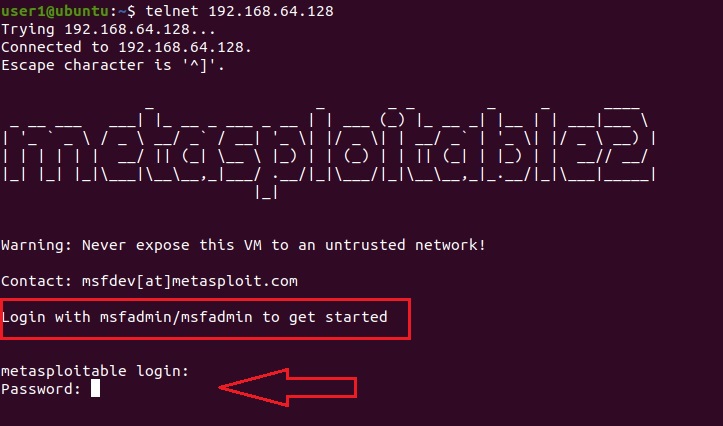
So we open a terminal and log into the Metasploitable 2 Telnet server with the credentials shown below.

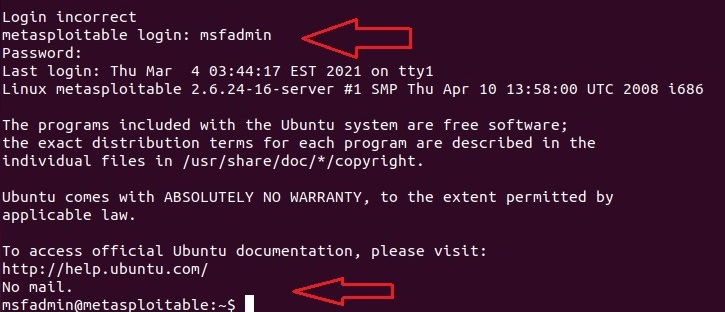
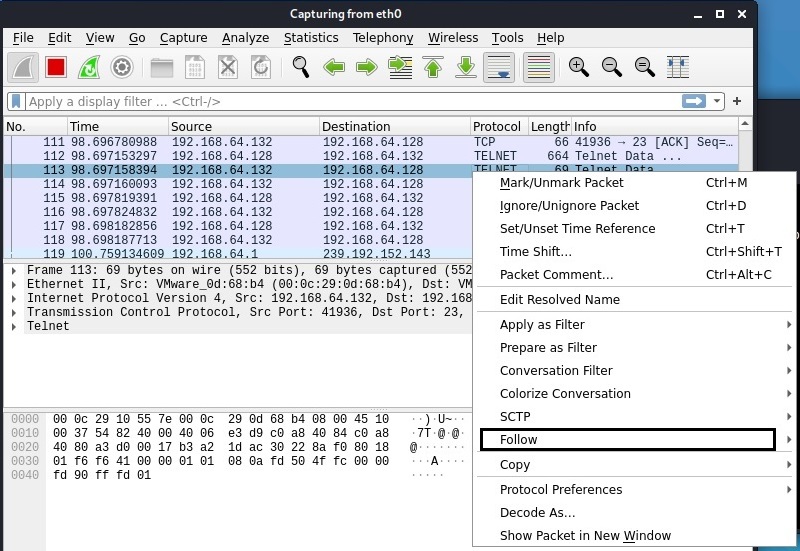
The login is successful. Now on the Attacker system, we can observe the traffic being captured by the Wireshark sniffer. You can see data related to Telnet being transferred.

We can Right Click on that Telnet data stream and click on “Follow” as shown below.

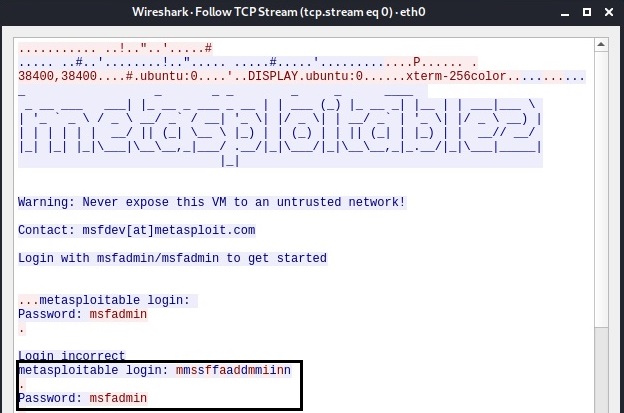
In the sub menu that opens when we click on the only option “TCP stream” a new window opens that will show only the TCP stream.

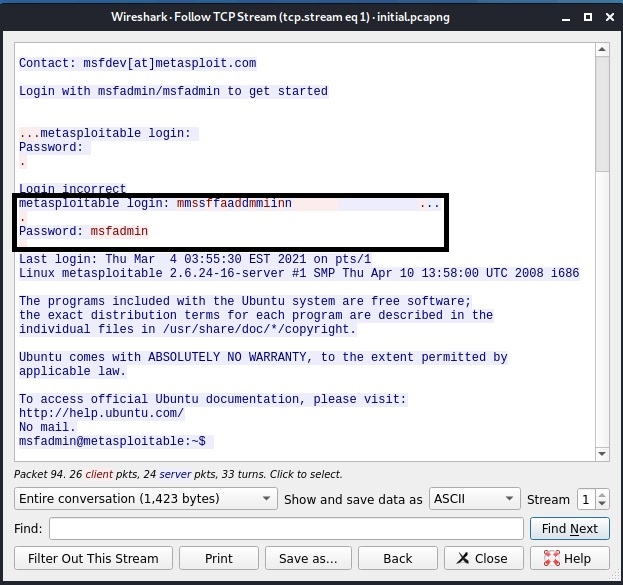
In this window, you can see the credentials we just used to login into the target system. Telnet is a plain text protocol which transfers credentials and other sensitive data in plain text. This allows sniffing of data. That’s the reason it has been mostly replaced by Secure Shell (SSH) nowadays.

Let’s see another protocol. File Transfer Protocol (FTP) is a protocol that is used to share files. It is another protocol that transfers data in plain text. From our client, we login into the FTP server with credentials “anonymous:anonymous”.

Anonymous account in FTP is used to share files to anyone without the need for them to know credentials.
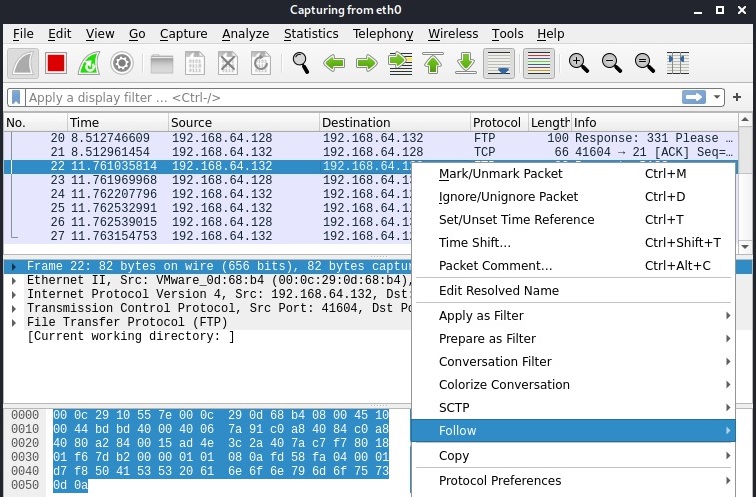
On the Wireshark interface, you can see FTP data being transferred.

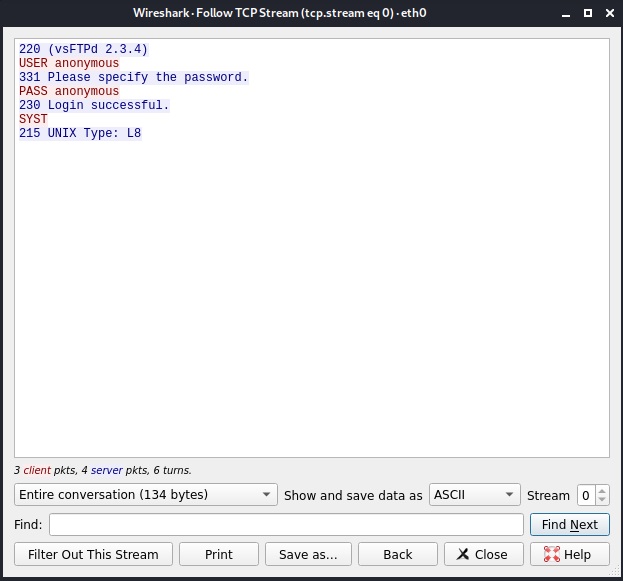
We can view the TCP stream

This once again shows credentials.
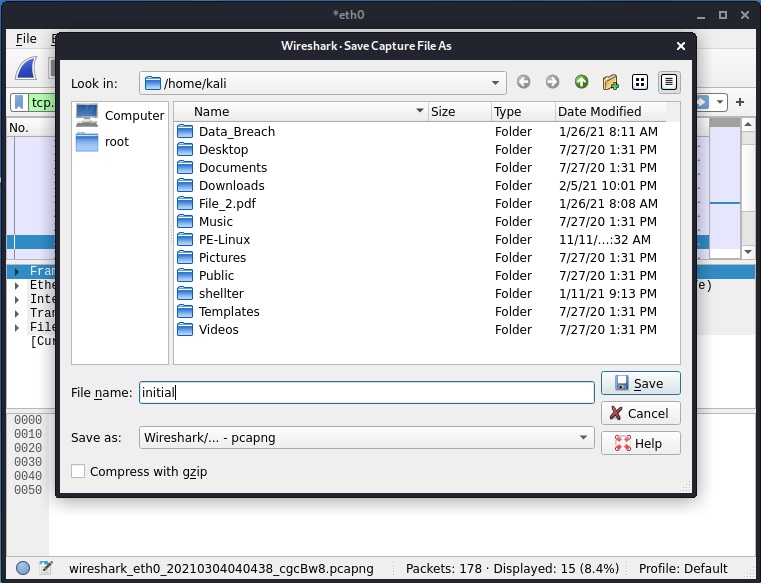
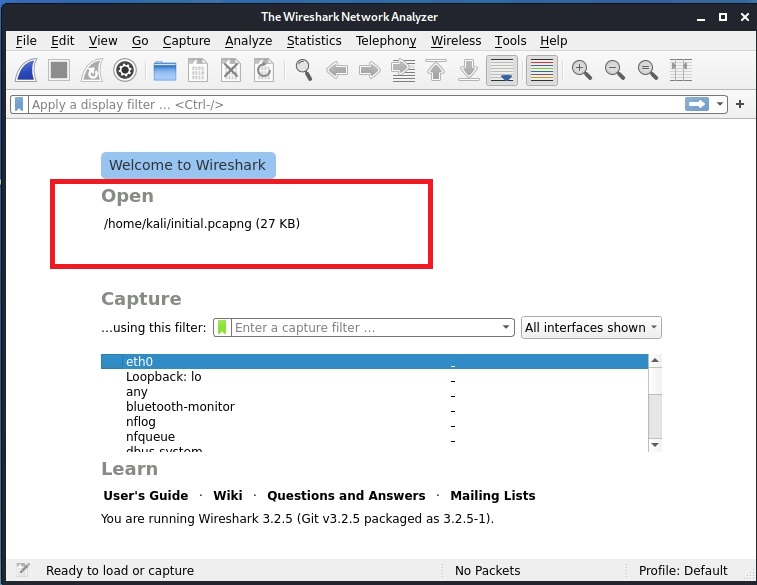
Instead of observing LIVE data transfer and following TCP stream from there, we can also just save the packet capture file and open the file later for analysis.

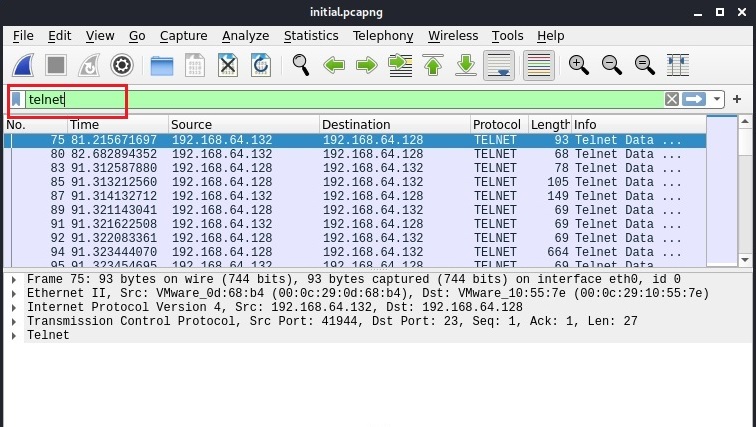
After opening the file, we can search for specific terms as shown below.

packet sniffing

Then following the TCP stream gives us the credentials.
Seeing the vulnerability due to sniffing, many protocols have been replaced with secure protocols which transfer data in encrypted form instead of plain text form. These are given below.

Posted on

Privilege Escalation guide for beginners

Hello aspiring Ethical Hackers. In this blogpost, you will learn in detail and clearly about Privilege escalation. Privilege escalation is an act of gaining elevated access to resources that are normally restricted to an application or user. To understand privilege escalation better, you need to first understand about privileges. Since hacking mostly deals with exploiting of operating systems, let me explain you about how privileges in a operating system are assigned.

Since Operating Systems (OS) are meant for user interaction and perform some specific functions you should have noticed that different users are assigned different privileges on a system.

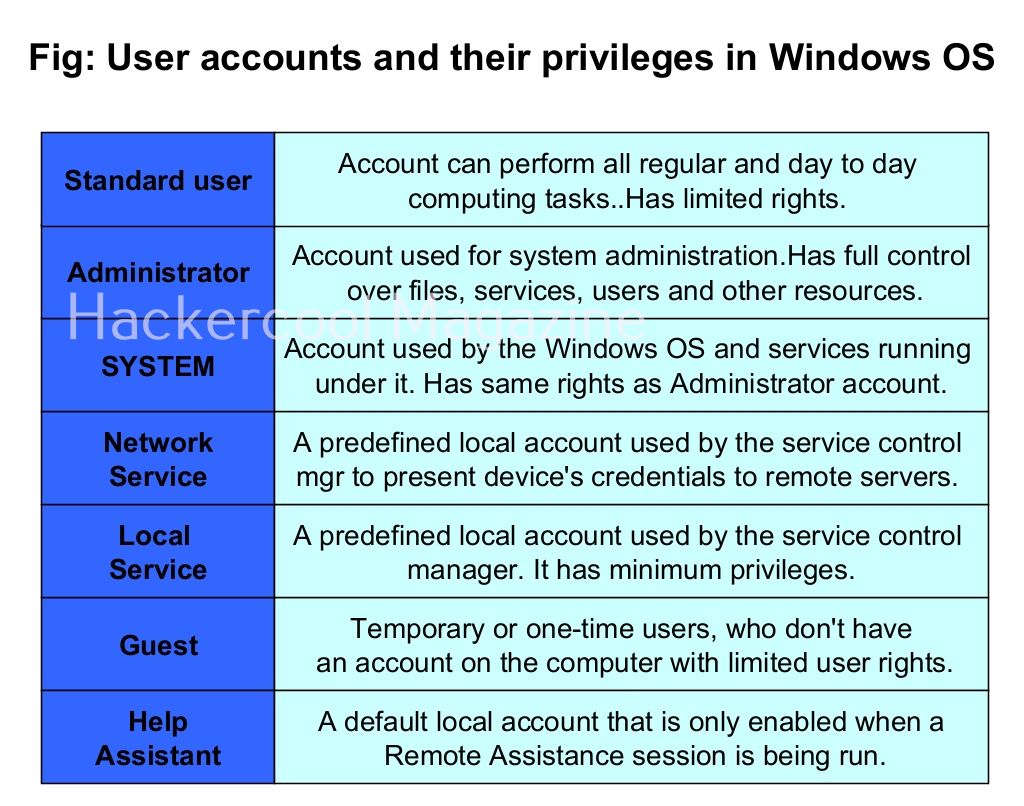
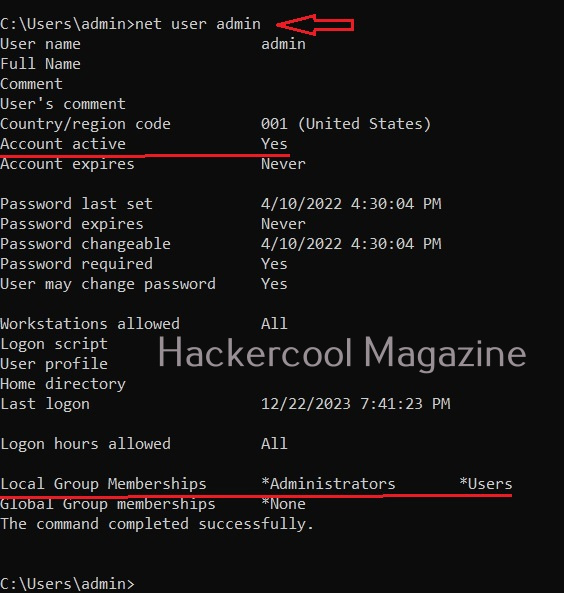
Let’s see the example of the Windows operating system. Windows OS has generally 7 types of accounts. When I am talking about accounts, I am talking about local user accounts instead of remote or online accounts. A local user account is defined locally on a device (computer) and are assigned rights and permissions on that particular device only. The types of Windows user accounts are given below.

When you do a fresh installation of Windows (Windows 7 to 11), the first user account that is created during setup is the Administrator account, As the name suggests, the Administrator account is a default local user account (account created during Windows installation) used for system administration. This account has full control of the files, directories, services and other resources on the local device. As you might have experienced by now, an administrator account can create, delete and assign permissions to other users.

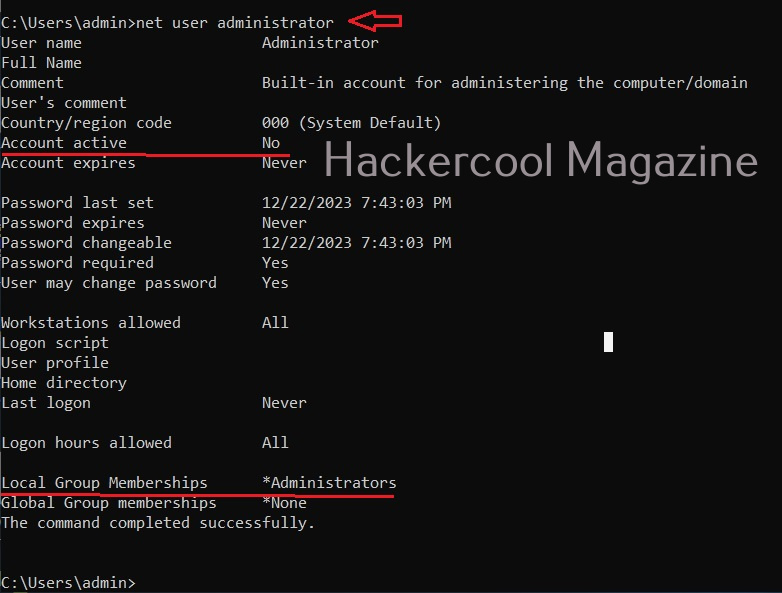
This default Administrator account can neither be deleted or locked but it can be disabled or renamed. Windows setup disables the built-in administrator account after installation of Windows and creates another local account that is a member of the administrators group.

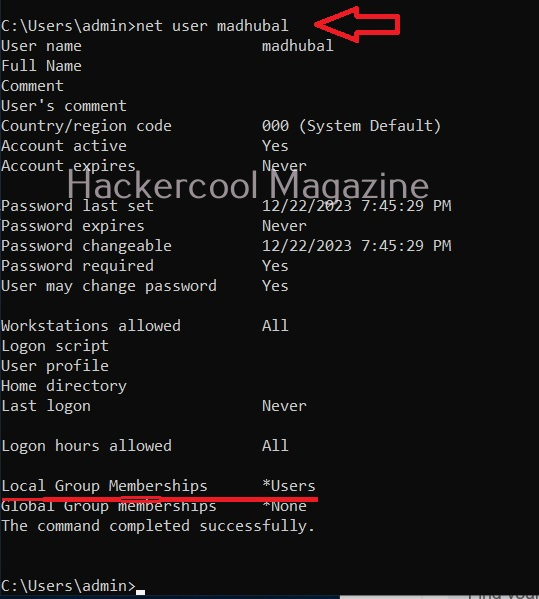
The newly created user belonging to the Administrator group has same powers as the default administrator account. Since this is too risky if some malicious user gains access to the system as Administrator user, Windows provides option to create an account called standard account. Most organization provide their workers a standard account. A standard account on Windows can run almost all application on a Windows system and perform all other day-to-day computing tasks.

However, to perform some tasks like installing programs or applications, making changes to the registry etc and other operations that require elevated privileges, the standard user is asked for credentials of Administrator of the system through the user Account control. Simply put, you cannot make any major changes to the operating system with standard account.

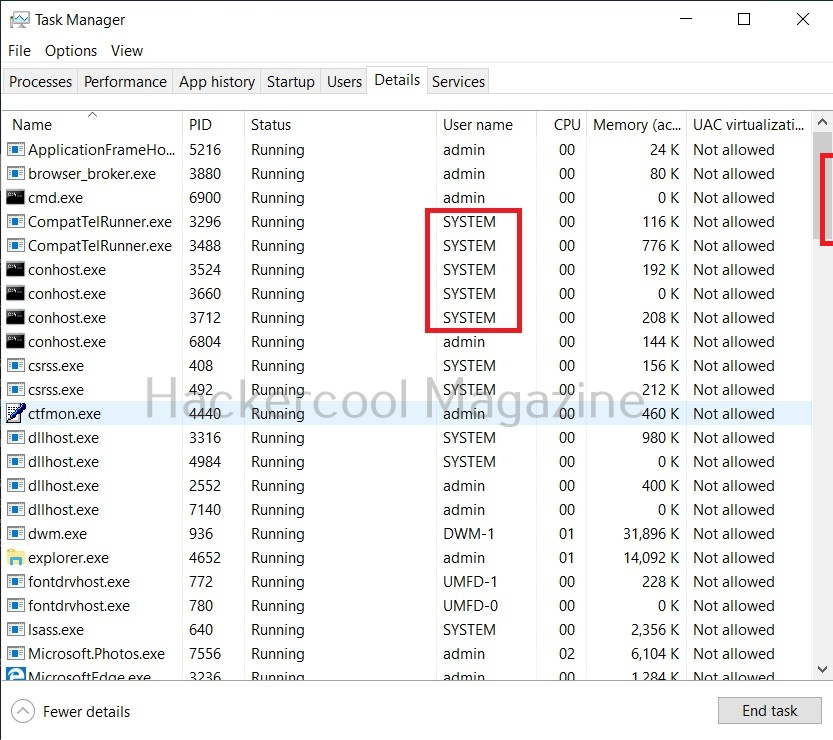
Apart from these two accounts, Windows has some default local user accounts that are automatically created while operating system is installed. They first one you need to learn about is the “SYSTEM” account. This account is used by the operating system and its services running under Windows. This account doesn’t show up in user manager which means you cannot login with this account.

It belongs to Windows and used by all Windows processes. You can view the processes running with this “SYSTEM” privileges from details tab of the Window Task Manager.

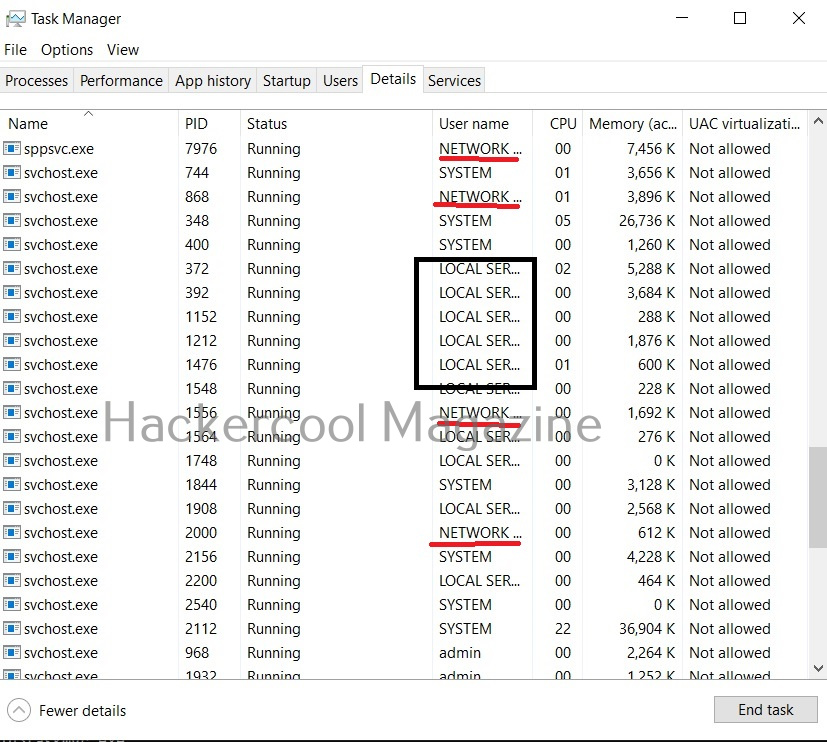
The ms08_067 vulnerability affected a process svchost.exe that runs with SYSTEM privileges. So, once you exploit it, you automatically get SYSTEM privileges. It can be exploited remotely and grant SYSTEM PRIVILEGS to attackers. No wonder it is considered very CRITICAL.

Another local default user account is the “Network service” account. This account is used by the service control manager (SCM). It is used to present the computer credentials while it is communicating with remote servers. Similarly, Windows has an account called “Local Service” which is also used by the service control manager. It has minimum privileges on the local computer.

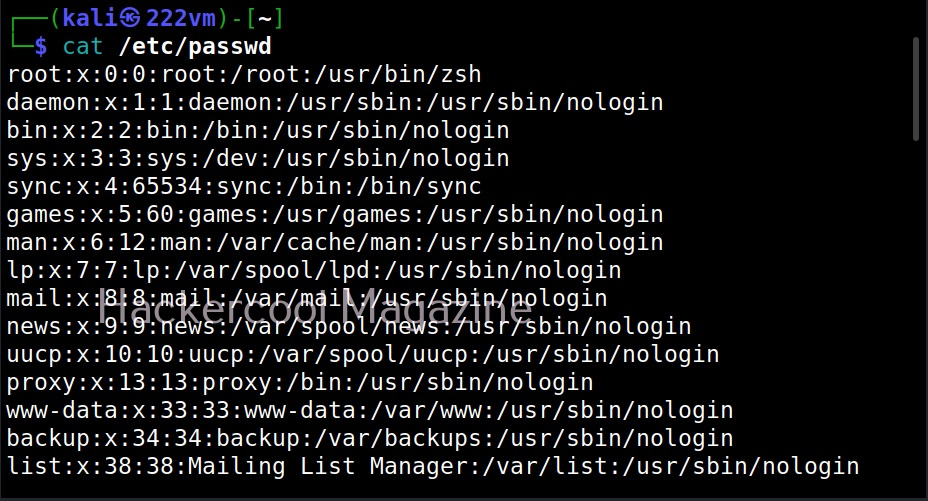
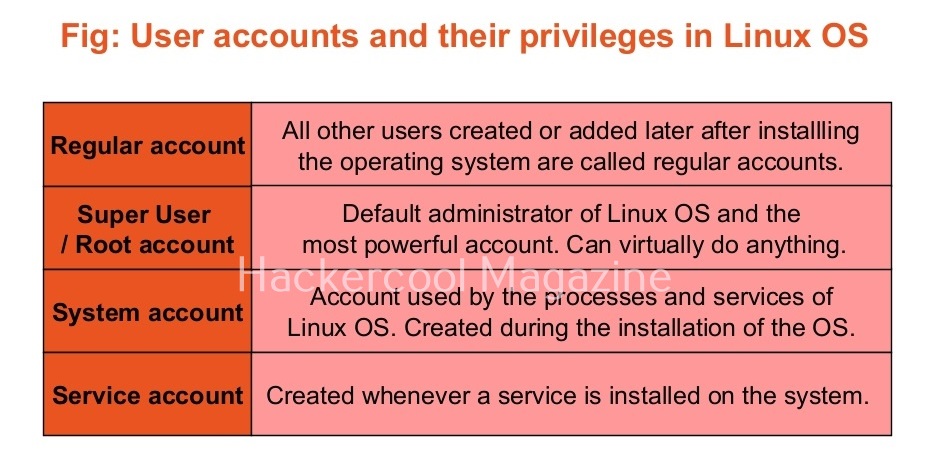
Linux systems too have different types of user accounts. They are 1) Super user account 2) Regular account 3) System account 4) Service accounts.

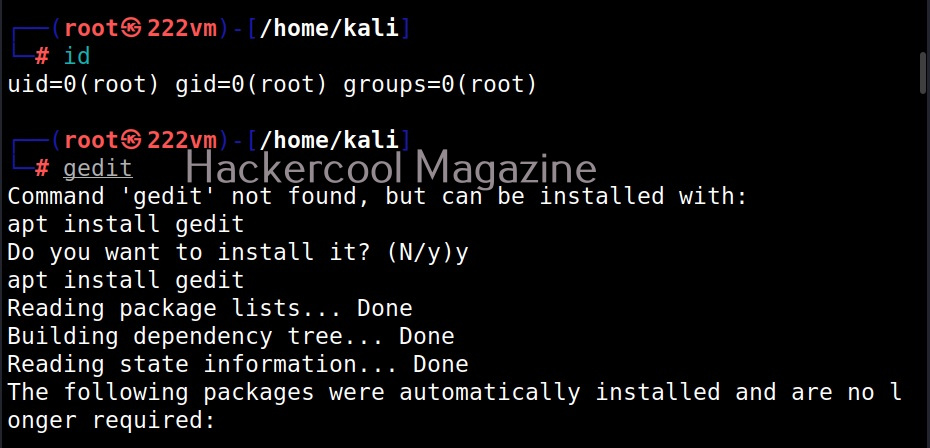
On Linux, the Super User account is the most powerful account and is the default administrator of the Linux system. This account is popularly known as root account. The root account has unlimited control on the Linux system and you can literally do anything you want with this account.

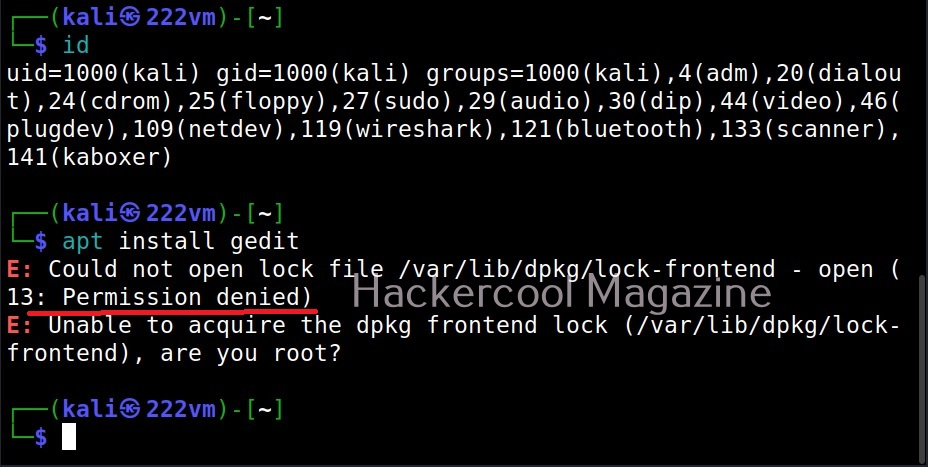
The root user in Linux has (#) symbol on their terminal. All other users who are later added are together known as regular accounts. Regular accounts are similar to “standard account” on Windows and to perform administrative actions on the OS, they need to use sudo or su command. Apart from these two accounts, Linux has “system account” and “service account” that are created during the installation of the OS and are by OS processes just like “SYSTEM account on Windows. However, these accounts don’t run with superuser privileges. Service accounts are created whenever a service is installed on the system.

Since you are now accustomed with privileges and user accounts with different privileges, you can now understand privilege escalation.

What is privilege escalation?

Privilege escalation is an act or process of gaining access to privileges of the other user account using any means or techniques. Normally privileges of user account with higher privileges are targeted by hackers.

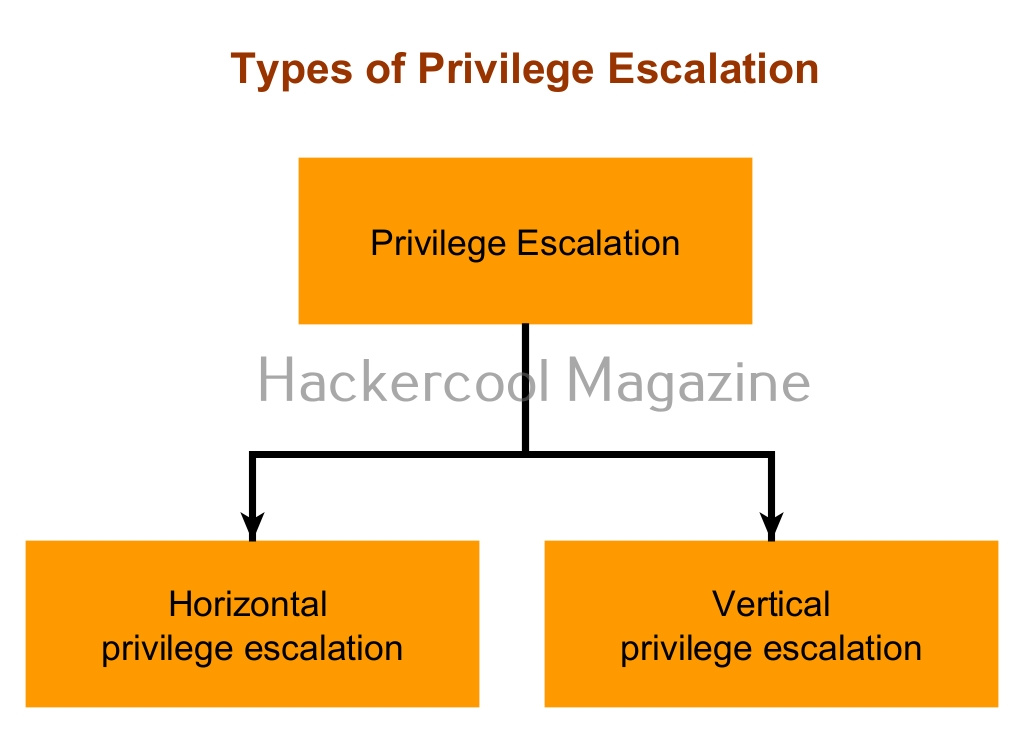
Privilege escalation is of two types: They are,

  1. Horizontal privilege escalation.
  2. Vertical privilege escalation.

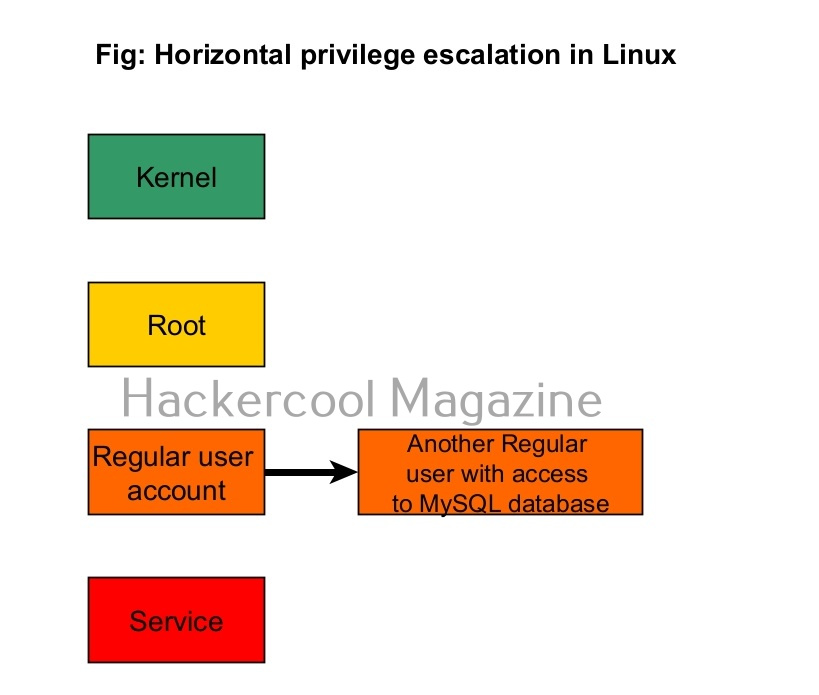
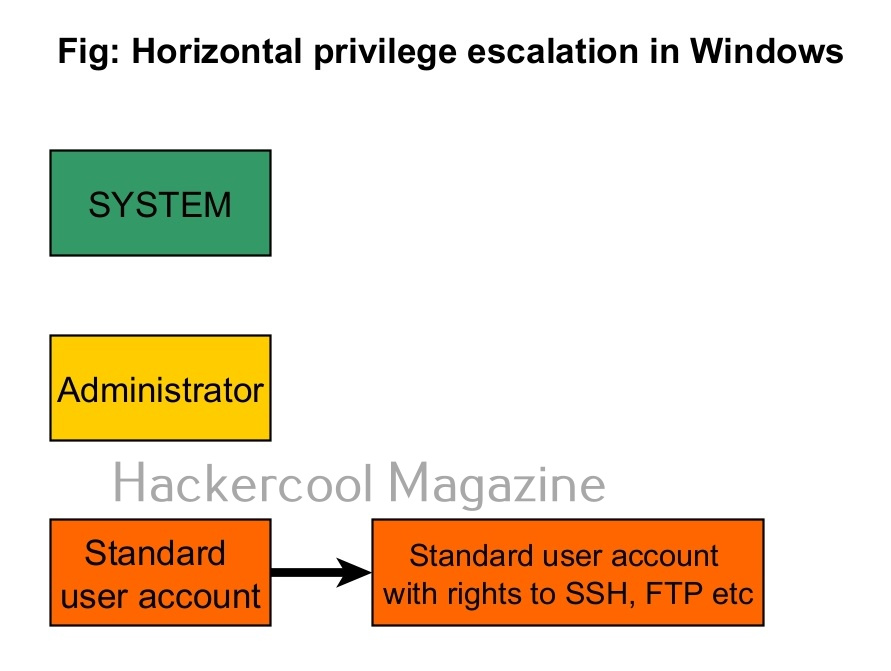
1. Horizontal Privilege Escalation:

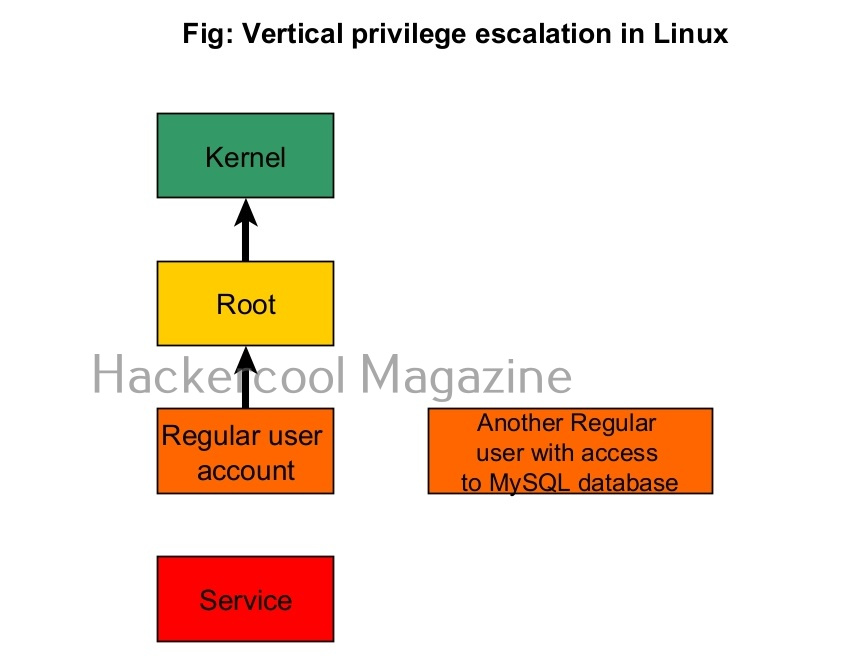
In horizontal privilege escalation, an attacker gaining access to the privileges of another user with same rights as him but with access to some other resources. For example, imagine on a Linux system, you gained access as a regular user (user_1). On the same system, there is another regular user (user_2) with same rights as him but with access to the MySQL databases. Elevating privileges to this user (user_2) can give you access to MySQL database.

2. Vertical Privilege escalation:

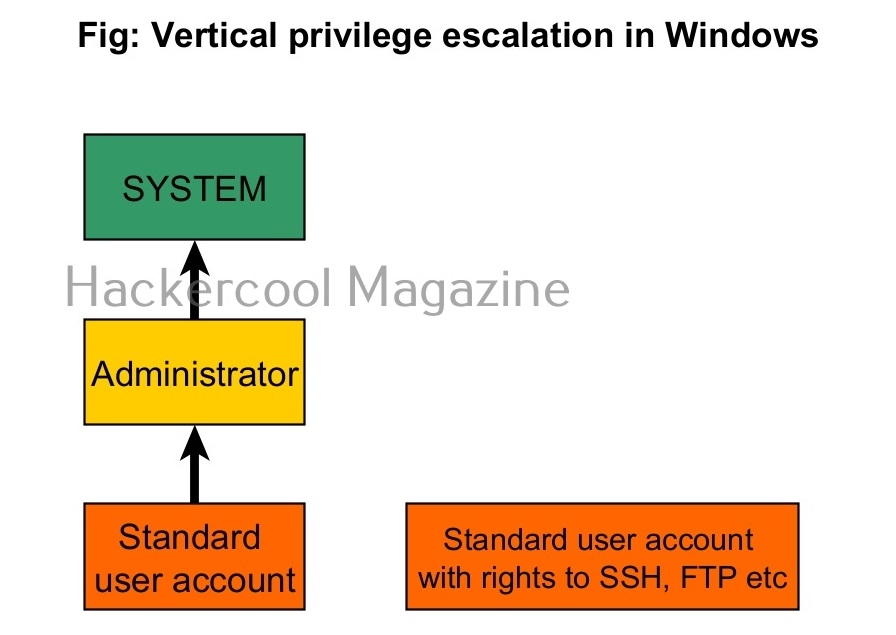
In cyber security or hacking, when anyone says “privilege escalation”, they are talking about this type of privilege escalation most of the time. In vertical privilege escalation, an attacker with low privileges tries to gain access to higher privileges.

Techniques used for Privilege escalation

Attackers use various techniques to elevate privileges. Some of the most general techniques are given below.

1. Social Engineering:

In Social Engineering, attackers somehow convince high privileges users to give access their credentials. These techniques include phishing, spear phishing attacks etc. For example, let’s say the attackers gained access to the email of the user with low privileges. From this email, he/she can send an email to the user with high privileges and somehow convince him/her to give any credentials.
In the first week top of September 2023, Okta, a company providing Identity services warned its users of social engineering attacks to obtain super administrator privileges on the organizations using Okta’s services. In these attacks, attackers performed social engineering attacks against IT service desk personnel by calling them and convincing them to reset multi-factor authentication (MFA’s) of high privileged users. Then attackers (allegedly APT Muddled Libra) abused these high privileged super admin accounts to impersonate users of the compromised organizations.

2. Password cracking:

Sometimes attackers crack the passwords of high privileged users to be used in privilege escalation.

3. Exploiting vulnerabilities:

This is one of the popular methods of escalating privileges. In this technique, attackers exploit vulnerability in software installed on the target system to elevate privileges. For example, PrintNightmare, Zerologon, Fodhelper etc in Windows and Dirtypipe, DirtyCow, PWNKIT, Netfilter, Heartbleed and Looney Tunables.

4. Misconfigurations:

In this type of attack, attackers use any misconfiguration on the target system for privilege escalation. These misconfigurations can include weak passwords, setting empty string as password, unsecured network service, open ports and exposed services etc. Examples are exploiting cronjobs and exploiting SetUID bits etc.

Many APT’s and Threat Actors exploit the recently (before patches are applied) released local privilege escalation vulnerabilities to elevate their privileges.

Posted on

Crunch wordlist generator: Complete guide

Hello, aspiring ethical hackers. In this blogpost, you will learn about a tool named Crunch which is a wordlist generator. A wordlist or a dictionary is a file containing credentials that is useful while using any password cracking tool like Brutus, Hydra, Medusa or John The Ripper usually when you are using Dictionary attack.

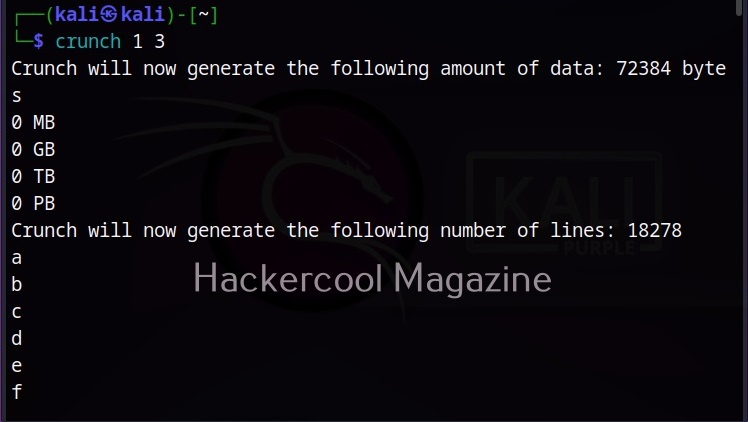
A good wordlist goes a long way in the success of a password cracking attack and Crunch is one of the best wordlist generator tools there. Let’s see how to use Crunch to generate wordlist we want. Crunch is installed by default in Kali Linux and it can be started using command “crunch”. The syntax of crunch is given below.

crunch <min> <max> <options>

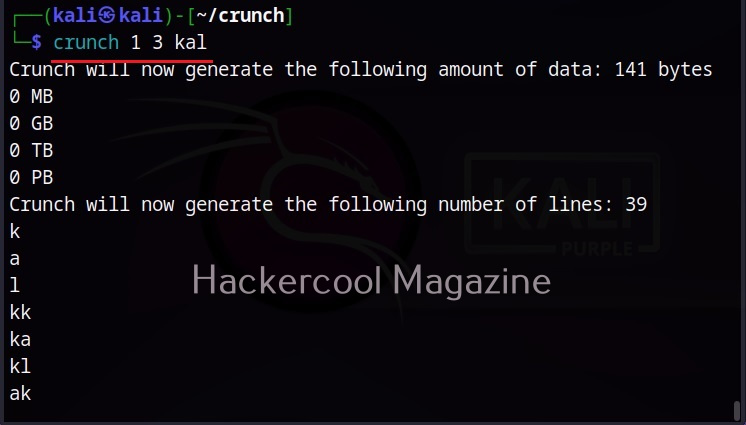
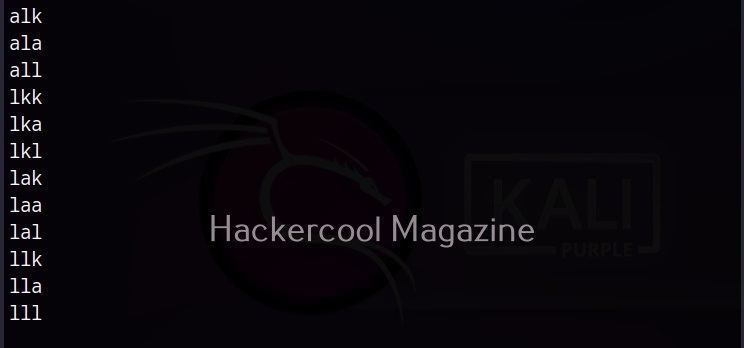
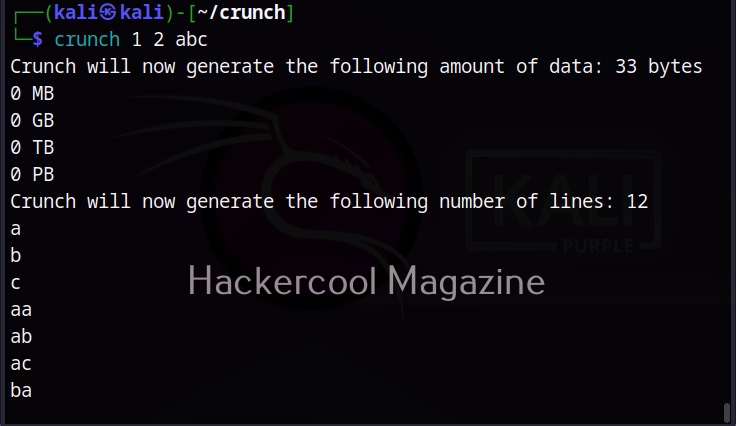
where “min” stands for minimum length of the password you want and “max” stands for the maximum length of the password string you want. To generate a wordlist containing random passwords with minimum and a maximum length 1 and 2 respectively, this is the command we have to use.

If you want a wordlist with characters you specify, you can also specify them as shown below.

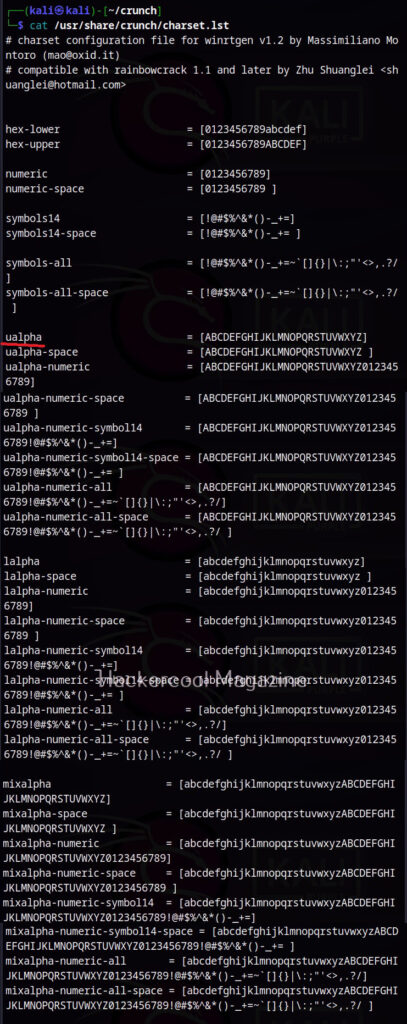
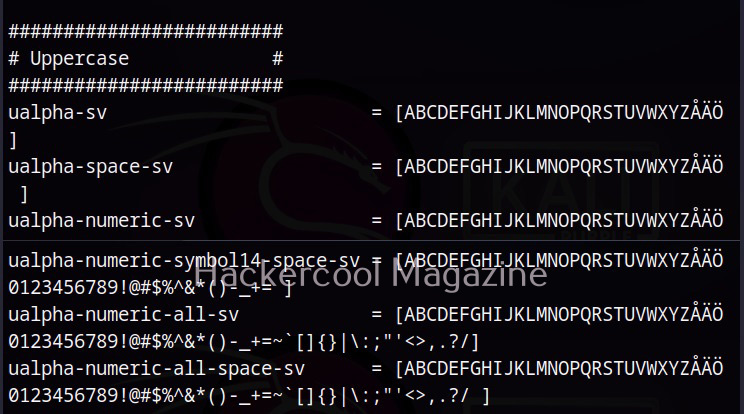
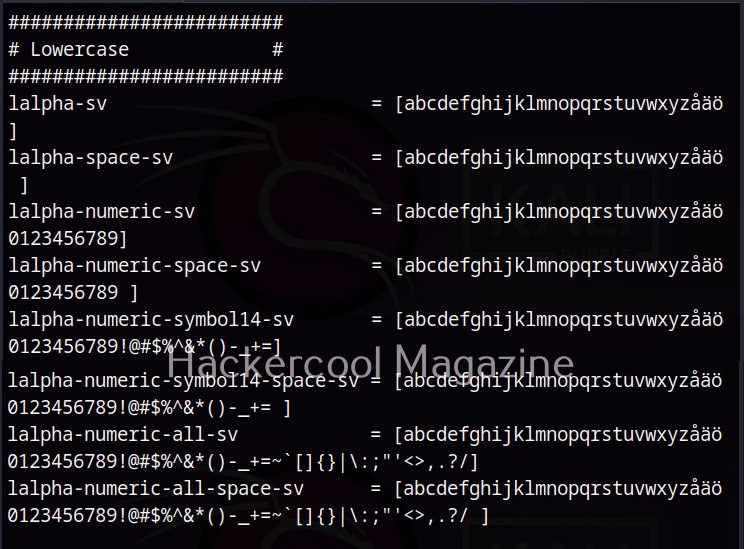
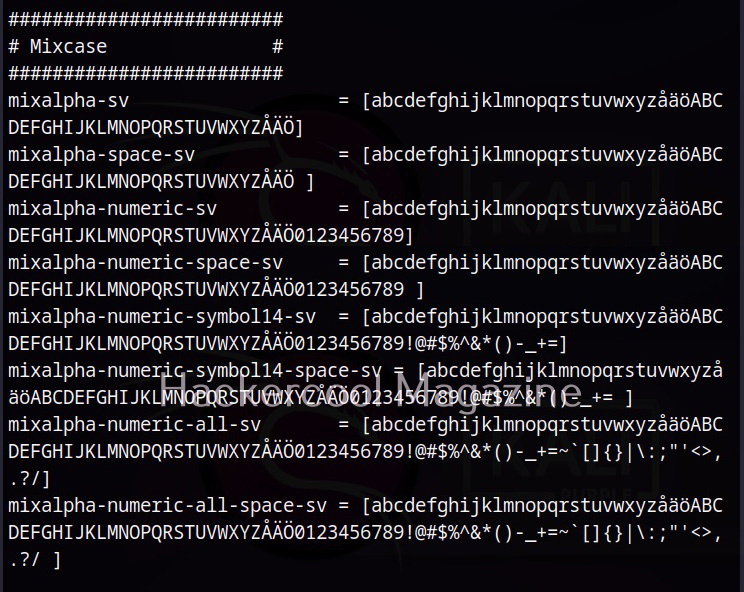
Crunch already has a collection of character sets stored in “charset.lst” file located in /use/share/crunch/ directory. Here is the list of character sets it has.

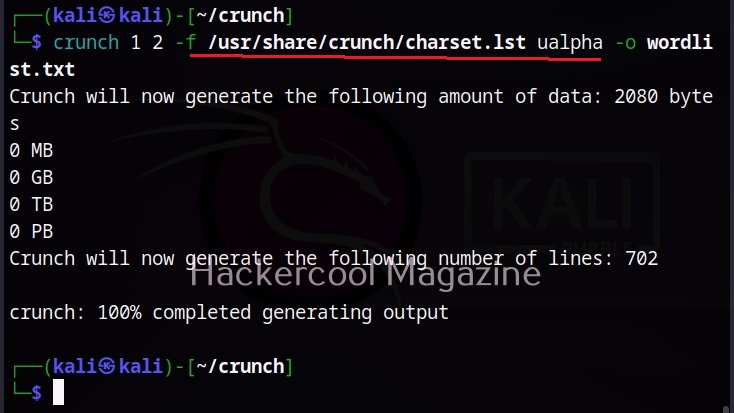
For example, if you want to create the wordlist with only uppercase alphabets, you can use the command shown below.

What’s a wordlist without a saved file? (o)

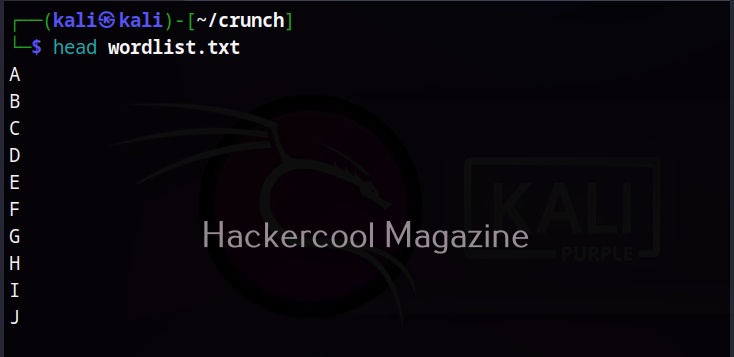
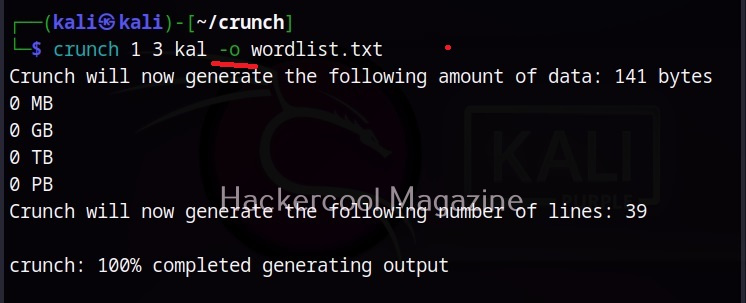
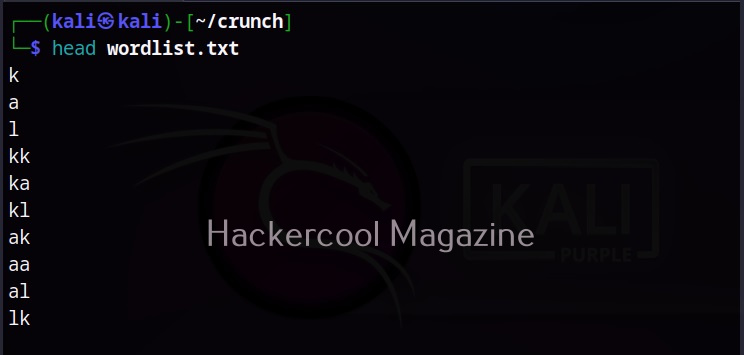
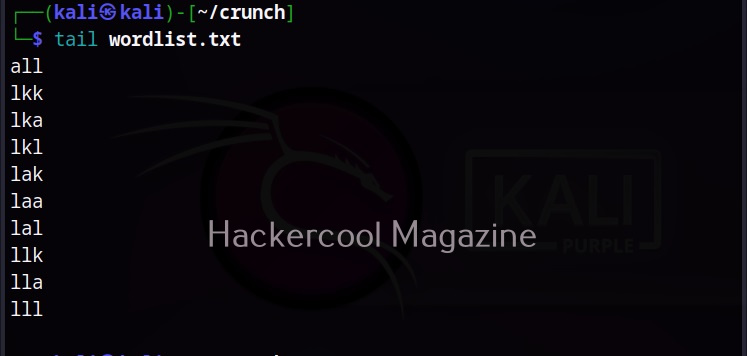
Really, what is a wordlist without a saved file. To save the output, use the “-o” option as shown below.

Be careful with the size of the wordlist (b and c)

Sometimes while making a huge wordlist, the size of the wordlist may become too large in size, usually adding up to Giga bytes (GB). This can put a lot of pressure on memory and resource of the computer or may be even difficult to open. Don’t worry though. Crunch has a feature to overcome this problem using the “b” option. The “b” option can be used to set the size you want for the wordlist.

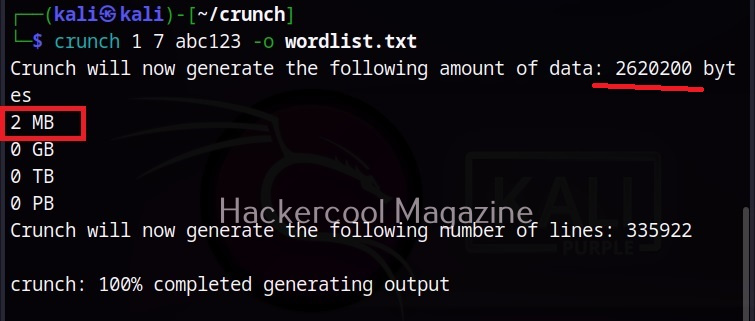
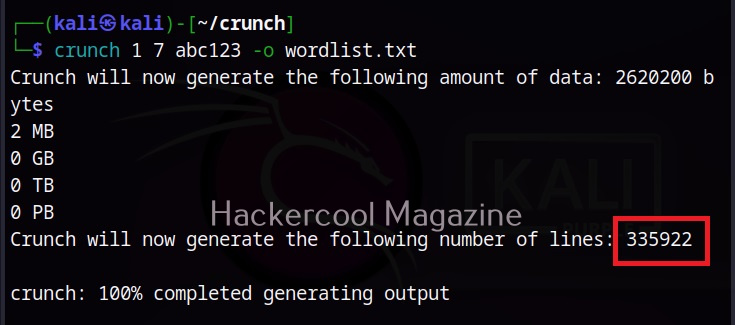
Once the size of the file reaches this limit, it saves the output to a new file with the same size. Let me show you practically. For example, here we create a wordlist and is size in 2620200 bytes as shown below.

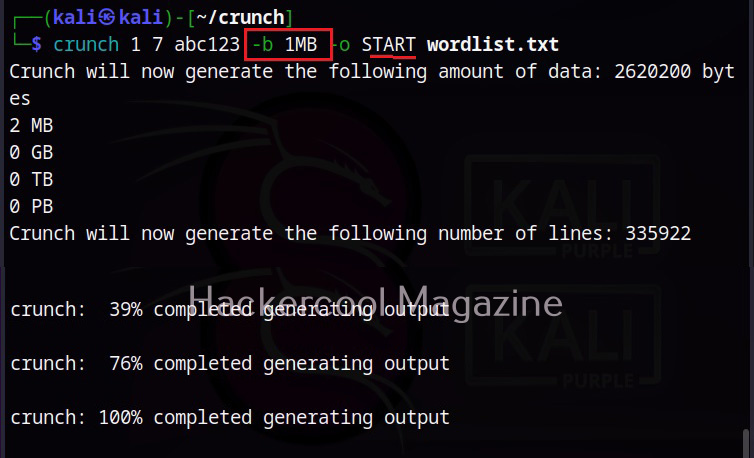
Now, let’s create the wordlist size of just IMB as shown. While using the ‘-b’ option, ‘-o’ option and “START” are compulsory.

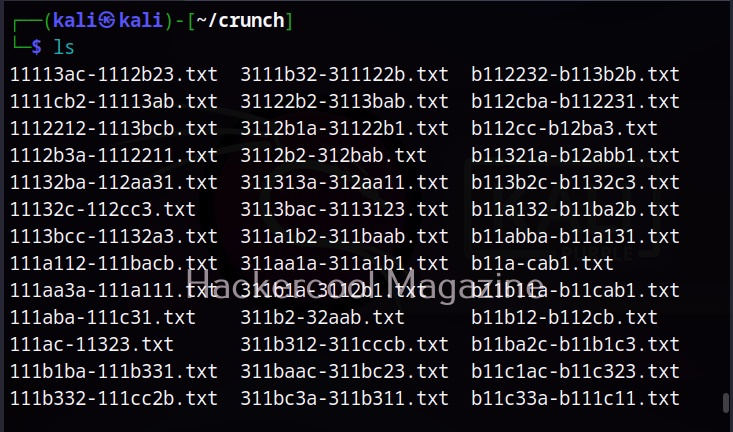
When we do this, instead of creating a single wordlist, crunch will create three wordlists as shown below.

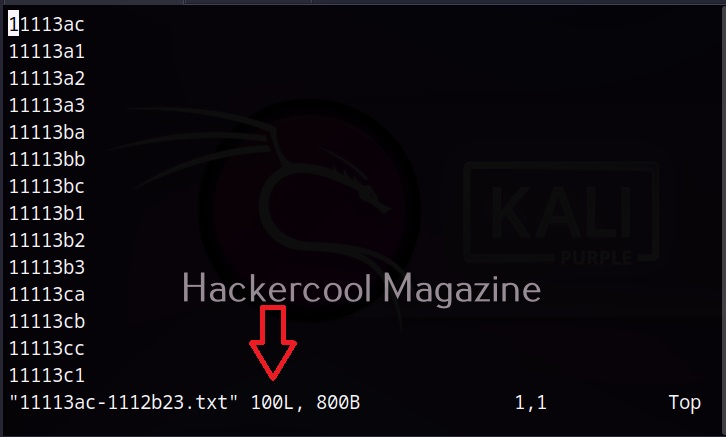
Add up the size of the first three files and that should add up to the size of the “wordlist.txt” dictionary. Also note that while we use the “-b” option, the name of the wordlist is the first and last string in the wordlist.

Crunch can also create a wordlist with a specified number of lines. For example, the wordlist we created here has 3,75,922 lines.

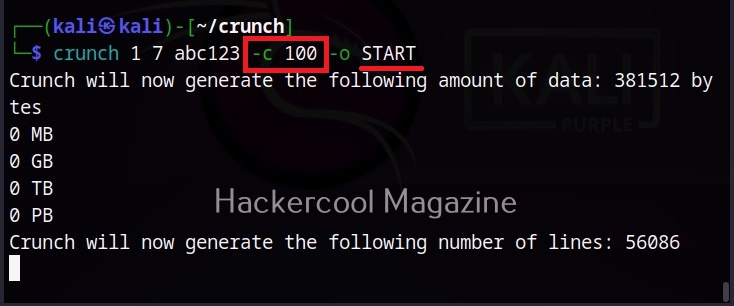
Now, if you want your wordlist to have just 100 lines, you can use the ‘-c’ option to achieve this as shown below.

Let’s check the number of lines in each wordlist.

Remove duplication (d)

Using the ‘-d’ option, we can remove the duplicate characters from the values in the wordlist.

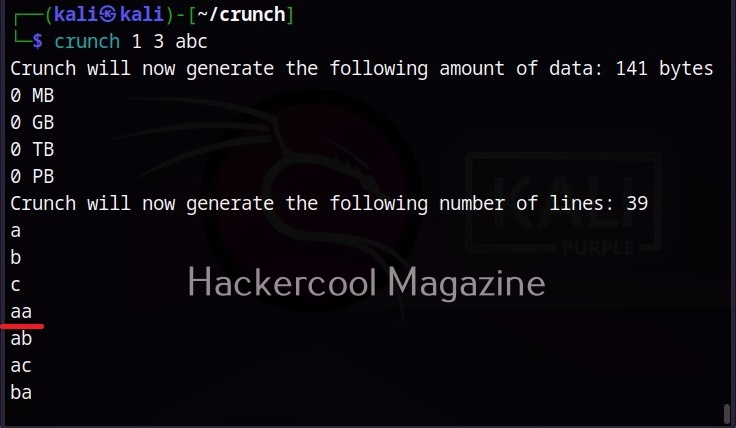
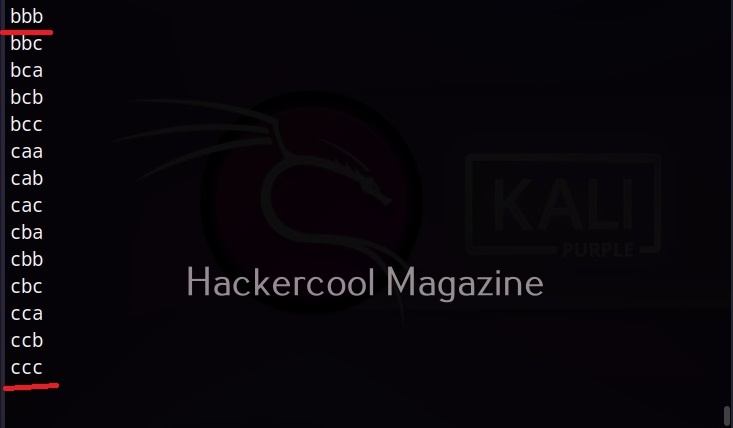
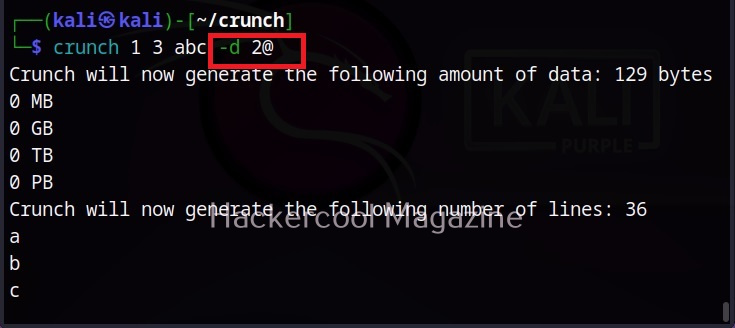
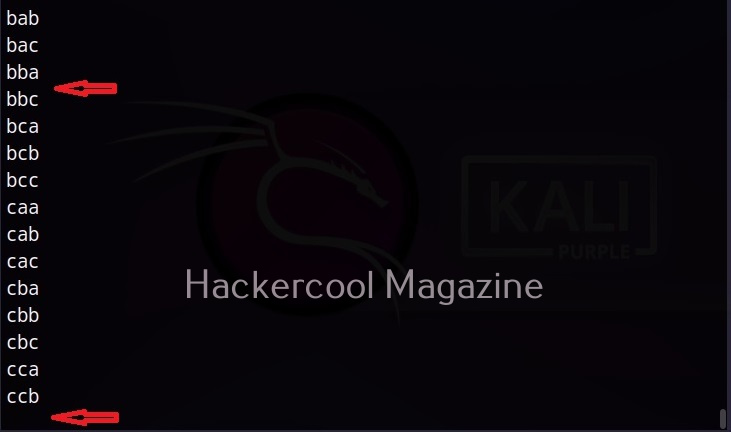
In the above wordlist, you can see duplicate characters like aa, bbb, ccc etc. Let’s say you want to limit the duplicate characters to two alphabets. This can be done by setting ‘2@’ value to -d option.

You can see that “bbb” and “ccc” are gone from the wordlist. The format to give value to the “-d” option is the number and the symbol. In ‘2@’, 2 is the maximum number of consecutive characters to be allowed and @ in the symbol of the characters we want to limit. The symbol for different character sets for crunch are given below.

Exit after a specific study is created (e)

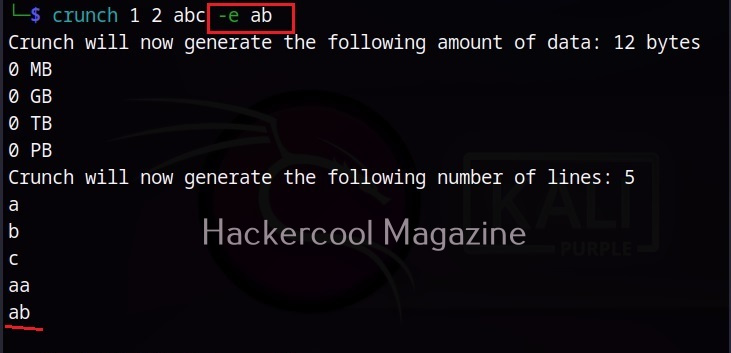
You just don’t have to wait for the entire wordlist to be created with crunch. You can exit wordlist generation after a specific string is generated. Let’s see an example.

Now, you want to exit crunch after creation of string ‘ab’ in the above wordlist, you can do so as shown below.

Invert the strings (i)

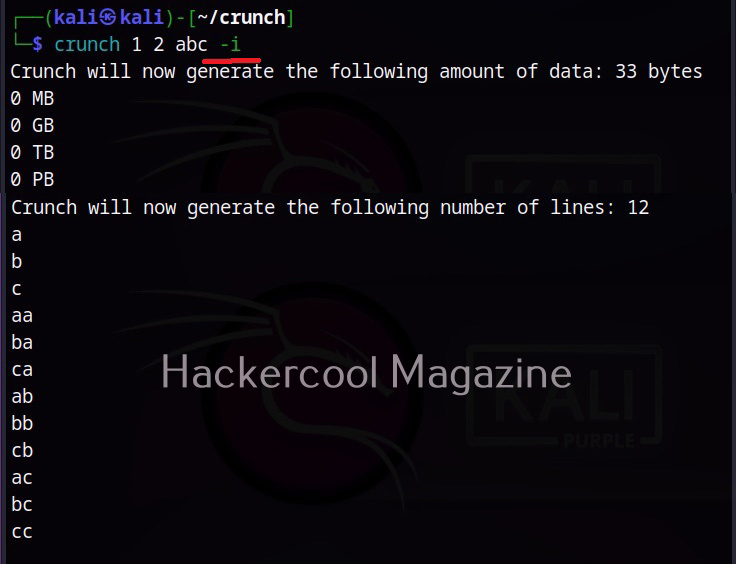
Using this option (-i), we can insert the strings generated in Crunch. In the above wordlist, instead of aa, ab, ac, ba, it will be aa, ba, ca, ab.

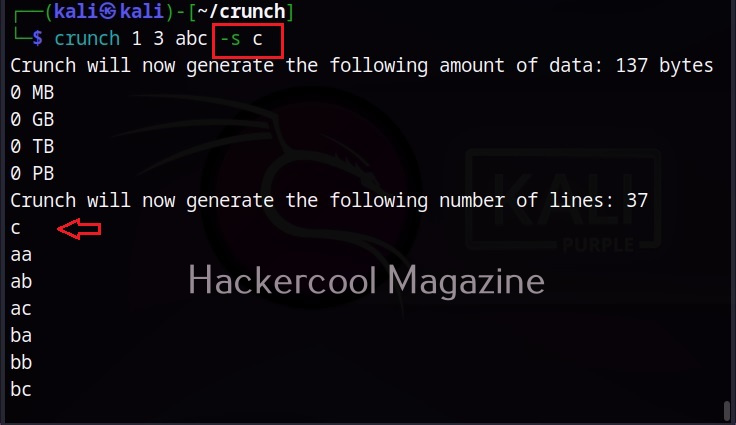
Start with a specific string (s)

While creating a wordlist, you may have a feeling to try a specific string as password but not sure. But you want to try it first in your wordlist. You can set a starting string to the wordlist you are creating using the ‘-s’ option.

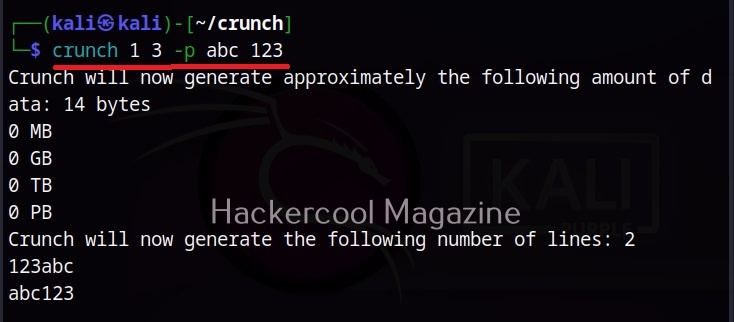
Don’t you want repeating characters (p)

Crunch can generate words that don’t have repeating characters using the ‘-p” option. Setting this option will generate factorial of characters in charset. For example, if there are 3 character in charset, setting this option will generate 3x2x1=6 words. While by default, crunch generates a wordlist the size of “characters in charset” to the power of maximum length specifically.

This option cannot be used along with ‘-s’ option and must be the last option to be specified. Also, this option ignores the maximum and minimum length specified but still needs two numbers to the specified.

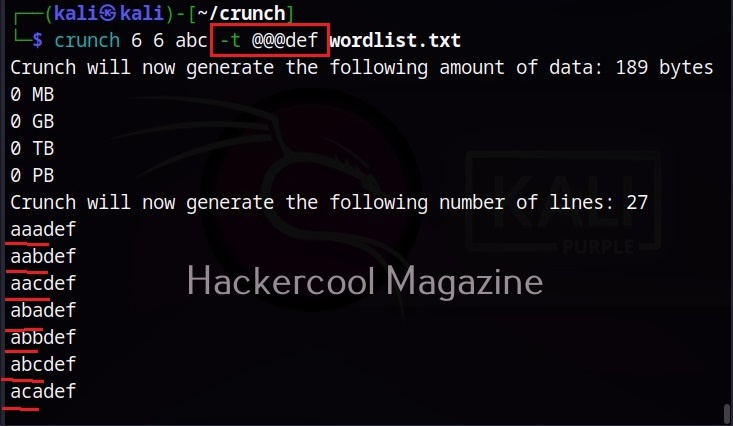
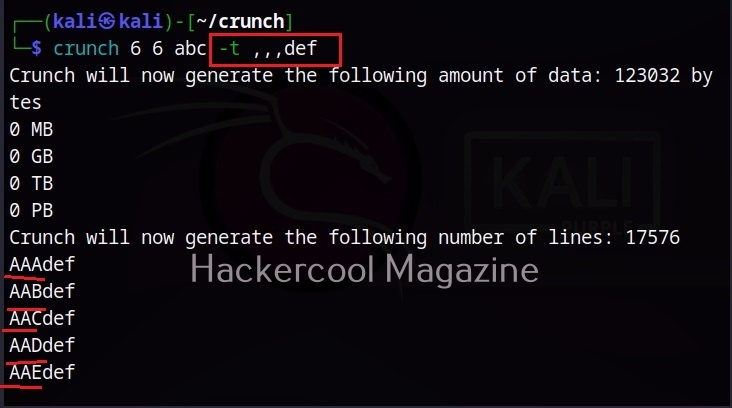
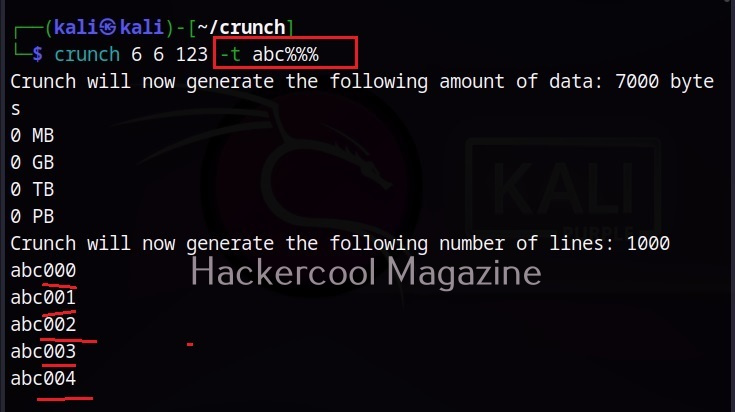
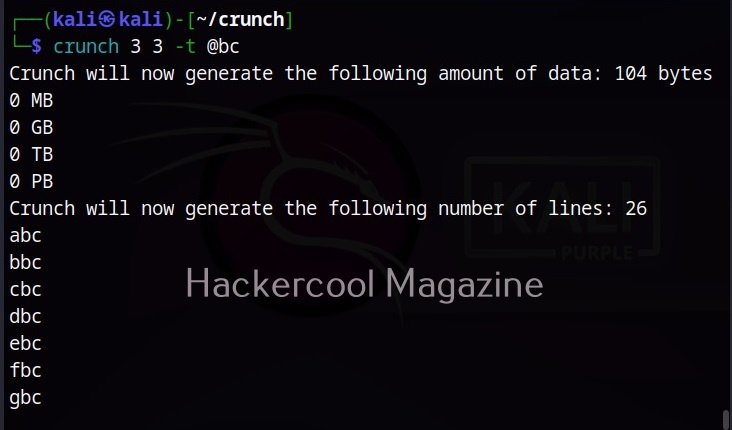
You want to specify a pattern (t)

This option helps you to specify a pattern. The character set can be specified using symbol as shown below.

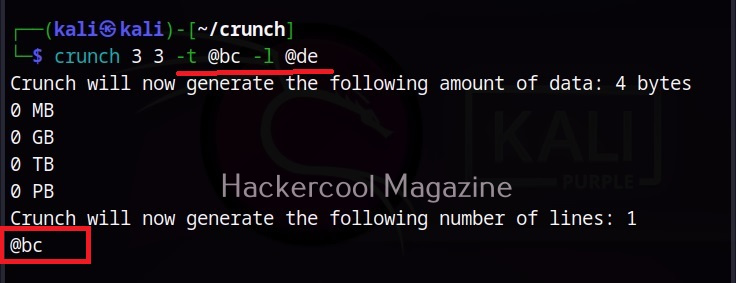
What if you want symbols to be treated literally (l)

Setting a specific pattern is very helpful while creating wordlists but what if we have to include @, % ^ character in the string. Don’t worry. Crunch has that option too. Using -l option asks crunch to treat the specified characters as literals instead of symbols pointed to other characters.

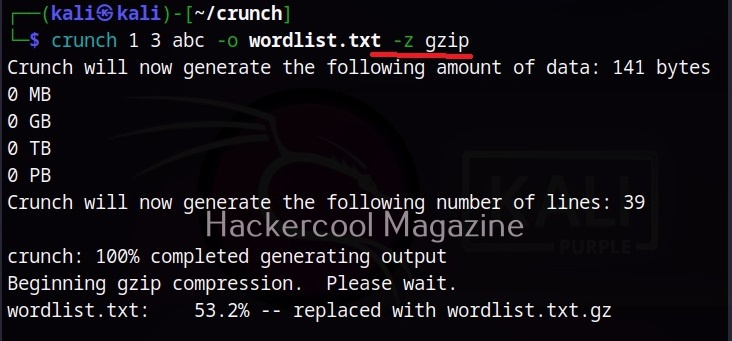
Save the wordlist as archive: (z)

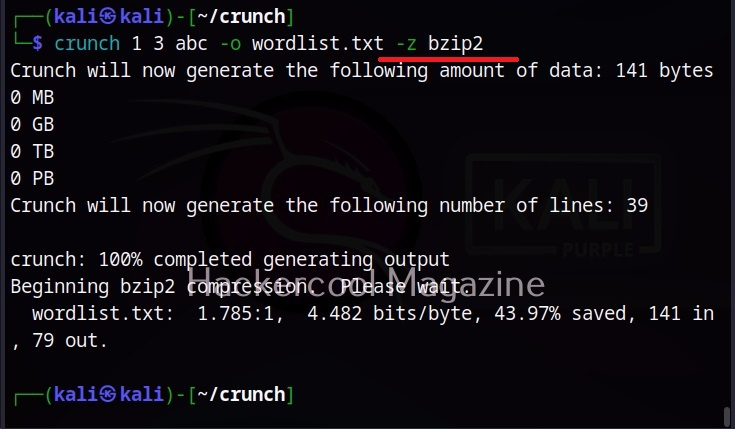
Sometimes, need arises to save the generated wordlist as a compressed archive. With the “-z” option you can save generated wordlist as gzip, bzip, lzma and 7zip archives.

Resume whenever you want (r)

You may face some unexpected interruption while generating wordlists with crunch. This may be power cut or unexpected shutdown or some other problem which forces crunch to abort generating wordlists. Don’t you worry. Crunch has the resume (-r) option to restart from where it stopped or got aborted.

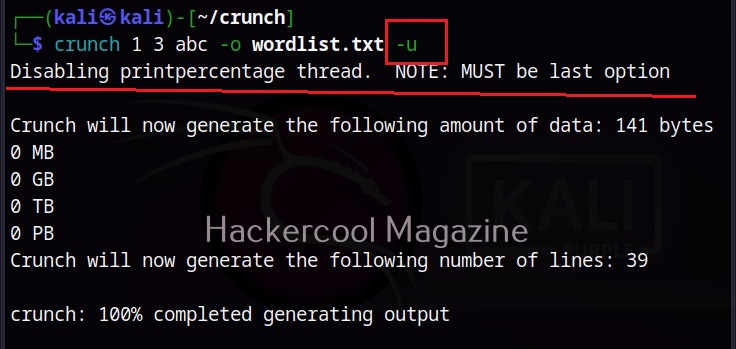
Disabling print percentage thread (u)

Its very nice to see crunch displaying the print percentage thread at the bottom while generating wordlist. But it you don’t like it, you can just disable this print percentage thread with the -u option.

That’s all about Crunch wordlist generator. Leave comments below.

Posted on

Brutus Password Cracker: Complete guide

Hello aspiring Ethical Hackers. In our previous blogpost, you learnt what is password cracking and various techniques of cracking passwords. In this blogpost, you will learn about Brutus password cracker, one of the popular tools that is used for cracking passwords.

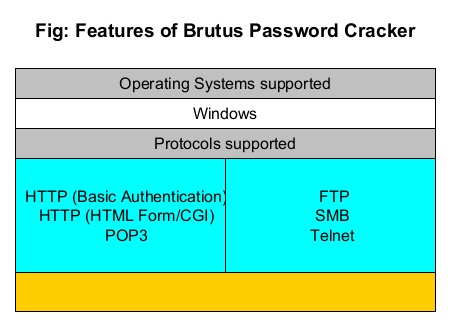
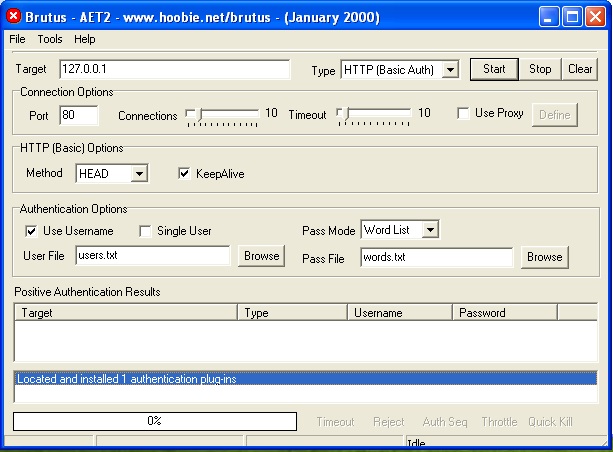
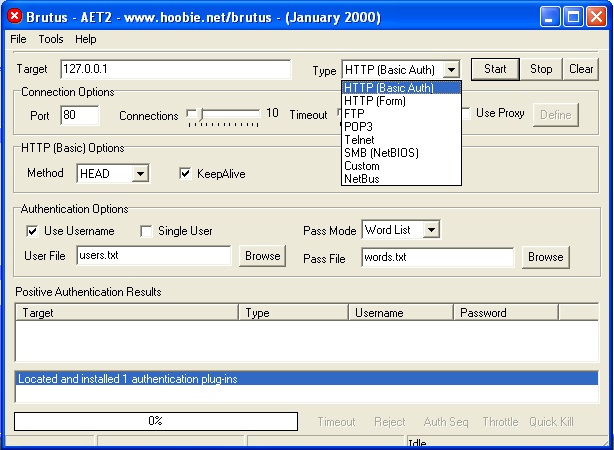
Brutus is a password cracking tool that was actually designed to test for default credentials for routers . It was made public way back in October 1998 but it is still popular in present time. It is a portable password cracking tool and there is no need of installing it. It can be downloaded from here. It works only on Windows and supports cracking passwords of various protocols. They are,

  • HTTP (Basic authentication)
  • HTTP (HTML form/CGI)
  • POP3
  • FTP
  • SMB
  • Telnet

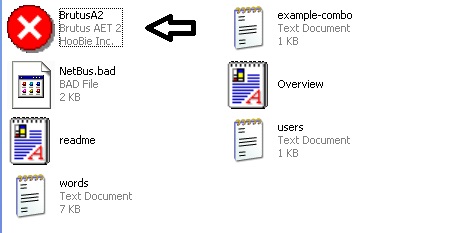
After downloading, we just need to extract the contents of the archive.

To run Brutus, click on the BrutusA2 application file.

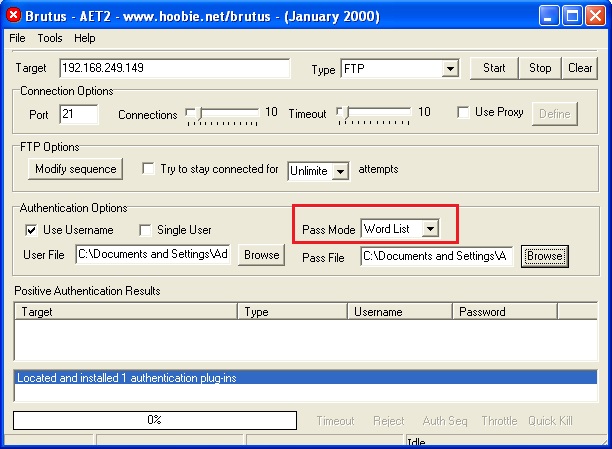
It has three modes of operation. They are, wordlist, brute force and combo list where credentials are given as username/password pairs.

Brutus password cracker

For the purpose of demonstration, let’s try to crack FTP password of Metasploitable 2. I will be using the wordlist mode of attack for this. This wordlist was created while performing SMB enumeration of the target. Wordlists can also be generated using tools like Crunch, Cewl etc. After specifying the wordlist, I just need to click on “Start” to begin cracking passwords.

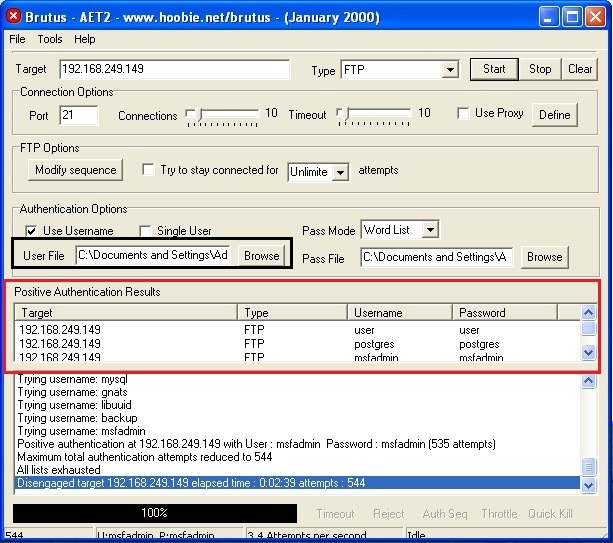
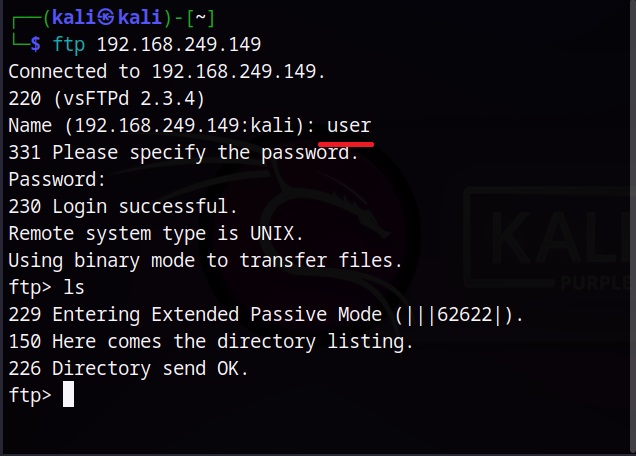
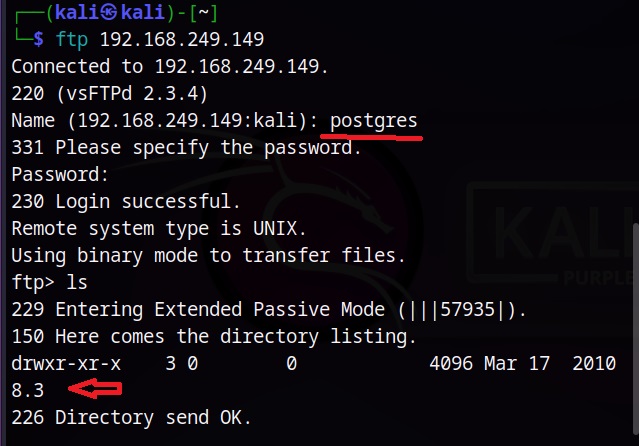
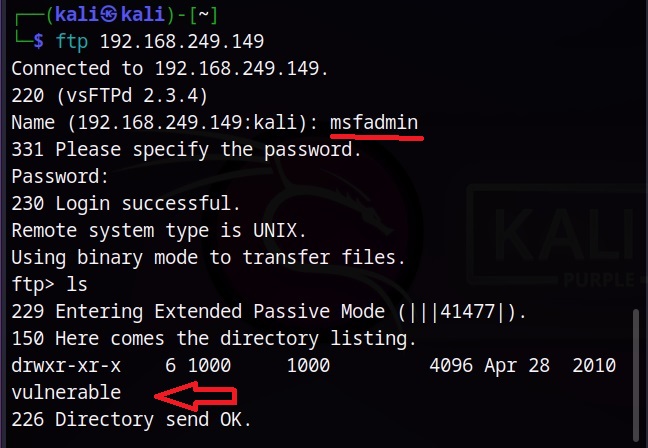
As the tool continues to crack credentials, any positive authentication results will be displayed as soon as they are found. In our current example, Brutus successfully extracted three credentials. They are,
  • user:user
  • postgres:postgres
  • msfadmin:masfadmin

Let’s use them to login into our target.
Successful. Similarly Brutus password cracker can be used to brute force credentials too.