
Hello, aspiring ethical hackers. In our previous blogpost, you learnt in detail about network scanning. This blogpost is a complete guide for using Nmap (Network Mapper), a popular and open source utility used for port scanning and network discovery by network administrators and pen testers. It uses real IP packets in novel ways to determine the LIVE hosts on the networks, open ports, the services they are running, type of firewalls in use etc. It is available for all major operating systems like Linux, Windows and Mac OSX.
New to Ethical Hacking?
Start your journey with The Beginner Ethical Hacker Starter Kit (2026 Edition).
Inside the free guide, you’ll learn:.
- Ethical hacking fundamentals
- Beginner cybersecurity roadmap
- Essential hacking tools
- Common vulnerabilities explained
We are using it on Kali Linux where it is installed by default. Let’s begin with how to specify targets while scanning.
Target specification
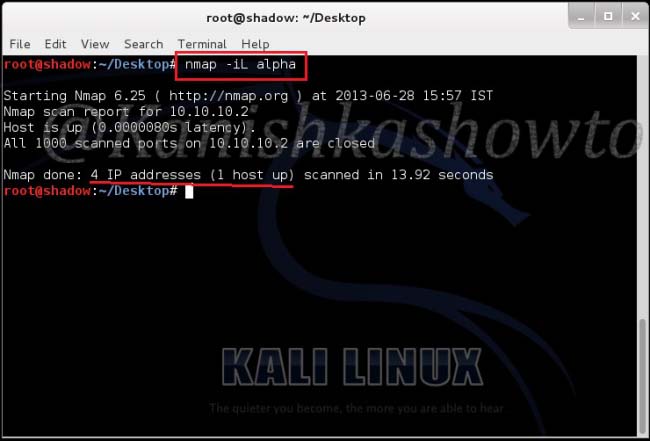
1. Provide input through a list:
nmap -iL <input filename>
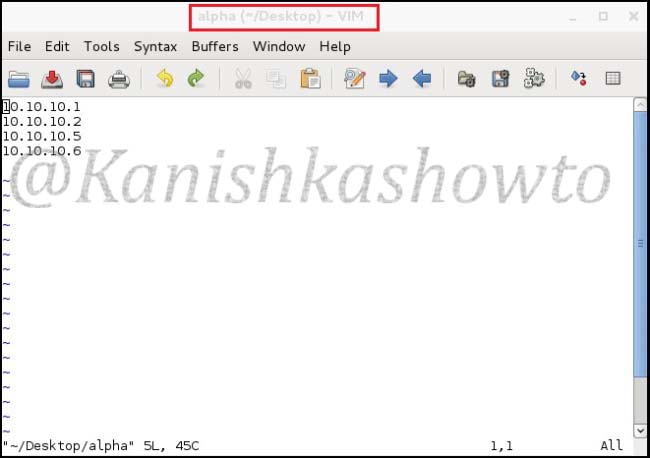
This option reads targets from a specific file. Let’s create a file named alpha with a few newline separated or tab-limited or space separated IP addresses using vi on Desktop.
Then, move to Desktop directory and type the command as shown below. It scans the four IP addresses listed in our file.
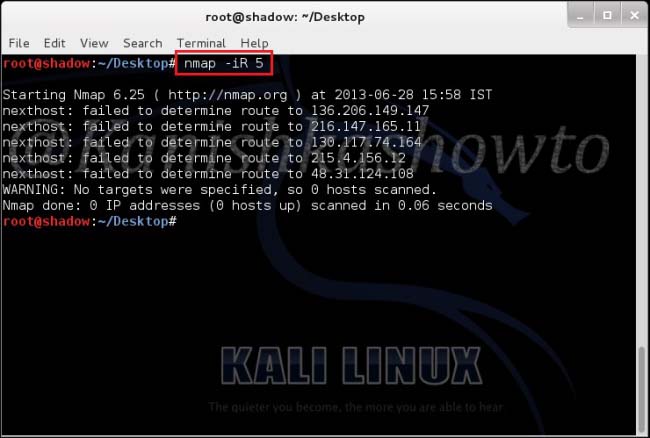
2. Specify random hosts to scan:
nmap -iR <number of hosts>
This option is used to specify random hosts to scan. Nmap generates its own targets to scan. The <number of hosts> argument tells nmap the number of IP’s to generate. Let’s type command as shown below. We can see that it generated five random targets to scan. The scan failed to determine route to the generated IP addresses because my system is not connected to Internet. Why didn’t it generate any internal IP addresses? Because in this scan private, multicast and unallocated address ranges are automatically skipped.
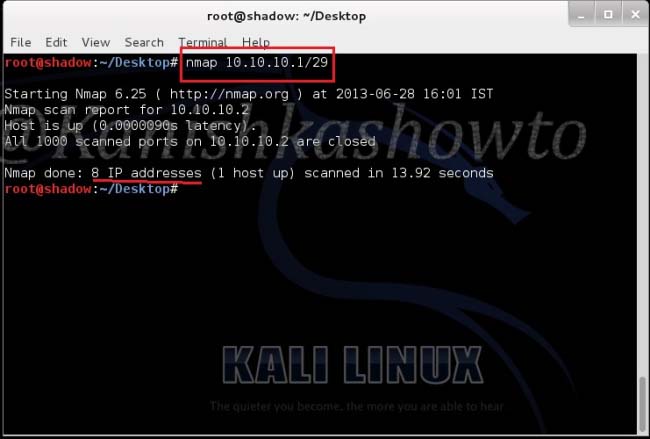
3. Scan the entire subnet:
nmap <IP address/dir>
This option is used to scan the entire subnet. Assuming you know CIDR let’s type the command as shown below to scan eight IP addresses from 10.10.10.1 to 10.10.10.8 and see the result below.
4. Exclude some hosts and networks:
nmap [targets] -exclude [targets]
This option specifies a comma separated list of targets to be excluded from the scan even if they are part of overall network range we specify. For example, in our previous scan we saw that one host 10.10.10.2( which is the system I am working on) is alive. Now I decided to exclude that host and another host from the scan. So I type the command as shown in the image given below and press “Enter”. We can see that nmap has only scanned six IP addresses.

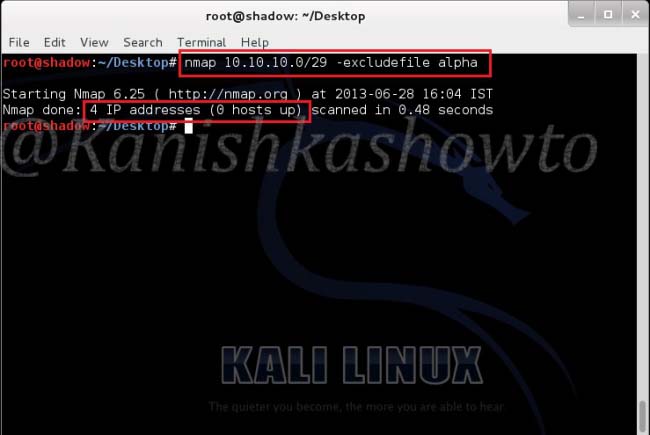
5. Take the exclusion list from a file:
nmap [targets] -excludefile [file name]
Now what if the subnet was very big and there are more number of hosts to be excluded from the scan. The above option helps us to achieve this. Remember the file “alpha”( with four IP addresses) we created. Now let’s specify nmap to quit scanning the hosts listed in the file. Type the command as shown below. We can see that it scanned only four hosts in the subnet.
Want to Learn Ethical Hacking Step-by-Step?
If you’re serious about learning cybersecurity, a structured roadmap makes the journey much easier.
Download The Beginner Ethical Hacker Starter Kit (2026 Edition) and discover:
✔ The ethical hacking learning path
✔ Beginner-friendly security concepts
✔ Essential tools ethical hackers use
✔ The most common vulnerabilities explained
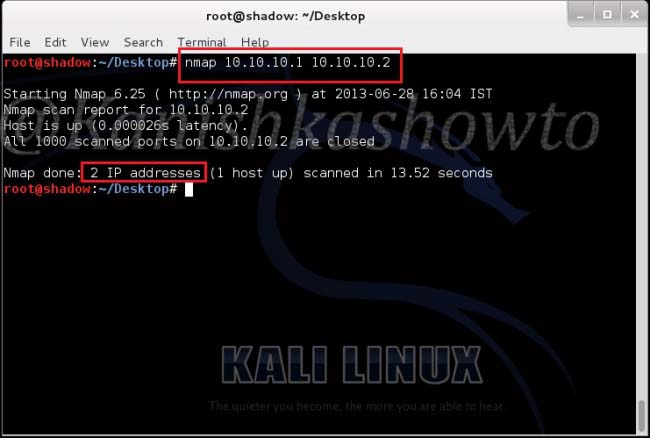
6. Scan specific targets:
nmap [target1 target2 target3]
This option specifies nmap to scan multiple targets separated by space. Type the command shown below . We can see the result below.
Scan types
Nmap is equipped with a variety of scans to detect open ports and services on the target system. Learn about Nmap’s various port scan techniques here.
Scan results
Nmap classifies the ports it scans into six categories. They are open, closed, filtered, unfiltered, open/filtered and closed/unfiltered. In which cases does Nmap classify a port as one of the above. Learn in port scan results of Nmap.
Start Your Ethical Hacking Journey Today
Learning cybersecurity can feel overwhelming at first. The best way to start is with a clear roadmap and the right resources.
Download The Beginner Ethical Hacker Starter Kit (2026 Edition) and get instant access to:
✔ Ethical hacking fundamentals
✔ A beginner cybersecurity learning roadmap
✔ Essential hacking tools every beginner should know
✔ Common vulnerabilities explained simply
Nice
[…] Nmap : Target Specification. (kanishkashowto.wordpress.com) […]