Hello, aspiring ethical hackers. In this blogpost, you will learn about most common firewall bypass techniques used by hackers and pen testers in real world. In our previous blogposts on Firewalls and IDS and IPS, you learnt in detail what are firewalls, Intrusion Detection System (IDS), Intrusion Prevention System (IPS), types of Firewalls, IDS and IPS and various techniques used by them to do what they do best. Please read them first to better understand how firewall bypass techniques described below work.
Why do hackers and pen testers bypass Firewalls and IDS and IPS?
Before you learn about different techniques hackers and pen testers use to bypass firewalls, IDS ad IPS, you need to understand why it is important to bypass them. In real-world networks of organizations, firewall, IDS and IPS are the most common devices or software that are employed by organizations to keep their network secure. So, in order to reach the actual network, a penetration tester or hacker has to bypass the firewalls. The result of a successful pen test depends on the bypass techniques they use.
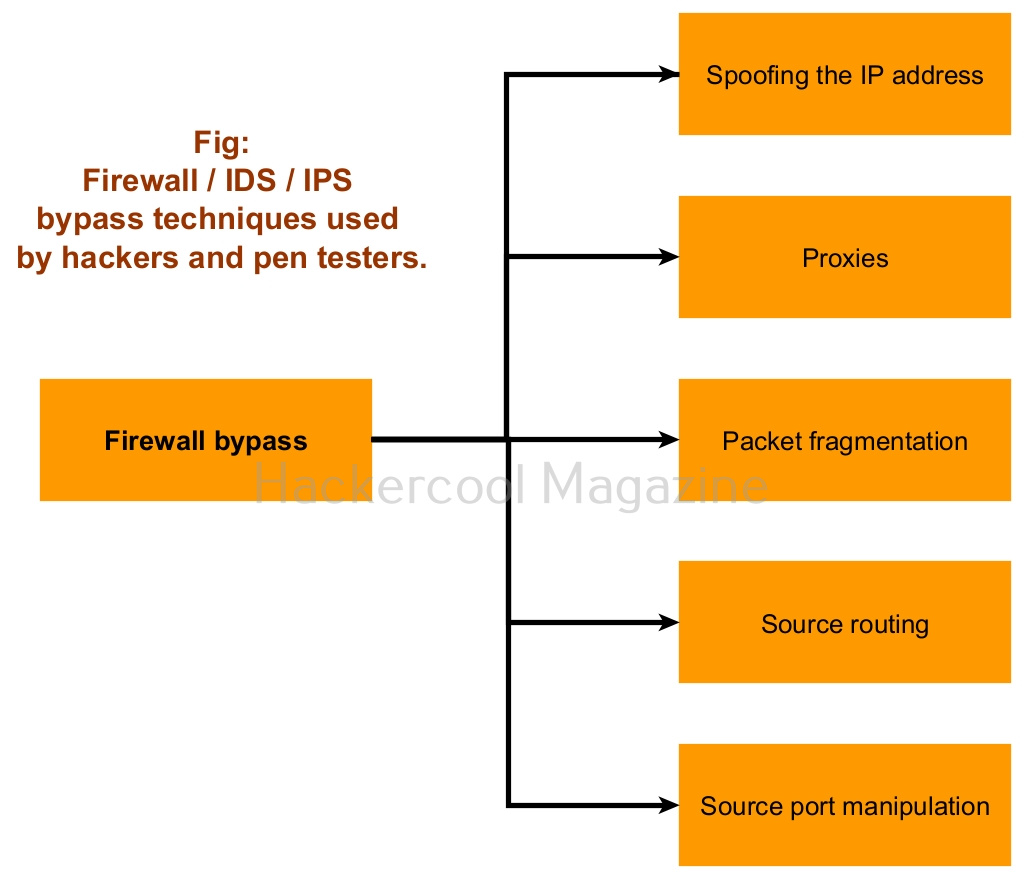
Common firewall bypass techniques
Pen tester or hackers employ various techniques to bypass firewalls, IPS and IDS. They are,
- Spoofing the IP address.
- Proxies.
- Fragmenting packets.
- Source routing.
- Source port manipulation.
Let’s learn about each of these techniques in detail.
1. Spoofing the IP address:
If firewalls detect malicious traffic coming from a particular IP address or IP range, they just block the IP address to prevent malicious activity. This is one of the simplest functions of a Firewall or IPS. However, hackers or pen testers can bypass this by spoofing the source IP address. Learn more about IP address spoofing.
2. Proxies:
Hackers in real world and pen testers always hack their targets routing through another machine or computer. This is known as proxy. Hackers do this for covering tracks and do this to hide their activity. They also do this to bypass firewalls especially when the IP address is blocked by the firewall. They can also use proxy server for this purpose.
3. Packet fragmentation:
Data through network is transferred in the form of network packets. Each packet contains all the information needed for data transmission like the source IP address, destination IP address, source port and destination port etc. Firewalls and IDS analyses these packets for information. Each packet can be fragmented into small chunks and then transmitted. Fragmented packets are reassembled at the target machine. Reassembling the fragmented packets take lot of time and consume lot of resources. Most Firewalls and IPS are configured to ignore packets that are fragmented.
4. Source routing:
When a network packet is sent from the source system to the destination system, it hops through a number of devices before it reaches the destination machine. If a firewall or IDS is present in the route taken by the packet, it is blocked. So, hackers try to send this packet through a different route that doesn’t have a firewall or IDS. This is known as source routing.
5. Source port manipulation:
Firewalls allow traffic through some ports by default, say for example, HTTP port. If the source port is manipulated in the network packet, then it can bypass the firewall.